A little more follow up on the Cripplebush rubber rocks thread…Painting this time:
Is it at all hard to blend the acrylic (ly) painted rocks’ colorswith the surrounding plaster or sculptamold? Do you seal the plaster with anything lst in order to match the finish/color of the rubber rocks? Other tips?
Got all of my plaster cloth up today so it’s time to make a decision/commitment.
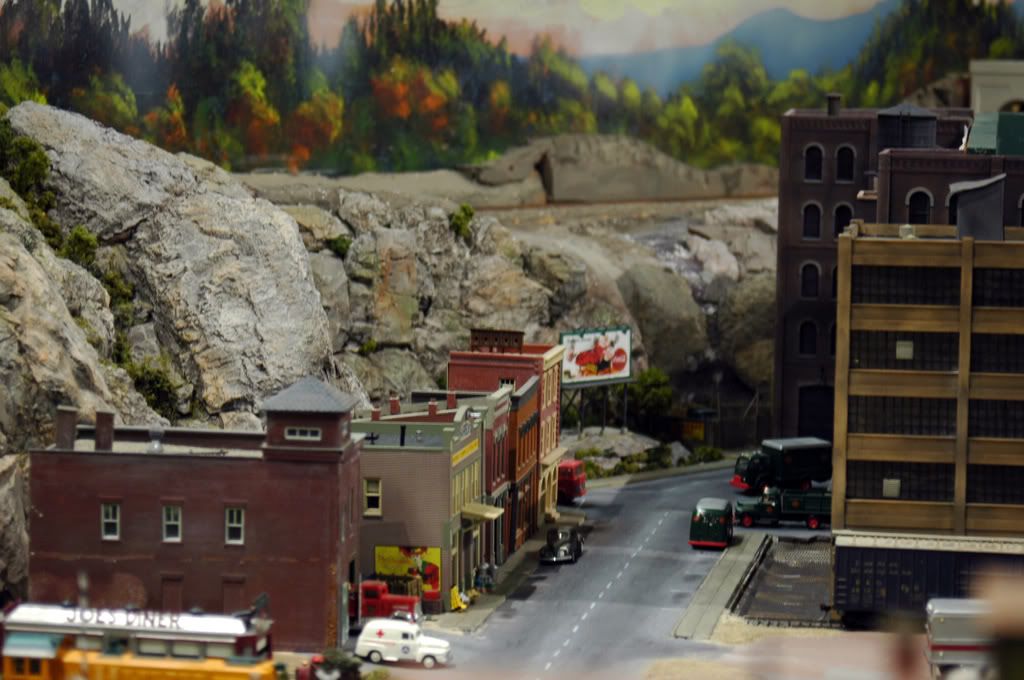
Since the rubberrocks are base primed and painted, I would treat any plaster the same. Generally I dye my plaster as I cast and allow washes to penetrate for coloring. But in this case of using a mix, you will need to seal the plaster w/ a base color of that on the rubber for starters. Once prined and “fogged” w/ various shades both the plaster and rubber should take any coloring the same. The greatest concern w/ placing the mix, is to make sure that the castings blend not only in rock type, strata and detail. Breaks between the materials can be designed and layed out so that addityional scenicing of washouts, brush bushes etc. The rubber is quite forgiving and be cut and shaped to fit the plaster. Save any of the plaster bits and pieces or break up castings for the purpose of gluing these into any voids at the seam.
One of my concerns about using the rubber rocks is that I like the look of thin washes built up over several coats (over plaster) and not sure this will work with the rubber rocks.
Anyone here take pics of their painting processes with your rubber rocks and surrounding plaster? My base rock will be chiefly gray if that helps anyone… just want everything to blend together color wise and look like one mass of rock.
Seeing as always, really helps with these kinds of choices. The owner of rubber rocks, Gardiner Cross is very helpful if anyone is considering trying this product out. I had just this week barraged him with questions about the thickness of various castings and wanted to wait a bit before asking him about achieving the look I’m after.
One last bump-for the “big” weekend.[;)] Just in case you rubber rock painters were busy with the ol’ day jobs… thought I’d put “it” out there one last time. Probably will order some “granite” next week.
What I did is probably a little unconventional,but I just mounted the rubber rocks, blended them into the Sculptamold, then masked off everything I didn’t want overspray on and hit the Buttes with a spray can of Acrylic gray paint from Home Depot.
After that, I went to work with the Bragdon powders and a stiff paint brush for the highlights. Now this isn’t what I NORMALLY do with scenery–I usually use acrylic washes in clay and earth tones. But as I told you in my OP, the Cripplebush granite is a really dark color–too dark for Sierra granite IMO–and needed to be lightened up. I didn’t trust a brush-on wash, hence the spray can. I hit the Cripplebush relatifvely ‘light’, and the Sculptamold enough to cover it. It turned out pretty well, I think. But definitely mask off the surrounding area if you try this. And those Bragdon self-adhesive powders really stick to the Cripplebush and Sculptamold.
Tom, I thought the same, Having to blend coloring on the dark Cripplebush rubber. Did seem unorthodox as you say, but the blending of light fogging w/ spray can does work great for the coloring and highlights. Of coarse i needed to go toward the reddish brown of shale. Drybrushing w/ all sorts of colors accross the spectrum helps if varying mineral leaching/ staining is desired also. Spraying at sharp angles (lighter from top- darker from below) also helps for the initial shading, then white tans light gray drybrushed to the tips of pronounced detail helps show sunlight/ hightlights.
I did find that on some sampling, that I had initially lightened the entire piece too much from the “factory” dark grey. Washes of dark were needed to darken the crevases before moving on to the highlighting again.
Thanks again guys. I saw another thread on a different forum that showed the entire hillside covered with unpainted (except for the dark gray primer) and they really were dark! Almost a “dusty charcoal” for want of a better name (?) They looked lighter on the Cripplebush site.
Anyway, I’m going to try them when I get down to the other end of the layout with a shorter (in both directions) and CHEAPER cliff.
In the meanwhile, I’ve decided on two Bragdon rock molds -weathered granites #s 91 and 89 for my big mountain range.
I’ve started another thread on the General Discussions page asking about ways to pour wet pour hydrocal into the 3’ long molds while they are already (temporarily) mounted on the plaster clothed cliff faces so that they’ll take the curvatures already there.
I haven’t ever seen this done in books or on DVDs but thought it “sounded” doable if the plaster is poured very wet?
I’ll finally start my scenicing this month but need to put some strategies in place lst.
I’d rather not go with the geodesic foam route. I really like the washes I can get with hydrocal or plaster.
If anyone can offer tips on that thread, for casting plaster with these really long molds without having to flip 'em up into place after being filled, that would be VERY helpful and I would be most appreciative!
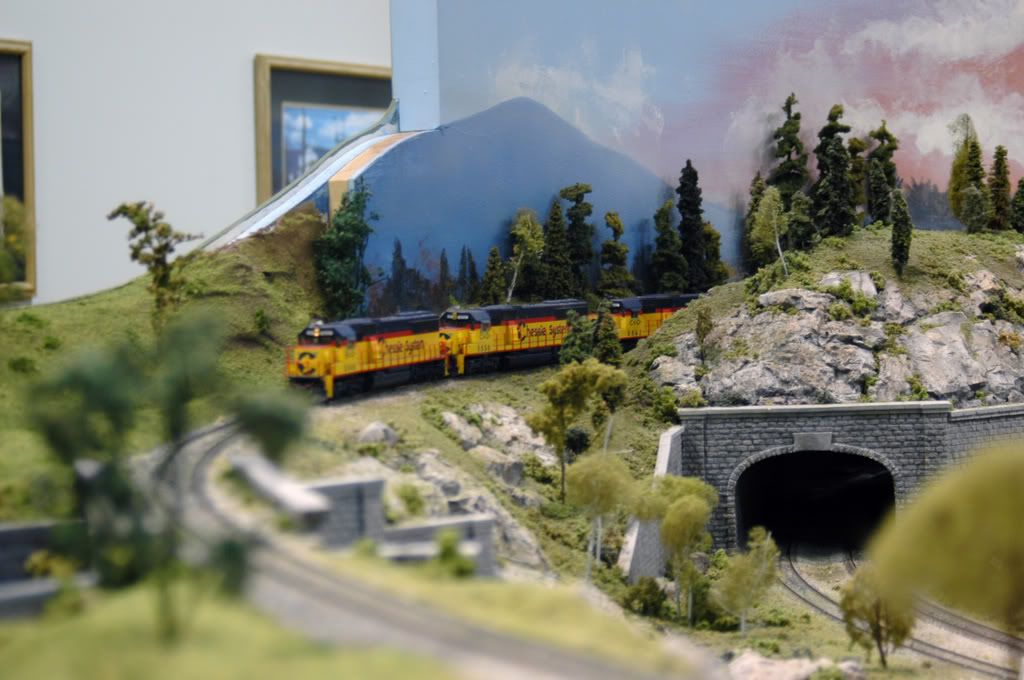
Jim, if you want to shape/ contour the casting to the existing scenery, you need to pour the plaster and wait just until the plaster begins to thicken, by gently lifting and placing the mold it will bend and can be pressed to fit the contours of the scenery base. If too soon the plaster can run out, too late and the plaster will crumble or break apart. I will usually mix a small second batch to use as a glue to butter the back of the poured casting to help in bonding in place. The plaster in the mold is already starting to harden and needs that wetted batch. This large mold may need an additional set of hands to lift and place. Once you have positioned the mold, keep even pressure and in a few minutes will the mold getting warm. This is the plaster setting. Continue holding or switch off and have help continue until you feel the mold will not move or pull away. I find that fresh well mixed Hydrocal will need about 2-3 minutes after pouring to just start to firm up, and then once placed will need to be held for at least (what seems forever) another 5-10 minutes pending the makeup and age of the material used. Allow the mold to sit for at least a half hour before pealing it off. I have actually left molds overnight and still was able to “peal” them off. Not a good idea though as some of the intricate detail may really get stuck and become very difficult to remove w/o damaging the mold or leaving bits behind.
Most all of these WS castings were done this way. Some were placed on rather convex base as shown. Not completed in pic considerable vegetation still needed
Although not nec, the Hydrocal is colored w/ powdered masonry dyes. Makes coloring go much better and will not show chips or damage.
Thanks bogp40. I appreciate your specific details. One thing I’m not clear about though… have you used the 3’ long Bragdon molds in addition to your WS molds? Were two people enough to place and hold that large a mold?
I’ll be away from my computer for a couple of days but will respond when I return.
On my other thread, someone said that they’d have to be cast and then broken and fitted as the plaster gets too heavy when filling as per my “pocket” casting idea. Which is what I kinda figured…