We are working on adding a river and lake to our layout. We plan on using “Magic Water” and built up the area using plaster cloth. However, there are several areas where one can see the seams, and worse, the texture from the gauze.
We’ve seen a few posts about using various materials to smooth plaster cloth, but nothing specific to water features. Should we add more layers of cloth? A layer of Sculptamold? Something else?
More layers of cloth won’t change anything. The bottom surface needs to be smoothed out with a nice surfacing layer of plaster or sculptamold, joint compound, etc.
In addition to Sculptamold or similar products (don’t forget Durham’s Water Putty) to create a solid and textureless bottom surface, I “landscaped” the bottom of my somewhat stagnant creek with ground foam of various shades prior to adding the Magic Water – I wanted that green slimy look on rocks and submerged logs, and mucky mud elsewhere.
That also would help hide the tell-tale gauze texture.
No matter what you use to smooth out the texture, it must be thoroughly sealed before pouring the water. If it’s not, the water will soak in and disappear.
First, I seal the plaster cloth by rubbing full-strength white glue on it with my fingers. Then, I mix a thin slurry of Gypsolite and skim-coat the plaster cloth with that. This gives me a rough surface bed for my ponds and such.
First, the swamp, dug out of pink foam and coverend with plaster cloth:
Then, coated with Gypsolite.
I squirt some dark brown acrylic craft paint into the Gypsolite when I mix it, so it comes out a light tan rather than its natural gray color. Here, I’ve already painted the deeper parts of the swamp black to suggest greater depth, and I’ve put in a couple of rock castings as well.
Quite true, this is why I perfer to use plaster, rather than other products that may be somewhat pourous. You may also want to look into using Enviortex Lite for the water. Far better leveling properties and the dried finish is more durable. There is always a bit of “creep”, but this is easily fixed w/ final edge scenery, even clear flat paint on protruding fixtures @ waterline (tree trunk, rocks pilings etc)
I used plaster cloth for a pond base. Then I make up a watery mix of plaster to brush onto that, when it’s almost dry, I used a damp sponge to smooth it out. When that’s dry, I paint the bed; using darker colors in the center, and feathering in lighter colors outward. If you’re modeling a shallow stream you want to use light colors in the center. Then I glued in rocks, weeds, grass, etc. I used ModPodge for my water. It looks like thick white glue, but dries clear. Make sure you use thin multiple pours, notone heavy one, or it will take days for the thickest part to dry. You can add the mossy effects to the rocks when it dries. If you want it to look mossy underwater, add that effect before pouring your water.
To ensure that it’s completely sealed, use clear silicone caulk, smoothed with your fingers. I would use a piece of wood, with wax paper to make a barrier at the end of the river. Then seal that seam with the clear caulk.
nik, plaster cloth seems to work best as a base for a top coat of a plaster product. I used vinyl spackle over plaster cloth for my streams. I used a mix of Structolite/Sculptamold for the banks and other land forms. I also like Magic Water. As others have suggested, make sure everything is sealed and use some sort of dam. Glue rocks, logs, etc. and paint before pouring the Magic Water. I used WS Water Effects to simulate moving water. DJ.
Remember the look of depth of your pond is done with color, as mentioned above, not actual depth. I would say a total actual depth of 1/2" - 3/4" should be plenty for the deepest ponds. Pourings should not be over 1/8" each. Let dry over night (cover with a piece of paper or bag to keep dust off), before adding the next layer. If you are doing a merky pond, add some olive green or similar color to the first pour or two, it works well, but you only need a drop or two in each batch.
Since you referenced my scenery thread on MRH already I’ll add something here…
Using a finer textured material like the tulle or mesh tape I used still only creates a base. It has a texture that must be covered with something else to yield a final scenery surface, especially before adding water. I normally apply a “smooth coat” of plaster by hand after adding two or three coats of thin plaster with a brush.
One mistake I see beginners make over and over is assuming they have to live with the appearance of the base scenery material. Cover it up as desired and smooth it out. My scenery has little in the way of large vegetation to hide any unrealistic texture, so I got used to applying several coats of plaster to prepare the surface for ground cover.
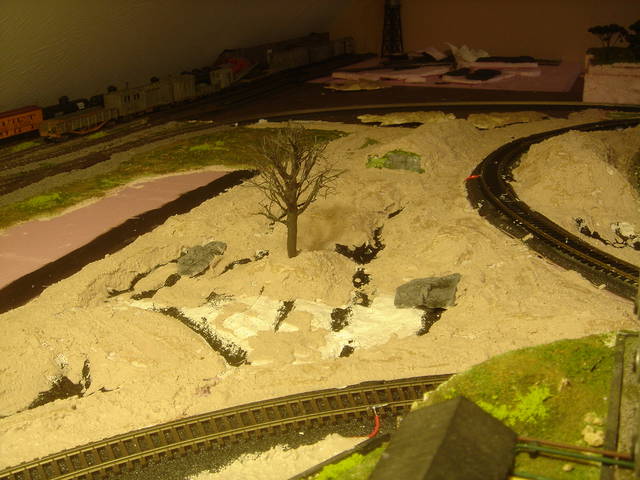
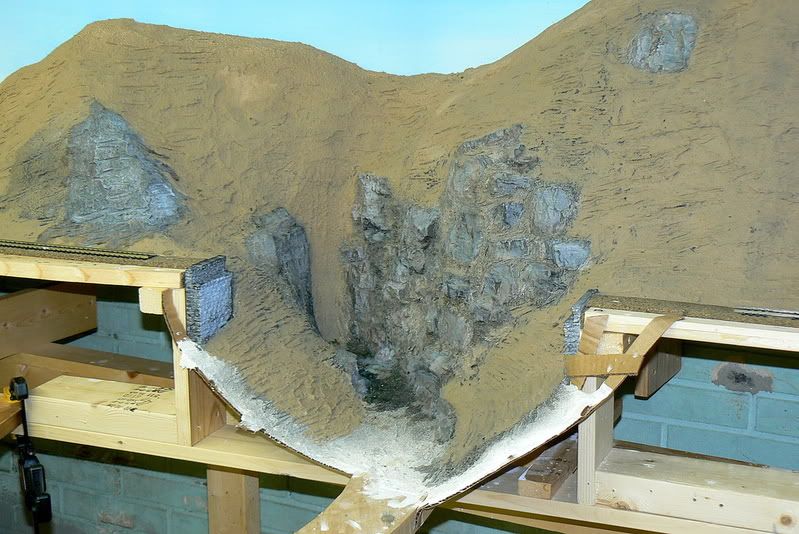
Here’s a comparison of the same future creek bed with the base plaster only, followed by a shot of the final scenery contour after it was painted. I made sure none of the initial texture from the cloth material was visible before painting. Note that the backdrop is only temporary underpainting and nothing is actually finished, including the culvert under the lower track…
Hey, Rob! Would you mind coming out and painting my backdrop? I could smoke up some ribs, make some homemade tater salad and baked beans and make a fun weekend out of it. [swg]