I’m currently putting down the scenery shell for my On30 Bradford Valley Lumber Co. layout, and I’ve run into a bit of an issue with the plaster shell that will be forming the base of the scenery. Currently, my method is as follows:
Cut up cardboard strips, and fold them over to form a right angle.
Attach the cardboard strips to the edge of the subroadbed, the rear of the fascia and the front of the backdrop, to form a ‘lip’ onto which the construction paper can be stuck.
Where neccessary, add corflute material to fill in the gaps and provide some structure.
Cut construction paper to fit, crumple it up (for texture), uncrumple it, then glue it in place.
Paint the construction paper with a 50/50 mix of water and white glue.
Once the water & glue mixture has dried, apply a layer of plaster cloth over the construction paper.
Once the plaster cloth has dried, apply a thin layer of dyed plaster over the top to fill in the gaps and provide a smooth surface.
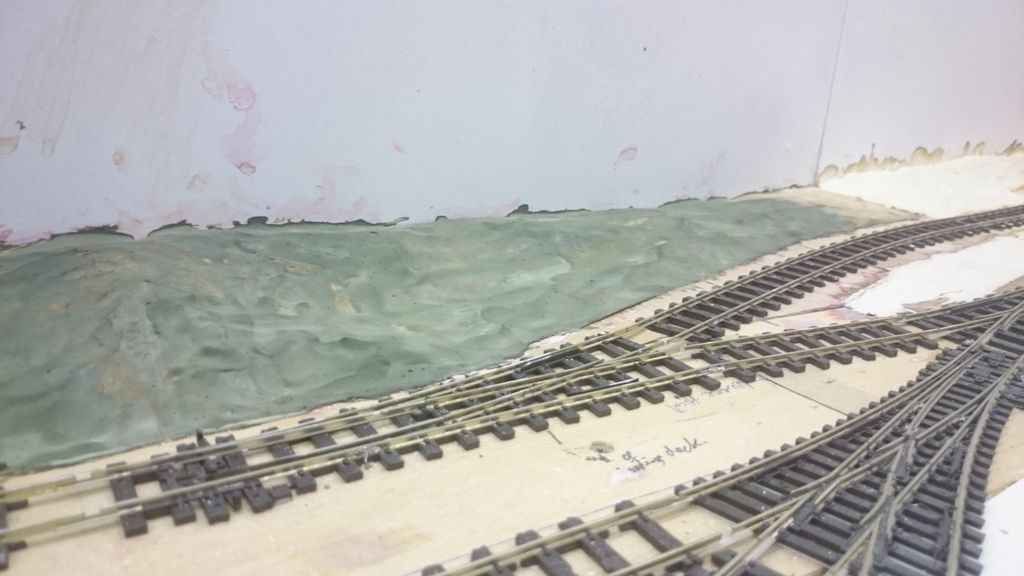
This approach worked on sections 1 and 2 of my layout, as you can see here:
However, for areas where there is a larger gap, there does tend to be a slight sag in the ground. In this shot of section 2, it’s where the green plaster was used to fill out the sag, just above the second set of points:
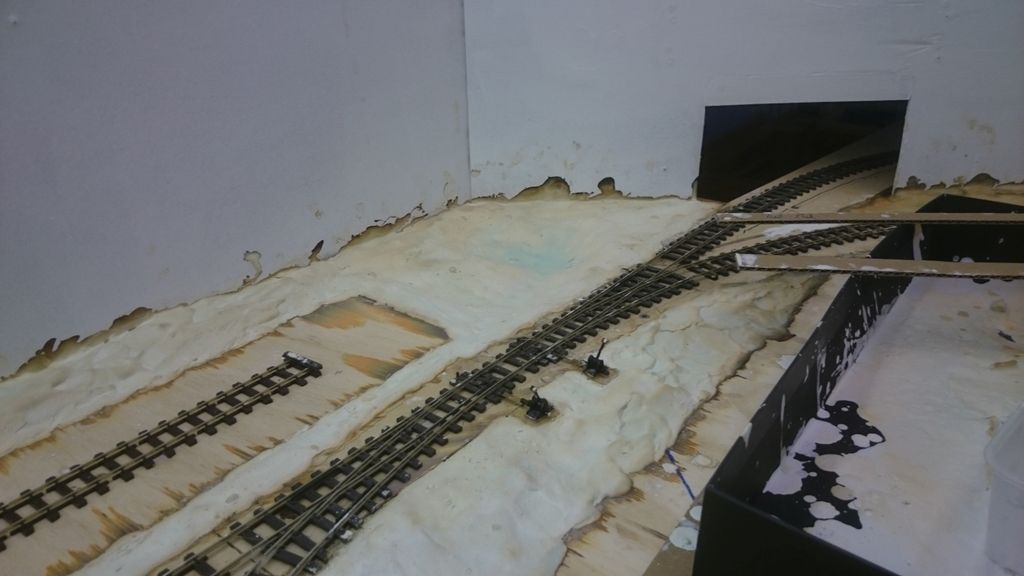
I thought, given that the construction paper seems relatively strong, that this would just be a small effect. However, on section 5, there was quite a pronnounced sag in several sections:
I think you are trying to re-invent the wheel. You need a lot more support. Have a look at this thread which is at the opposite extreme of not having enough support:
I’ve been following a similar process but may not be as far along as you. What I’ve done to avoid “sag” is to build up a skeleton using some thin pieces of scrap wood I have (such as luan, 1/2-inch plywood etc.) which has enough strength to support the cardboard strip sub-scenery in area’s where there was a gap. Further more, I even went as far as to build in some “shelve” sections in the skeleton to support some shapes in the cardboard strips so that it gives the general look of some resistant rock ledges in the canyon scenery I am working on.
The ledges that are visible in the cardboard shapes were formed by hot gluing the card board strips to some curved or straight pieces of scrap wood supported by some wood skeleton framework attached to the bench cross members. They will not sag because they are attached to cross members of the benchwork. Photo’s 2,3,4 and 5 are recent work in the past few weeks.
I haved tryed and then given up on plaster shell,too mutch time, work, and mess.
I use foam; cut,broke,carved,and shaped, glued with caulk, covered with drywall mud, some tinted with water colors, then finshed wit a wet [water] paint brush.
Use a mesh tape over joints,up to 1in, most shagging,looks lik it belongs there,if not just fill with more mud.
Don’t answer your question, but IMO a better way to do it
Your still going to need to cover up the carved foam with plaster or something to hide all the rough edges. I’ve seen a lot of mess from carving and shaving foam too.
How is cardboard strips with plaster cloth more messy?
So far I haven’t generated hardly any mess - plaster cloth is just dip and drape, and hot glue and cardboard can go pretty quickly. No shavings to vacuum up from a rasp. Just cut card board boxes into strips with a box cutter and hot glue them. Mine has taken a bit longer because of the way I’ve chosen to do land forms with it rather than just a basic hill. Otherwise it can be much faster.
I have just been through that exercise and believe me, it is as messy as making the classic hardshell scenery from plaster. I ended up with cleaning up the mess I made from carving the foam and later emoveing the dust from applying that layer of plaster.
I wonder about the OP’s use of “construction paper” which I have not used since I was in school but recall as being not terribly sturdy when it gets damp. I think some guys use the same basic technique as he does but use red rosin paper which you can get at a home supply store.
I myself use the cardboard strip lattice plus strips of plaster cloth method. Yes it creates mess but I have a solid top type benchwork not an open grid so the mess pretty much stays where I can deal with it.
By the way those photos of the cardboard strip lattice posted earlier are so pretty and neat-as-a-pin that it seems a shame to cover them up!
I have built a 30x15’ layout using beaded foam to cut make the shapes as close to what I wanted as finished and then plaster clothed the hills etc. Then zip textured the plaster cloth, not much mess and very fast and no sag. I cut the final foam with a WS hot wire, no fuss, litle mess.
As correctly noted, construction paper is very flimsy. Like Dave, I used carboard stirps (as Rio showed) to create hills and mountains. I then covered that up with plaster cloth (you can use paper mache). Doing that provides additional durability and covered up the carboard strips. However, unlike Dave, I put Plaster of Paris over the plaster cloth and then painted it once dry.
I’m not clear on how the OPs cardboard strips are arranged.
On my layout I tried the cardboard strip web approach with plaster cloth covering in some areas. Per a Kalmbach book as my reference, I hot glued the strips where woven together. I would think the interlacing and gluing at intersection helps strenght considerably vs only parallel strips. With most areas covered with 2 layers of overlapped plaster cloth the combo is pretty strong. Of course, the cardboard strip spacing affects the strength. My layout is smallish, and my strips probably provide 40% coverage, probably overkill.
I also integrated pink foam layers where I had more height, mainly to try both methods. In both cases the next to top layer was plastercloth and I then added Sculptamold for some texture. Then added rocks. I’ve yet to detail with dirt, bushes, etc.
I would think construction paper would absorb a lot of water from the plaster and get soft. It’s been 20 years since I used plaster and my cardboard lattice half the cardboard strips as in the above pics. To say it another way, I had at least 2" gaps between cardboard strips and I had no sagging using paper towels dipped in hydrocal.
Scrap cardboard is free; with a glue gun and some clothes pins you could add all the support you need.
Seems to me some are making things harder than they have to be.
White glue dries hard but can be softened again with some water. The plaster cloth is probably making the white glue and the construction paper soft. Then it sags, then it hardens again. Adding another layer of wet plaster then softens everything under it. Just consider how much water it takes to be able to put it on with a paint brush.
How are you tinting the plaster? With water based paint?
I cut card board strips approx 3/4" wide. I put them on the layout in a criss cross pattern, not weaved together. Every place the strips cross another strip I put a dab of hot glue. I leave 3-4" spacing between the strips so I have a checker board appearance.
The card board is covered with either paper towels or cut up bed sheets that have been dipped in soupy plaster of paris. I leave it to dry for at least 24 hours then paint it with some latex paint. It get the paint at my local Ace hardware, custom mixed.
( I really need to find out why I can’t post pictures anymore )
Also in your post you state you are only using one layer of plaster cloth I would sugest using three layers laid in oposite directions, then puting the coloured skim coat on top.
As for the dip in the logging /mining camp area don’t fill it the camp builders would not, just put a log in it to hold up the edge of the hut if need be or throw a couple of planks across it if its in a path way.
If its a big hollow and it’s rained fill it with muddy water with some junk floating in it or just plain fill it with rubish.
Some times with a bit of side ways thinking a scenery issue becomes the thing that can make the scene
Worse case if you can’t work round it, fill it up so you can build your scene as orriginally thought out.
Scenery is one area in model railroading that is very fluid and flexable and the result is only wrong if it’s don’t like it cut it out and start again.
With hard shell the thing is to have the shell thick enough to be mostly self supporting, but it will still need some perminent suport. Temporary suport can be provided with balls of news paper which can be pulled out later if needs be.
Thank you for all the feedback so far. After reading all the posts, what I’m getting is:
I need to provide more support for the landform
I should reconsider the use of construction paper
The plaster cloth will work being spread directly over the cardboard strips
Paper towels dipped in soupy plaster may also work when placed directly over the cardboard strips.
With regards to tinting the plaster, I’m adding food dye to the water when the plaster is being mixed - red, yellow and black until I get the colour I’m after.
Thank-you to everyone who’s replied. I’ll try making these changes for section 4 and see how it goes.
Make a skeleton frame using strips of cardboard boxes. My strips are usually about 4 to 6 inches apart. Hot glue or staple them together. Dip paper towels or napkins into soupy plaster (of Paris) and cover your frame. Add rock molds. Paint with latex paint, sprinkle on first layer of ground cover while paint is still wet. This is the old school method which has been working for people for decades. I think this covered in a recent issue.
I don’t think the construction paper is such a bad idea.
It seems to me thats what is stoping you having a horrible mess on the floor to clean up.
However more support yes.
You can substitute paper towels, news paper etc dipped in thin plaster old “T” shirts or bed sheet works even chux dish cloths as well that’s what we used before plaster cloth became easy to get.
You could try ordering a box of plaster bandage from the local chemist, it will be cheaper than geting it from the hobby shop.
Never thought of food colouring as a tinting agent for plaster will have to try that idea myself.
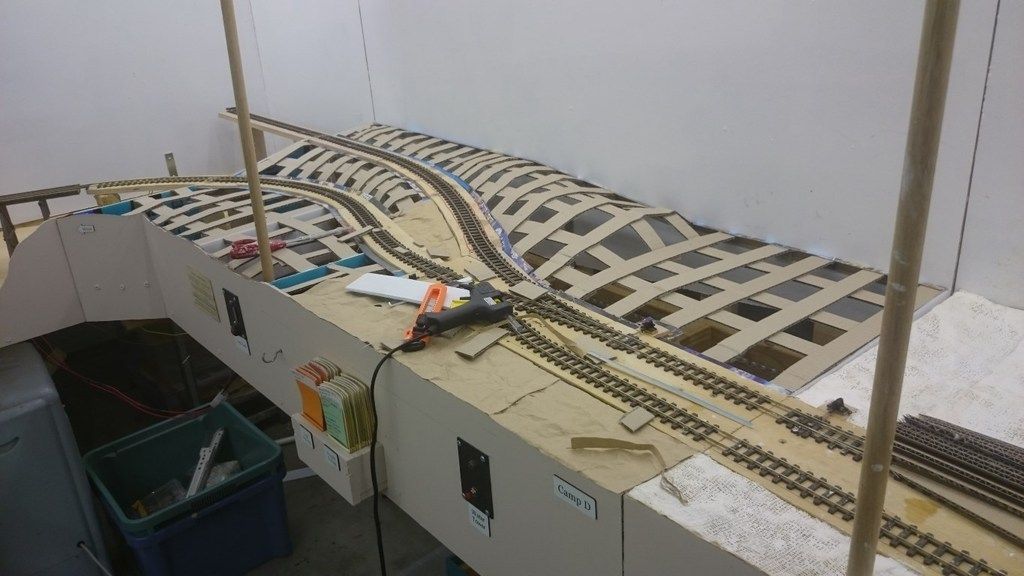
Thanks for the additional input. I’ve done section 4 of the layout with cardboard strips, so here’s how it’s looking at the moment:
I’ve noticed that this is actually a bit easier and more efficient than the old method I was using. It uses less glue, too.
I’m about to start doing the shell over it. Given that I’m pretty much out of plaster cloth, I’ll be switching to a product similar to chux cloths for this and section 3. I bought a roll of about 200 of these wipes for about $7 at an auto parts store a few months ago, for just this purpose.
I found it gave me a bit more control over how the finished ground form would look. I may actually rip out some (not all) of the shell on section 5 and redo it.