Sorry for the belated reply, I just found this thread. I found this on the internet somewhere. I did not create it. Apologies to the author if you see this! I found this extremely helpful. And it has been mentioned here before but the Accu-Lites Digitrax breakout boards are worth every penny!
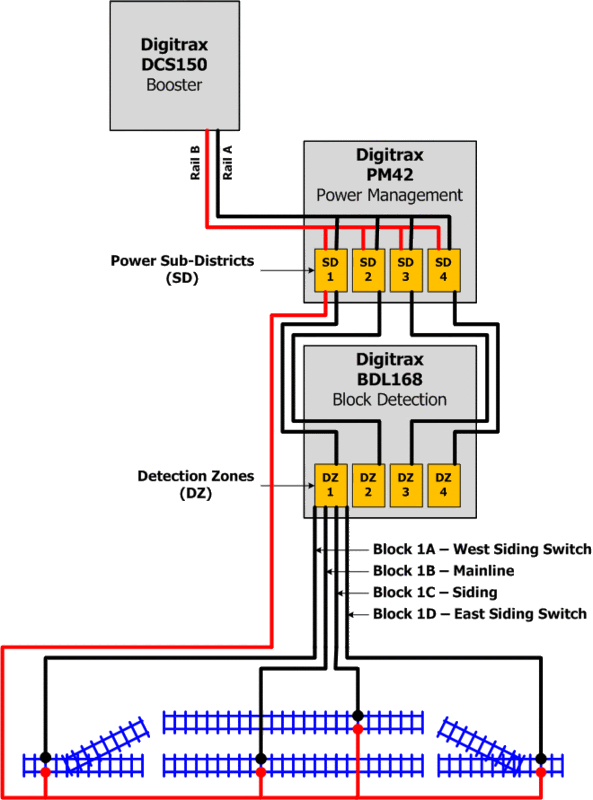
I have started planning the track wiring for my layout. I have a Digitrax Super Chief system and will be using a PM42 for power management and a BDL168 for block detection. I have been reading through all the Digitrax manuals plus about a zillion blogs and message boards and think I have my overall track wiring strategy mapped out. I have posted a high-level diagram below–can y’all do a quick review and let me know if I have got this right? Thanks! I have only shown the details for the four blocks wired from zone 1 of the BDL168; the other three zones would use similar connections to 12 additional blocks. Also note that my turnouts at the ends of passing sidings are wired as independent blocks since I want to eventually have a prototypical CTC installation. By doing this, the turnout blocks will serve as interlockings or control points within the signal system.

Replies:
- Yes, this is correct. I assume you will have another red line from SD2 to the common side of detection zone 2, and so on.
You do not need to gap the red rail side in the detection blocks. Also, if you
