Even though this is not Soviet Russia – you do not choke cherry, cherry chokes you.
4 Likes
Well, I haven’t been able to do much work, but I did fix my soldering gun! Turns out that all it needed was a new tip. The problem? Where to get a tip!
The solution was to go to my grandpa, who made a new tip for it. Now it works just great!
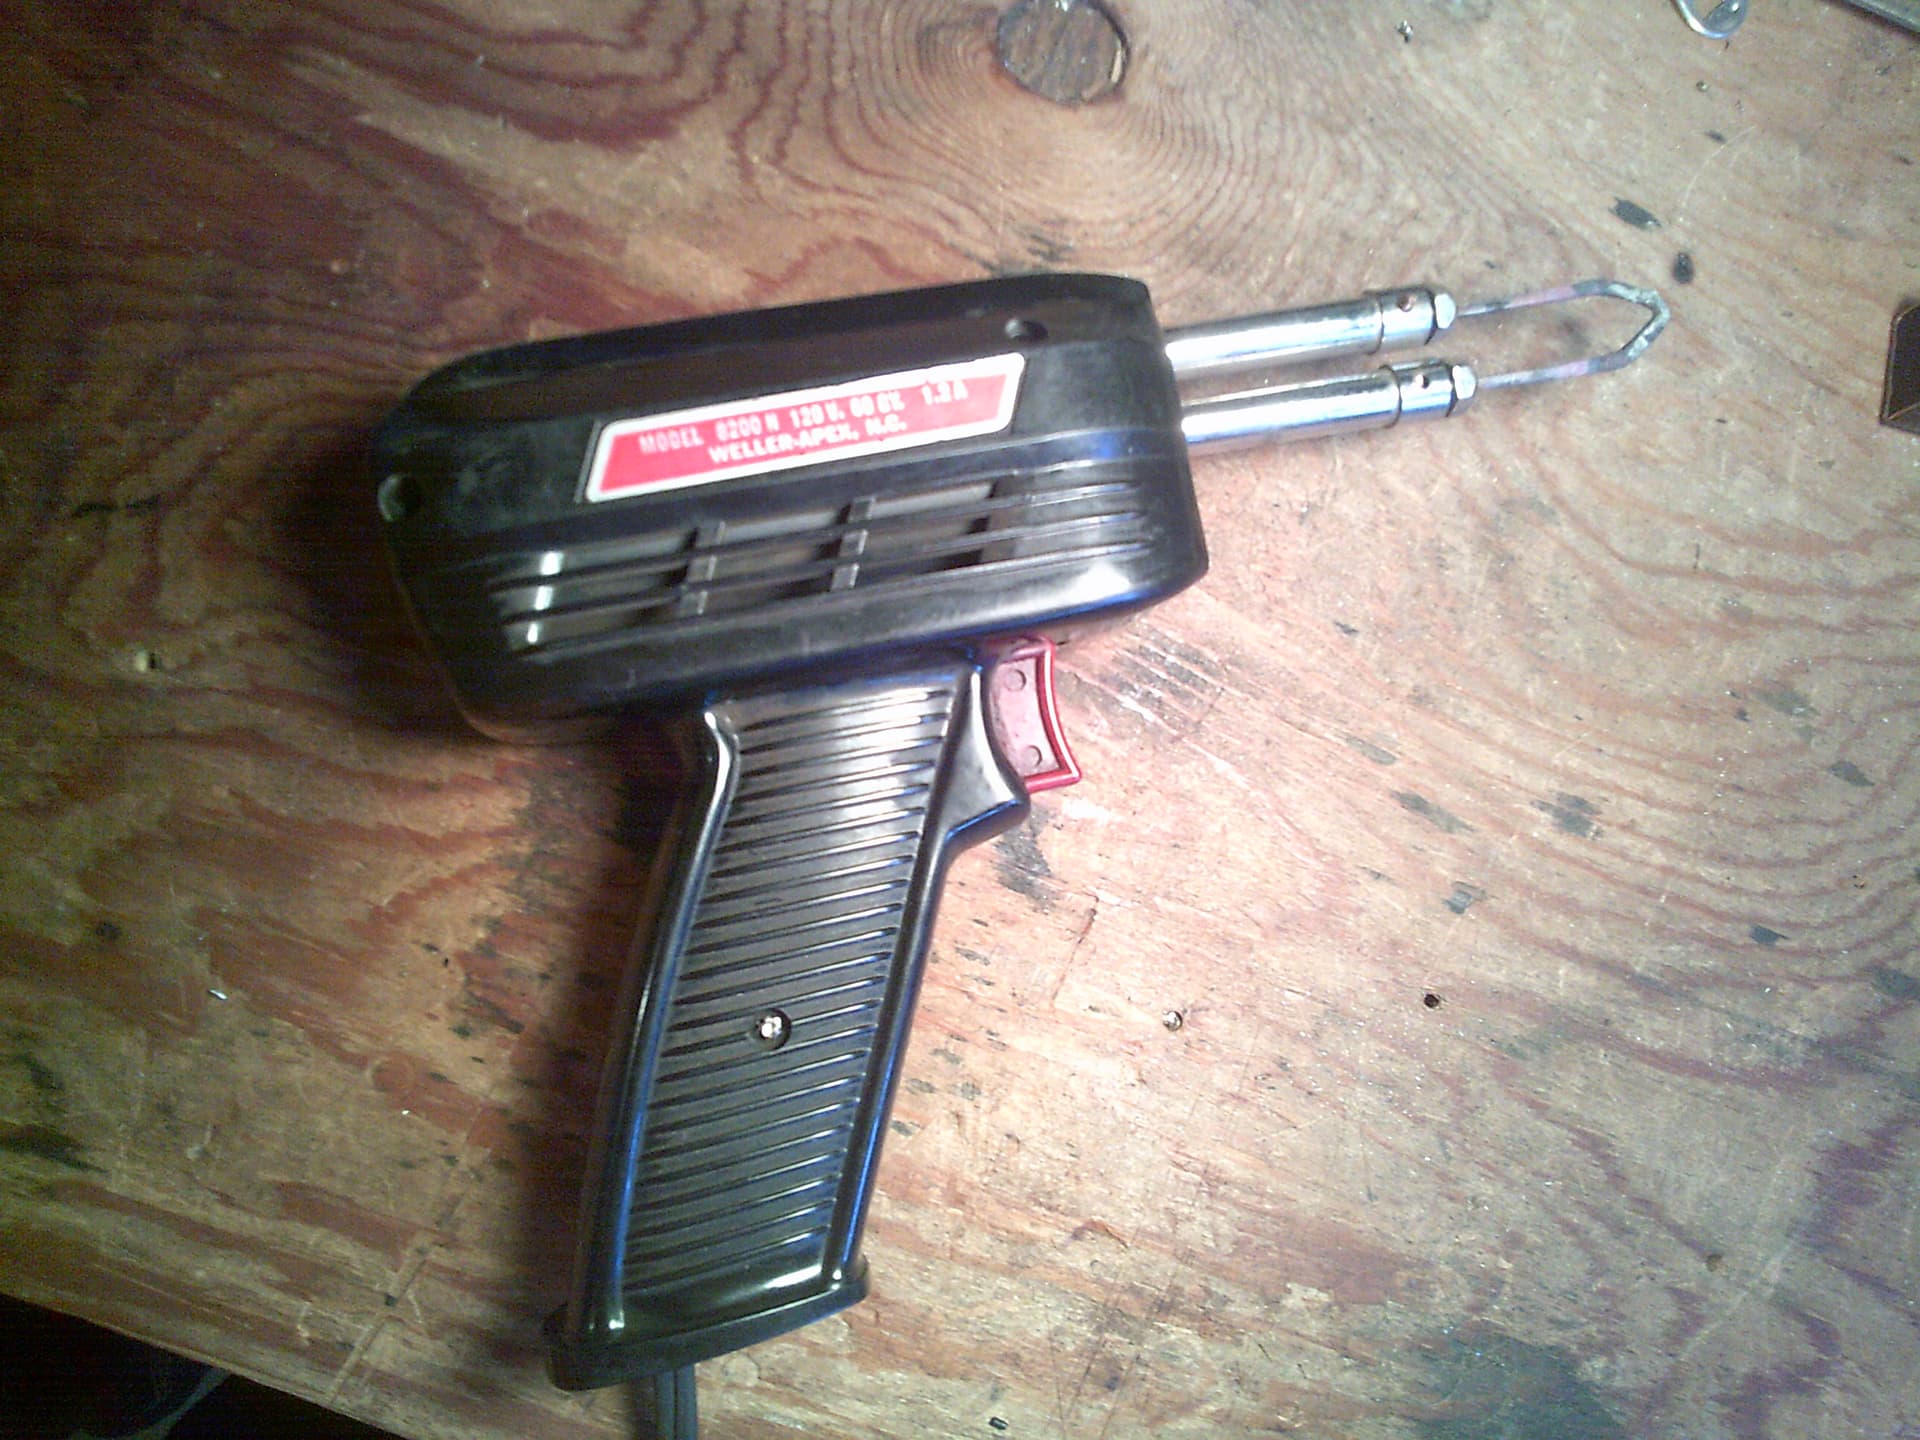
The new tip, by the way, started its life as a copper washer–no joke!
3 Likes
If what you have is working, that’s great, but for future reference, they still offer tips for these. Here is an example at HD: https://www.homedepot.com/p/Weller-8200-Soldering-Gun-Tip-2-Pack-7135W/302576065.
(your photo shows 8200N if I read it correctly (photo was slightly blurry), and the Q&A section says this tip will work for 8200N guns.)
Depending on how much effort was involved to turn a copper washer into a tip (which sounds impressive!), this may be easier next time! ![]()
3 Likes
Those are the right kind of tips (thank you), but I’m unlikely to buy them.
Making the washer into the tip mostly involved (1) cutting it, (2) hammering it flat into a copper strip, (3) bending it into the right shape, (4) grinding it to fit, and then (5) installing it. The hard part was finding a suitable copper washer! I think I’d rather spend a morning modifying the washer than $5.
Sorry about the photo–my cheap camera thought it important to focus not on the soldering gun but mostly on the workbench right by the switch. ![]()
3 Likes
I fashioned a tip for my old Weller soldering gun out of a length of scrap telephone wire at one point. The tip had given out and I needed a replacement quick, so I dug around what I had for something I could make into a tip. I have a proper replacement tip at my disposal now, but the telephone wire has held up well so it hasn’t been swapped in yet. A proper tip probably works better, but sometimes it’s necessary (or fun!) to make do with what you have.
-El
3 Likes
Of course!
1 Like
Well, I spent most of today and yesterday wiring up the layout!
I can now properly run trains across all of Menardsville, excepting a certain section that I need to wire up separately. However, the majority of the Menardsville is wired up. I mostly color-coded it (red=+, black=-) but that didn’t work out completely because I cheaped out a little and used some (mostly red) scraps of wire in both spots. I hooked up feeders to every eight sections of track (with a few exceptions for dead spots). I put those little crimp-on screw terminal connectors on the feeders and stuck them in the slot on the rail–it works pretty well! I basically have no dead spots with a notable exception: in one spot with two turnouts, both the unpowered sections coincide with the location of the pickup rollers on two of my locomotives! I may rework the track slightly, but I’m thinking that I’ll probably add more pickup rollers or something. I’m not sure yet.
3 Likes
Finally went back to the train room after a few days. Somebody’s kitty was watching me through the window!

That cat was probably thinking, “I wonder how I can get in there and knock down those model trains…”
Otherwise, about the only things of interest were that I finished wiring up the Wren Song Railroad (a tourist railroad based in Menardsville) and started work on a control panel.
3 Likes
The only critters that should be on model railroads are switchers!
2 Likes
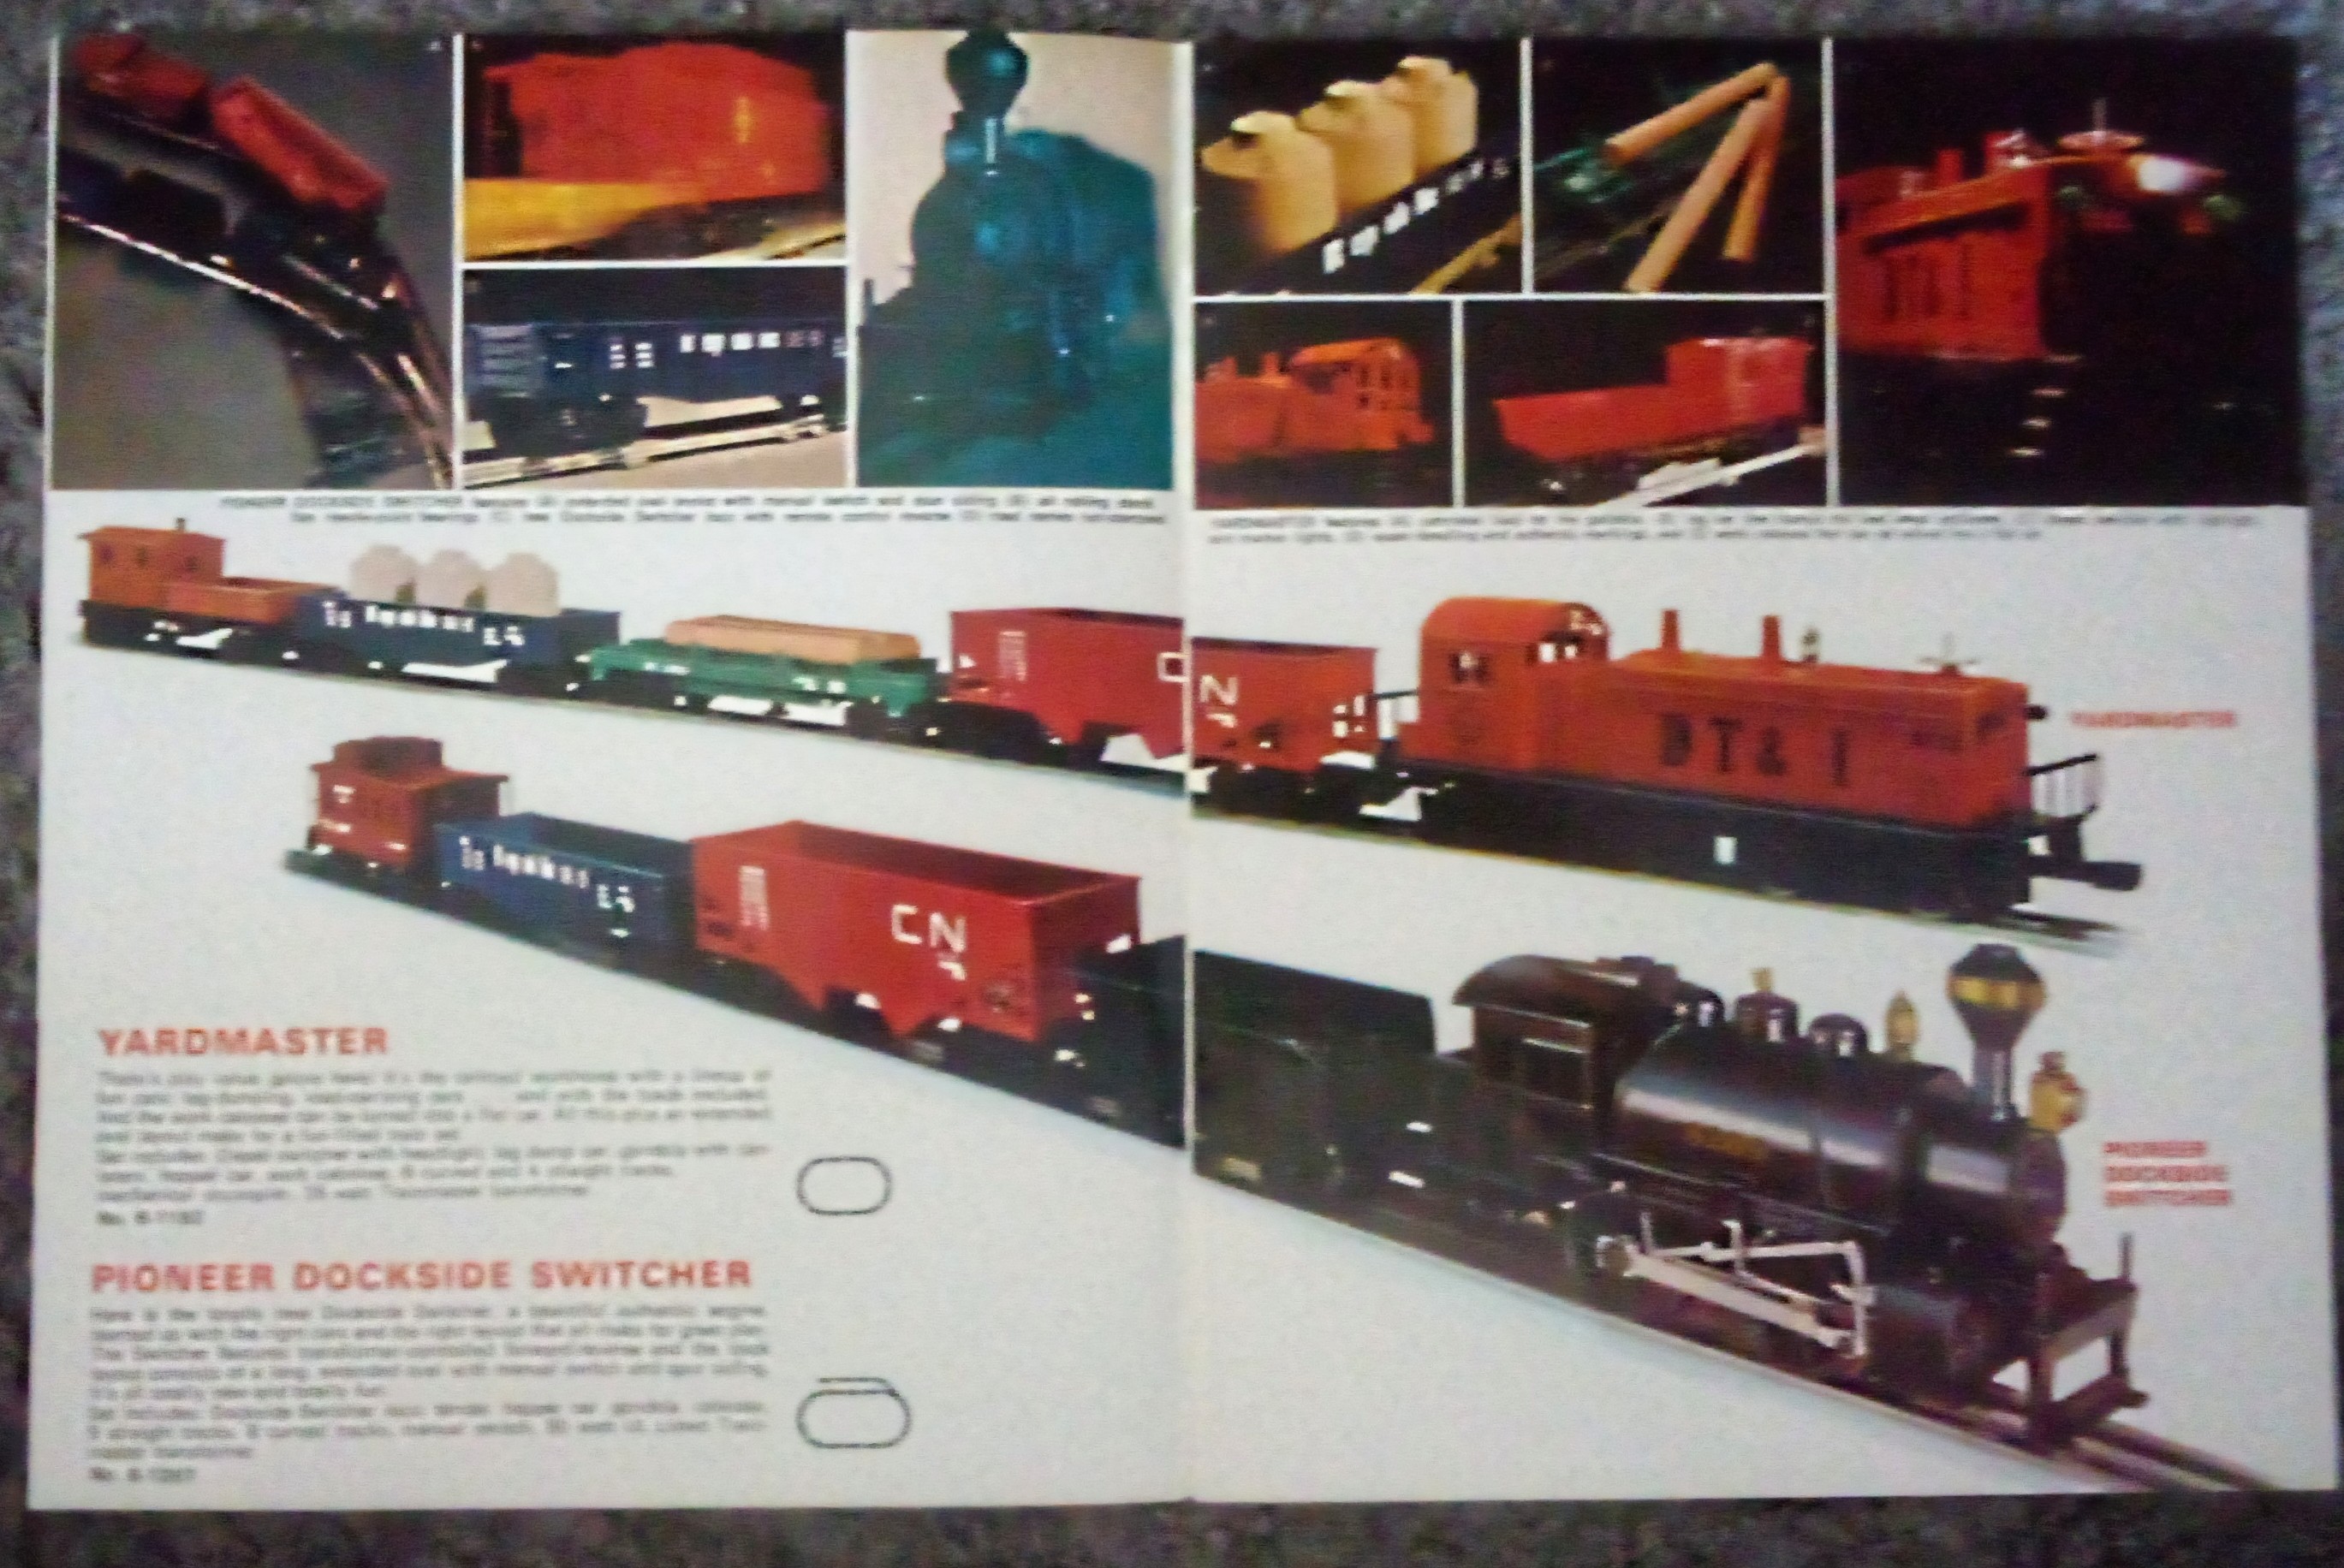
Speaking of switchers, I just bought one! Specifically, there happened to be this nice little bundle on Ebay for a few days now.
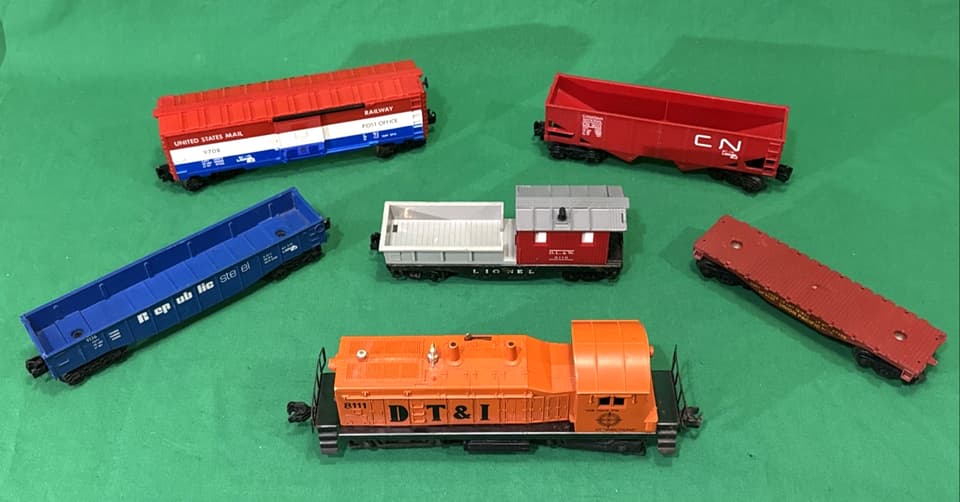
The loco is supposed to run, and the 40-watt American Flyer transformer (not in the picture) is supposed to work too. Counting shipping and tax, it’s $87. Ouch, but worth it. I did have to pass up a boxed Marx train set (probably Factory New condition) for $40 at a Bismarck antique store, but it just had another steamer anyway. Yeah, I’m going to be kicking myself for passing that by.
Anyway, the switcher, as you can see, is the Lionel 8111 DT&I NW2. This is just about the worst locomotive that you can buy if you want to run trains realistically, as it has dummy couplers and fully manual reverse. So why, then, did I buy it? Well, my RCC system–an important part of the Subdivision that I should really discuss more here–can bypass the reverse issue. The couplers can be replaced, preferably by RCC-controlled Electrocouplers. I could maybe even put one of those cheap tiny Bluetooth speakers in the cab for a sound system!
Wait, but there’s more! I’ve been looking forwards to the USA’s Semiquincentennial with excitement and apprehension. Why apprehension? Because I don’t have the appropriate patriotic train (yet)–original Bicentennial locos have been out of my price range by about $20-40. Repaints? Well, that would mean a new shell for my locos because I don’t want to change the original shell on any of them. So, I was thinking, What’s better than a Bicentennial locomotive to celebrate the Semiquincentennial? Why, an actual Semiquincentennial locomotive! But nobody has one. That means a paint job. And shells cost money. But I have been improving in convincing my used 3D printer to actually print something (in the couple of years that I’ve had it, I’ve probably made less than 20 successful prints). So, why not make a new shell for the switcher? Sure enough, a quick search of the Internet produced this: 1:29 scale SP Configuration Motorized OpenRailway EMD SW 1500 G Scale Locomotive by rogermamie - Thingiverse. That’s right, an SW1500 3D model that can be modified, rescaled, and so on and so forth to produce a shell that will fit on the NW2 frame. Meaning that then, I can get my Semiquincentennial switcher. Plus, that RPO car will match it nicely…
Anyway, I also did some work on that control panel–just a little more paint and then it can be installed. Plus, I worked on a Plasticville signal bridge kit. It isn’t done yet, but the majority is together and glued. I plan to add lights. On that topic, this is the general way that I’m going to wire my railroad’s track and signals.
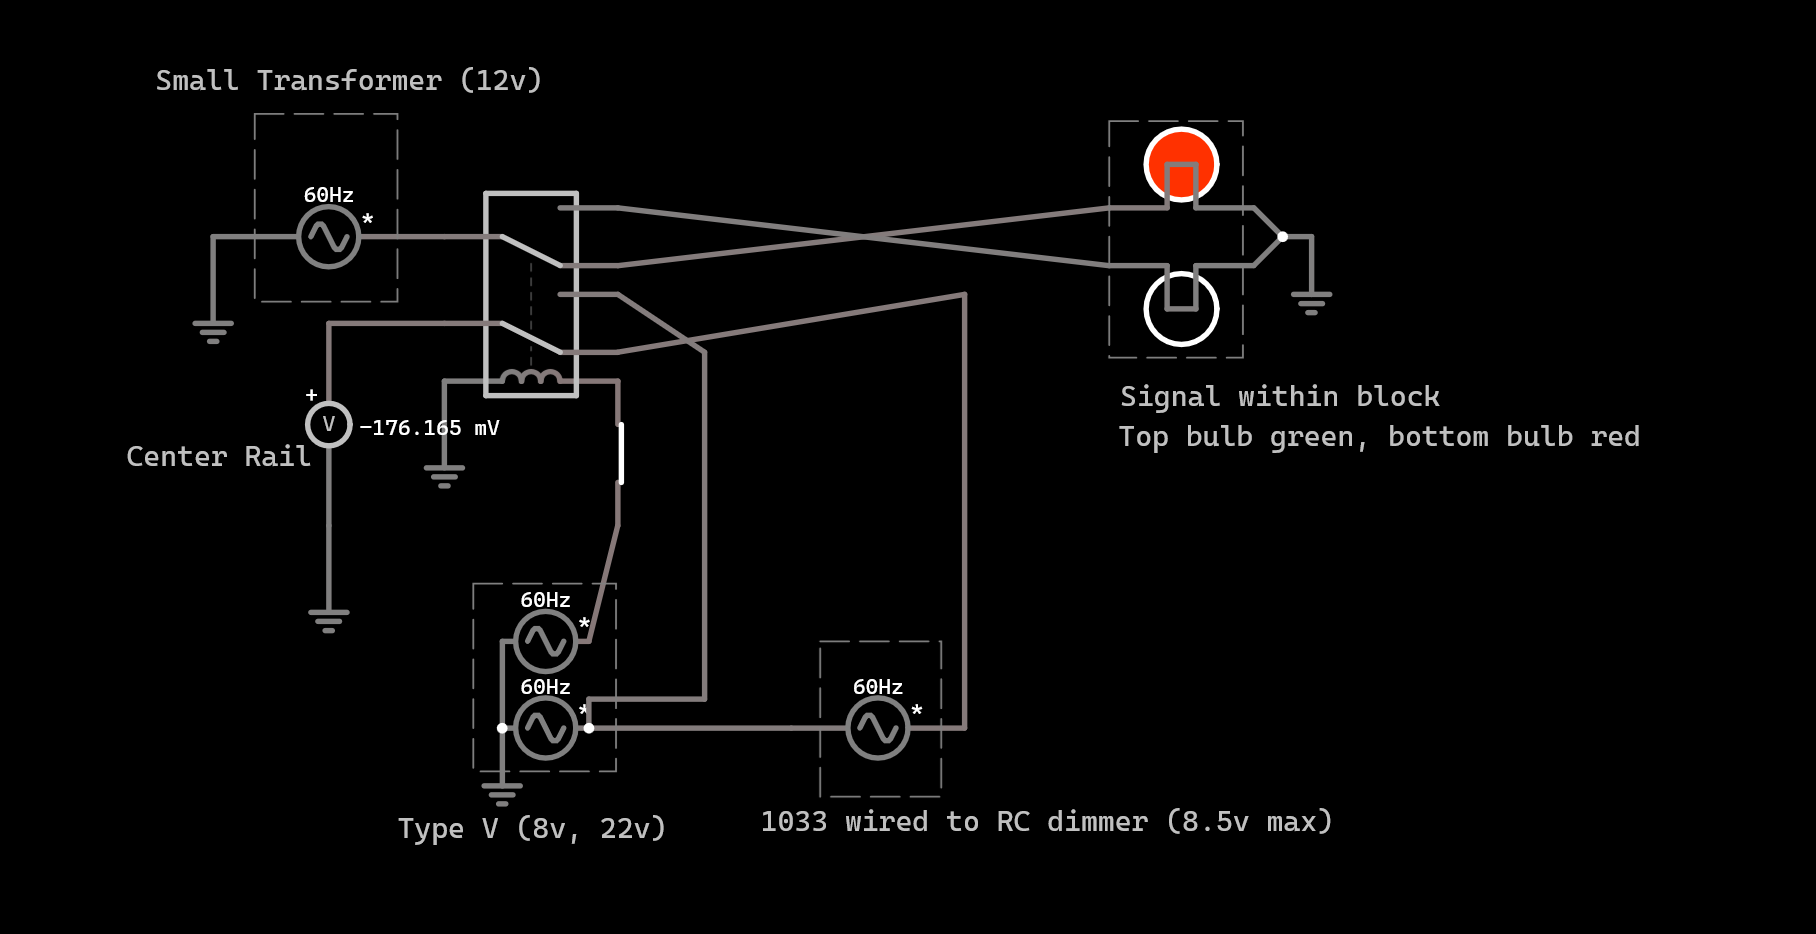
I’ve been using a new circuit program (Circuit Simulator Applet), so if you’re interested in fiddling around with the wiring plan I’ll upload the file here. Anyway, this is basically the plan if I was controlling only one block. Instead, there’s going to be multiple signals, switches, relays, and the like. Anyhow, so this system allows me to have a control range of 8-16.5 volts. Now, you may be wondering, “but, Engine 1988, how are you going to control the reverse units if you never have less than 8 volts in the track?”. Well, that’s all accomplished through RCC–once again, I’ll explain that one of these days. Because there’s always power in the track, turnouts always will work (yes, I know that they can be converted to full constant power) and E-units in parked locomotives will not cycle. Lights will also remain on.
So that’s about that for what I’ve been doing.
3 Likes
This is the raw text for the circuit program.
$ 1 0.000005 119.19350207351468 35 5 43 5e-11
178 208 -224 304 -224 6 2 0.2 -0.21347572178183882 0.05 1000000 0.02 20 0.015 0.005 1
g 240 0 240 32 0 0
v 240 0 288 0 0 1 60 8 0 0 0.5
v 400 0 496 0 0 1 60 8.5 0 0 0.5
v 240 -48 288 -48 0 1 60 22 0 0 0.5
w 240 -48 240 0 0
s 304 -192 304 -112 0 0 false
g 208 -192 208 -144 0 0
w 304 -112 288 -48 0
w 288 0 400 0 0
w 496 0 496 -240 0
w 304 -208 496 -240 0
w 288 0 288 -16 0
w 288 -16 352 -16 0
w 352 -16 352 -208 0
w 352 -208 304 -240 0
w 208 -224 144 -224 0
g 144 -112 144 -64 0 0
181 576 -288 656 -288 0 1295.4447412378931 10 12 0.4 0.4
181 656 -256 576 -256 0 300.1460618344061 5 12 0.4 0.4
w 656 -256 672 -272 0
w 656 -288 672 -272 0
w 672 -272 688 -272 0
g 688 -272 688 -240 0 0
w 304 -256 576 -288 0
w 304 -288 576 -256 0
v 80 -272 208 -272 0 1 60 10 0 0 0.5
g 80 -272 80 -224 0 0
p 144 -224 144 -112 3 0 0 10000000
b 224 -80 303 24 0
b 576 -336 650 -205 0
b 416 -48 483 38 0
x 32 -145 134 -142 4 16 Center\sRail
b 103 -340 182 -236 0
x 48 -353 262 -350 4 16 Small\sTransformer\s(12v)
x 182 61 331 64 4 16 Type\sV\s(8v,\s22v)
x 383 57 700 60 4 16 1033\swired\sto\sRC\sdimmer\s(8.5v\smax)
x 582 -178 759 -175 4 16 Signal\swithin\sblock
x 581 -156 870 -153 4 16 Top\sbulb\sgreen,\sbottom\sbulb\sred
o 28 64 0 4098 20 0.1 0 1
38 3 F1 0 0 8.5 -1 1033\sWired\sto\san\sRC\sDimmer
1 Like
My first Lionel was a ‘Yardmaster’ set someone had left at the town dump, headed up by the 8111. Mine never ran until maybe a year ago now, when I finally traced the issue to a worn out armature bearing. I had to get fairly creative to repair it (the bearing with issues was all plastic, molded into the bottom of the motor truck) but it runs like a dream now. It has a double-wound field hooked up to a manual reverse switch. Coupler swapping might be a challenge on the rear truck where it’s riveted on, but should be easy peasy to take care of on the front.
The 8111 isn’t super glamorous but it was my first, and I really like mine- it runs far better than I ever could have imagined for such a basic engine.
-El
4 Likes
I’m glad that you were able to fix yours–it’s always really satisfying to get a loco running, especially when it’s been in the shops for some time!
I hadn’t thought of the rear coupler–I really wanted to do this in such a way that I can fully return the locomotive to original condition–but I guess that nobody will cry if I permanently remove the dummy. After all, from what I’ve seen you can throw a rock at ebay and hit an 8111! (not that I’d want to hit an 8111 with a rock, but you get the point)
Do you think that these (K-Line K2400EC 2" Electro Coupler Conversion Kit (Pair of 2) – Trainz) would work? I don’t have the switcher yet, so I don’t know what length of coupler I should use.
2 Likes

Aside from the couplers and the reverse unit, that’s the sort of set that I’d like to find under my Christmas tree!
2 Likes
I had that set once upon a time. Ran great. I could easily live without the modern amenities, but I wasn’t using the switcher as a switcher.
3 Likes
That’s something that I find ironic–several Lionel switchers (both some of the NW2s like this one and also a few of the smaller switchers derived from some Postwar tooling) don’t work well when used as a switcher!
I suspect that the reason that this loco may run well is the lack of an actual reverse unit. Since the reverse unit seems to be the most belligerent part in all my older locos (the new ones with circuit boards don’t have this issue), this would make sense…
2 Likes
Well, UPS says that the switcher is in Illinois. I received a discount of off the price for some reason, which is making me worried that the seller damaged or lost something. Probably the shipping was just cheaper than expected…
Anyway, it’s supposed to get here Monday morning.
1 Like
The switcher has arrived in Fargo, so it’s only a few hundred miles away!
1 Like