The question being is there any way to model belgian block (aka Belgium block) borders without spending hours hand carving blocks, or tonnes of money? Probably about 20cm (real-world measurement) worth of edging is needed.
This page displaying various edging and curbing illustrates what I am after (although the block border won’t be for a driveway, but same idea). I can get sizes and colors readily enough from real-world sellers of Belgian blocks eg: 10x4x7", 6x12x3", 5x5x9" etc. in Grey or pink, and there are plenty of prototype photos, and while I can cut styrene strip into about the right sizes (looks like .040 x .080 x .115" long for the first size), getting that erose, rough texture and shape looks to be a problem.
Any useful suggestions would be helpful There’s plenty of cobblestone streets available from our European scenery friends, but I need both top and side detail (3-D), not just a 2-dimension strip hacked from a street paving section.
How about cutting a strip of foam insullation (pink or blue) and scribing in the lines. I have seen very nice looking stone work done that way. They used a ball point pen, any blunt tip tool would work. Much easier than carving plaster, just run the point along where you want the divisions and apply a little pressure. After the lines are in place, paint and washes should get a nice effect.
I agree with Richard, although I’d use a piece of strip wood rather than foam. I have Belgian Block edgers around my gardens, and mine only stick up 3", or 0.03" in HO. At that size, you’re not going to see much detail, so just paint it a basic gray and dry brush it with darker shades of gray, coffee, whatever colors you want. Even ones that stick up a foot are only going to be about an eighth of an inch (0.137, actually), just barely worth fiddling with. You might try just using paint, and if your eye craves more detail (look at it amid real scenery, not on your workbench), go back and scribe the wood with a blunt object.
Thanks, you both have interesting suggestions. I think cutting a foam to .04 x .04" I think maybe too tough. I’ll try .04 x .04 strip styrene and “emboss” with the back of a knife (I just tried this on some scrap, so far it looks OK), then as suggested paint a base grey and use dry-brushing to depict texture. It just might work.
I have used use the Preiser 18200 curbstone set in similar situations on my layout. The set also includes some tight-radius curved pieces, which I’ve found to be very useful.
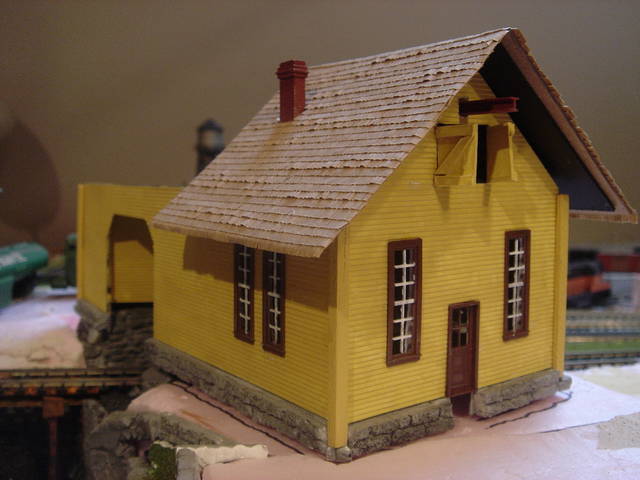
I cut the foundation blocks for this structure from a Hydrocal casting:
The mold for this casting was about 3x8 inches. I cut a thin strip 2 blocks high off the top to use for the foundation. I used to use a utility knife or a Dremel, but recently found that a razor saw is a great tool for this job.
Where they would be so small in HO, I would also go w/ using stripwood. Foam or plaster strips that small would be rather difficult to work with. Using an Xacto blade, razor saw and a triagular file would allow the cuts and cobble to be done fairly easy. I have worked in plaster (Hydrocal) for foundation stone and cap stones, buit not to anything that small especially since it is not a wall or multiple coarse veneer. Even using a quality bandsaw, I was never able to achieve such thin cuts w/o the strips disintergrating. Before carving individual blocks I would distress the wood. Vise jaws, rasps or other surfaces may work to do this crushing or lightly pounding the sides. If a bit too distressed, sand some out.
Styrene may work but the plastic may be more difficult to cobble.
I still like working w/ Hydrocal for the stone carved look. We pour plaster into a mold that used that texture packing foam as a base. The plaster is cut to size or scored or strips for walls and capping stone. It chips and shows a very good stone texture cobble. I just don’t think it will work for the small size for Belgian block. Could try it though, you don’t have a huge area to do.
I have decided to go w/ .04 x .04 styrene, first notched approx ever .10 inches, then sand the notch and visible (top) edges a bit to look somewhat rounded (I have never seen a belgian block with a neat straight line edge, although they probably exist), then light grey primer, dry brushing w/ white, medium, and dark grey craft paints (Ceramcoat and the like), and a rubbing of light grey chalk in the notches to simulate mortar. The dry-brushing (and notching) will take a while to get it right, so I’ll do it little by little, as even 20cm of edging would get old fast in one session (causing mistakes via rushing things).
The styrene is already cut, and the fact that the base ‘plaza’ to which these blocks will edge is also styrene will reduce the amount of cursing required for this project down to a minimum (yeah, I will sand the edges to be cemented down to bare plastic first - at least I have learned that over the past 20+ years).
Those blocks that Geared Steam mentioned before, I’m sure I saw those used in the Garden Railway forum to build G-scale structures, and as for the Presier Curbstone sets MR Terry mentioned, I actually thought about those first, and I swear I had once use them (or something similar) a few decades ago as endcaps (topcats) on a retaining wall on my long-gone first layout.
As for carved Hydrocal, I’m no N-scaler so the results would only be a disaster for me.(the only way I could see that is as a one-piece deal - plaza and edging carved from one casted block - and even then you’d need to carve the notches, as well as the seperation lines and expansion joints in the plaza.
I have a couple of cans of Rustoleum’s Multi-Colored Textured spray paint. I like the black paint with light specks for roofs, and the brown paint with dark specks for any kind of rockwork:
These are Hydrocal castings, sprayed with the speckled paint and then brushed with a thin wash of India Ink in water. Starting with stark white, I get this coloration in a very short time with minimal effort.
Have you ever thought of trying some 1/8" VCT flooring. Select a piece of gray (color throughout) and score and snap w/ a lineman’s pliers. I have seen this done for stacking multiple coarses, however this may also work for your need. The score and break give that cobbled look to the break.