I’ve been using NWSL’s reccomendations for repowering the Y6b but am having trouble getting the reccomended motor to align. How much metal can I grind away before loss of strength is an issue? Anybody done this? Any tips?
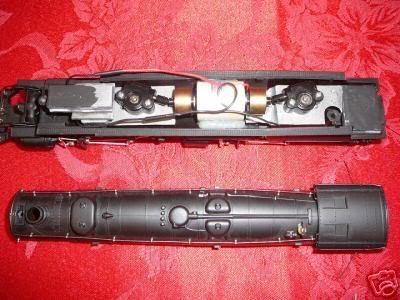
Here are some pictures of a remotoring job I did on mine. I used a Mabuchi motor from a motorized volume control, and two NWSL 32% reduction kits in the upper gearboxes. It still uses the mount in the cab.

I couldn’t find The NWSL instructions, but don’t they involve milling the boiler weight to make a cradle for the motor between the gearboxes? I have a picture of someone else’s repower job where they severed the entire boiler weight to accommodate a large Tan-Can motor.
It appears that the weight is only screwed to the lower boiler in the front, so he must have found a way to secure the rear of the weight as well. The NWSL instructions are not nearly this drastic, so I wouldn’t worry about the engine breaking in half, if that’s you’re concern.
Steamfreak,I actually had to grind away a lot of the boiler weight to get the nwsl motor to come close then had to raise the gear boxes on shims to get the shafts to line up. It seems to run smoothly and I just now glued the motor down with silicone sealer. I may havea to make longer couplers from the bottom of the gear boxes to the running gear. We’ll see. Will add pics in a later post as I can’t move anything til the silicone sets up. Thanks for the comeback.
I just realized that taking a picture does not involve moving the model.
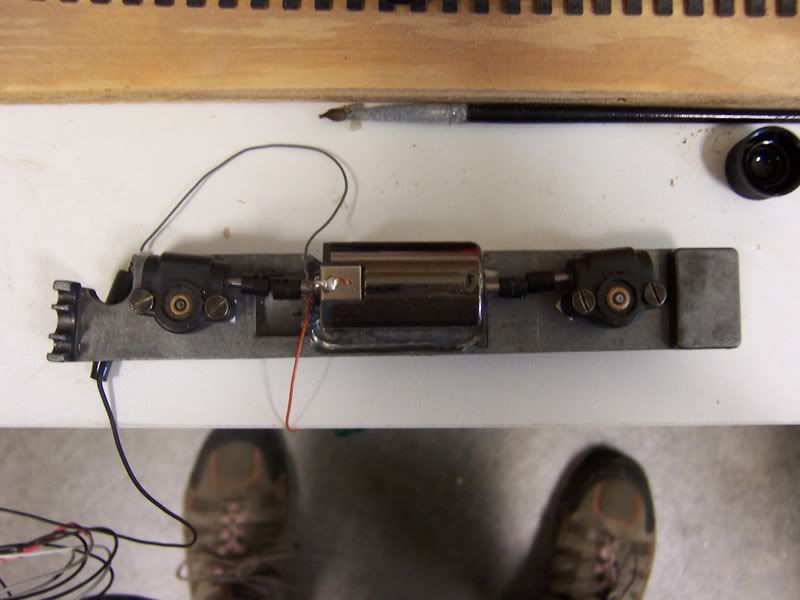
pardon my feet
NWSL has instructions for doing this to the old Big Boy, but they’re generic instructions for all of the Rivarossi articulateds.
http://www.nwsl.com/Catalog/pg072-cat4-44-v0604.pdf
The Y6b probably has less room between the gearboxes than the Big Boy, and the boiler weight may be shallower as well. They recommend 18377-9, which is a narrow flat-sided motor, and looks like it should fit without too much grinding. Is that the one you used?
You beat me to it. Which motor is that? It’s not the one listed in their instructions.
That is indeed the reccomended motor. I’m guessin from the diagram that the Y6b is a smaller locomotive than the ones they did there conversion on. I however have succeeded fitting the motor in using a clever system of mirrors and levers and my Dremel. Now if the boiler weight doesn’t collapse from the weight of the motor and the ravages of operation I will have a successful remotor.There is probably 1/16th to 3/32 thickness of metal left under the motor. I was actually contemplating cutting a new frame from brass. However I have not mounted the boilerweight to the body and running gear. I am curious as to how well the couplers will fit the running gear. Also,someone else disassembled the model,but, I do have the exploded drawing to help with the rebuild. Stay tuned.
That’s a later version of the boiler weight with the cast-on motor mount, as opposed to the brass one that screws onto mine. Yours also has that well cast into it between the gearboxes - I wonder if they were intending to mount a motor in the boiler themselves.
You had to remove a lot more material than the flat can would require, but as long as it doesn’t flop around like a wet noodle you’re OK. The recommended motor is shown in their pdf brochure. It’s #18. http://www.nwsl.com/Brochure%20Pages/broch%20160009%20Motor.htm
You may be able to make longer universal shafts by cutting slots into the ends of some brass tubing with a razor saw.
Steamfreek, Thanks for the idea on cutting slots in tubing. I had already thought about that but your comment backs up my feeble thinking. I was wondering if the tubing would cause undue wear on the ball and pins, but they’re metal so they should stand up. Now, to find those articles on how to reduce the pizza cutter flanges.
The later versions of the Rivarossi Y6b did have the motor between the gear towers, not in the cab like the earlier versions.
Golf Manor Hobbies, http://www.golfmanorhobbies.com , probably has replacement motors for either style, based on past performance. I wouldn’t be surprised if they have the smaller flanged wheels as well. If you decide to check them out, I suggest the phone. They ain’t cheap, but they are good.
Yeah, but that was in the 90’s, when they underwent a complete redesign utilizing diesel style gear towers and new engine frames and boiler weight, not the 70’s era weight shown above. The cutout was more likely a cost saving measure, but it makes a great place to put some lead shot. [:)]
I ran the mechanism this morning and it worked great. Then I decided to remove the ground wire and the wire to the head light. In the process I managed to lose the timing or whatever you call it and now I have a bind in the front driver set. Always somethin. I wanted to remove those wires because I’m putting a decoder in the thing.
Did one of the universals slip loose, or is there an actual bind in the running gear?
After fooling around with the mechanism for a couple hours I discovered two things. One, the crank that drives the valve gear had loosened and got out ouf quarter. Two, when I removed the light I also removed a thin washer/electrical connector that also served as a spacer so tightening the bottom plate bound the driver shafts. Everythings running smoothly now. Haven’t quite figured out how the electrical pickup works. Its obviously grounded to the frame,and it sort of looks like,judging from the traction tires that the power trucks pick up from opposite tracks. Think I’ll abandon that and use the tender for pickup after replacing the plastic trucks with metal ones. As I mention we’re going wwith DCC on this loco.