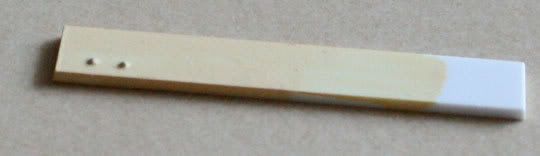
I tried to make some rivets in a bit of styrene today. This is what I did.
I drilled a small hole by holding the drill between my fingers. I will NOT recommend it because it’s not good for your fingers. Then I used a tichy train plastic rivet glued with ethyl acetate. I painted the styrene with a brush. I know it will be better with my airbrush, but it was just a quick test.
I’m very satisfied with the result but…
How do I drill the holes in a straight line and with the same distance between holes? I know that you guys are the real pros. Please share your secrets 
Unless you have a NWSL riveter, you’ll have to do it the old-fashioned way, draw a line with a straightedge/ruler and measure and mark it off. Use a pencil or a very fine felt-tip pen. Then use a pin or scribe to make starter dimples to locate the drill and keep it from running off.
You should get a pin vise.
If you gonna mark off the line and slather the plastic rivets w/ cement anyway, why bother with drilling the holes - just mark off the locations, then put a ‘guide’ (I use a metal ruler) edge to line the rivet heads on, using a very fine brush (I use a worn out 000 brush) put a drop of cement to the rivet location, and then pop the rivet on target, pushed up against the guide to get a straight looking line (sometimes I have to touch the brush w/ cement to the rivet bottom also). Yeh, the rivets have flat bottoms, either because I salvaged them from some other model (hooray for old school Athearn flat cars) or …well, that’s about it.
Admittedly I don’t need to long lines of rivets (in the future, everything’s chrome…er, welded, baby), maybe 6 or so, so I do not vouch for this when doing, say, the bottom of a passenger car w/ 80 or so rivets in a row.
Oh, and always use a pin-vise when drilling…don’t kill your fingers.
Can you apply decals?
http://www.archertransfers.com/index.html
Sells decals that are rows of little drops of resin on decal paper. You apply the rivets like a decal but they are 3D.
The $300 answer is a Micromark miniature drill press and an X-Y table.
Dave H.
One technique is to make a template by measuring off the proper rivet spacing on a piece of card stock or thin brass. Then drill holes at the marked spaces with an appropriate size drill. Cut the template at a convenient length and place the template on the material you are using and drill the holes using the template. I like to use card stock for the template because you can easily bend it to any shape. I have thought of but, never used your technique. What gauge are you working in? One comment I have is to try to use a smaller rivet spacing and if possible a smaller rivet. I would strongly recommend using a pin vise that will close and tighten on a drill as small as #80.
Peter Smith, Memphis
This extremely unusual but also quite useful website has all sorts of ideas about how to make rivets, with useful photos and links:
http://15mmvsf.bagofmice.com/vsf/builder_rivets.html
One of the oldest tricks in the book is the “clock gear on a stick” method of making rivets - the gear turns like a wheel, the teeth dig into the material (paper, card or thin styrene or brass) and you follow the line of a straight edge, so the other side of the material looks riveted. Obviously the method is chancy unless the gear teeth just happen to be the right spacing.
In this day and age spare clock gears are almost as rare as hen’s teeth, so the pounce wheel that is otherwise used in fabric work or in transferring drawings is the way to go if you want to explore this method. Cheap pounce wheels let the “gear” wander too much for close tolerance work, so sometimes a washer or bushing needs to be inserted. MicroMark sells high quality ones that likely do not need modification to work well. This is a pounce wheel:

from this website: http://www.roseantiquetools.com/store/page28.html
Dave Nelson
Try printing a row of dots on a clear label. Stick the label on your part and use the dots as a guide to drill or make starting points with a sewing needle.
Use a pair of dividers. Set the distance between the points to the distance you want between your rivets, and line up the points on a pencil guide line or preferably the edge of a rule. The slight depressions made by the points in the styrene will act as starter holes for the drill.
Mark.