Before I can proceed on my layout I need to finish a limestone appearing cliff on/in an extruded styrofoam board. I thought I could make a passable wall using a hot wire, hobby knife, rasp on the styrofoam but now I have my doubts. I was thinking about trying spraypainting the styrofoam with some of the Home Depot exterior furniture spray paint that has a rough consistency to the finish. Suggestions please?
well; before you paint the styrofoam you’d better make sure the paint is water-based or it’ll attack the foam.
Regular spray paint wiil melt foam. Your pretty limited in the colors available in the latex spray paints and I think they’re all gloss coat. The cheap bottles of craft paint will work in an airbrush if you have one. (thin the paint down)
I could never carve foam to look like rocks very well. That’s why I stick with plaster and Sculptimold.
Here’s what I do…I make a basic hill/mountain out of blue insulation board [1\2 inch]…I cut pieces in the basic shape I want the hill to be and each piece is a little smaller,I stack them and pin them together with skewers, then In use premixed drywall compound [availible in 5 gal. buckets at your home improvement warehouse] and use it like plaster, reach in, grab a handfull, and slap it on the foam, you have a good amount of time to work with the mud and you can really make it look like real rock faces with a little practice.
When it’s started to set up, about an hour or so, you can begin to carve detail into it, I use a putty knife. Now heres the part that I think really makes it look real…when the mud is still soft, I press real rocks into it, limestone from the driveway mostly, since it’s the most ‘‘realistic’’ looking for a cliff or exposed rock face. I have tried to make the mud look like layerd rock, it took me a while to get the desired look, and when I do it again I’ll try a different method of carving the detail into it, using something other than a putty knife.
I like this method because it yields some pretty nice looking ‘‘rock detail’’, and a 5 gal. bucket is about $10, plaster is messier and costs more.
I usually add some latex paint to the mud as I’m mixing it [it will seperate during storage, a drill with a paint mixer works very well to mix it]…I use a grayish brown for rocks and greens for just basic landscaping. Woodland Scenics has a very good weathering and color kit that uses a spray bottle to apply colors and blend them…this is the method I use, except I use dyes ,RIT dyes, mixed to ge
I use a steak knife and lots of patience to carve foam, but for a rock wall, I put 1/8 inch drywall mud on before I carve the individual rocks.
An example, catved with a #11 blade.
WOW Tremendous advice and tips guys. I really appreciate it. This sounds like something I can accomplish after all =)
The cliff on the right was carved with a dremel and an 1/8" ball end routing bit.

That on the left is structolyte over foam. Maybe one of them is similar to the style you are looking for. Sorry that I don’t have a clearer picture handy.
This is also carved foam in a different style. It takes a lot of practice and it’s NOT my favorite technique for most rock faces. It is nice for steep ones and those that need to be removable for access.

Coloring on all was done with an india ink wash then thined acrylics. also don’t forget that a wire brush can create a nice texture.
Good luck,
Karl
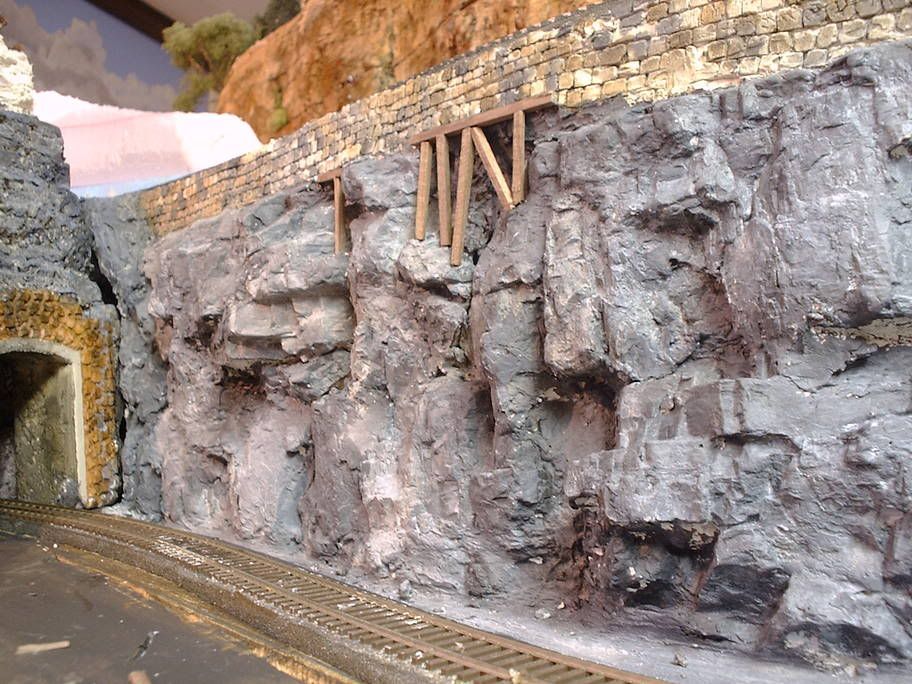
the pic you provided with the Virginian display is very close to what I have in mind. I hadn’t thought of using the dremel, which sounds like it could save a lot of time. It is a sheer wall that I have to complete. I would imagine if I need to redo an area then I can re-mud it. I’m getting excited that this is possible!
Hi Greg,
I posted another photo for you.

This one is half way through the painting process. It really helps to take a bunch of photos of rock ledges in the area that you want to model.
-
Carve the foam to the rough shape (it may bend) of your ledge with a knife or saw.
-
Draw the larger cracks onto the foam.
-
Carve them out with the dremel - practice first on scrap and wear a dust mask! There will be some mess. Step back and look at the piece and your photos.
-
Draw in the medium and small cracks, then carve them.
-
Not all surfaces should be the same distance from the front. It’s hard to see this in the photos. Make some rock faces recessed.
-
I like to finish with light strokes from a wire brush (handheld not dremel).
-
Blend into the surrounding scenery - can you tell where the foam ends and structolyte begins? It’s not quite where it seems.
Yes it is exciting! This is really a fun hobby and there are so many alternate ways of achieving a goal. Sure, if you don’t like the results try again. It’s only mud and foam. [:)]
Karl
That rock wall looks great. Would you elaborate just a bit on how you did it?
Jim