I’m sure this question has been asked a thousand times but how do you apply rust effects to things like bridges and water towers etc.
Dry brushing (IOW, dip your brush in paint, then wipe most of it off before gently swiping the brush over your model) with Polly Scale “Rust” paint is my preferred method.
You can also use rust colored powdered chalk (either make your own, or buy “weathering powder”.)
Bragdon Enterprises makes a pigment that is self adhesive, it is applied as with chalk but some agitation with the brush activates the adhesive in the pigment and they stick where you put them. They do a rust coloured set with four shades of ‘rust’ I believe.
Or you could just use chalk, I never ‘set’ my chalks on the models because I dont ‘play’ with them once they are finished, structures as you are talking about wont get handled often so chalk would work fine.
Karl.A
I mix a very little bit of red acrylic craft paint and an equal amount of yellow into about four or five parts Burnt Umber acrylic craft paint. Then I cut that in half with water and use that for as long as it lasts. But the secret is to use this diluted paint in tiny amounts along rivet lines, flanges, etc.
-Crandell
Sophisticated Finishes. You can buy it at Michael’s Arts and Craft Store. Buy the “Rust” color.
Hi from Belgium,
Rusting models or wheatering them are for me the same thing; I use the same method for both effects.
I use accrylics craft paint (liquitex and golden straight from the tube) and power chalk or straight pigment to do rusting and wheatering for my Nscale models.
I choice the method following my mind and the effect I want.
I prefer, since some times, the pigments and power chalk even they need a fixative to better fix them. With very little practice they can give You very good results.
Take a little colored powder and place it around the parts were you want the rusty/weathered effect
I use a soft brush to aplly them and some “women” paintbrush.
I blow of the excess of powder.
I use also, and often togheter the india ink/isopropyl solution to fade the colors, before rusting the parts.
Following two pictures of such effects:

On this picture the chimney and the water tank were “rusty” with power chalk and pigments; the roof had receive a mix of paint and chalk traitement.

The small build up Walthers switch tower was just faded with the india ink solution, because it was uncessary to paint it (and difficult). Only a few power chalk was added here and there on the roof, chimney.
Marc
To try to give you a slightly different answer from the good ones so far Iwould suggest…
The obvious: go out and look at a whole load of different rust conditions.
Rust comes in lots of variations but about the one common factor is that the sort of rust you can get on an oil drum that you can get near looks pretty much the same as the rust you will get on a high, inaccessible, bridge… but a good pair of binoculars as well as a good zoom lens will really help.
That is not to say that all rust is the same… but the many varieties of steel start off with iron and rust is iron oxide… the variations depend on loads of things like;
-
how long it has been rusting,
-
whether it has always been exposed or started off under paint.
-
whether the rusted side you can see is the side it started on or it has come through from the far side.
-
Has rust resulted from water falling, rising or standing against the metal?
-
Has something damaged the paint to get the rust started?
Loads of things to look at.
There can also be rust stain rather than rust itself. This is often a pretty thin smear of rust over (or down) a painted or galvanised surface… the source of actual rust will be somewhere in or above the stain area. It can be that the main rust is on the other side of the metal and the stain has come through either a bolt hole or a rust hole… it’s like the wing of a car - outside it still looks well painted but when you lean on it it collapses… guess how I know about that?
I’ve had no luck with chalks and powders but I do like acrylics. You can achieve so many colour variations.
This is a heavy application of “Instant Rust,” the Sophisticated Finishes stuff:
Instant Rust is a two-step application. The first is an emulsion of fine iron filings, which you paint on to the surface. The second is a chemical oxidizer that literally rusts the iron.
For a lighter touch, I used AIM weathering powders on this engine:
I used Dul-Cote over the whole shell first, after masking the windows with blue painters’ tape. Then I applied the powders, mostly rust on the pilot and trucks, and some black on the hood. Then I used another application of Dul-Cote to seal the powders, which will otherwise rub off on your hands.
Mr. B
Tthat stuff pretty much nailed the look I was going for. Being in the vehicle restoration business for way too many years I am no stranger to rust. The look I was attempting to go for is you know when paint bubbles and blisters from the rust popping through you almost get this start burst effect with the rusty center and the paint pealing away and streaks of rust. I think this very hard if not impossible to duplicate but the heavy rusting you have on that bridge is excellent. This one plate girder bridge is going to be front and center as soon as you come down the stairs into the layout room as soo as you turn there it is so I want to try and make it as impressive as I possibly can. Even though it’s jsut a simple single track plate girder bridge you know what they say about first impressions.
If I’d known I’d have got you to fix my rust bucket! [:-,]
I do know the sort of rust coming out from paint flake you mean… real hard to do. Have you thought about getting some paint of the bridge colour and either thickening up the surface or making a small blob on the part you want to work on… let it dry really hard and then do a bit of micro sculpting for the star burst.
You might find that a “water based acrylic oil paint” is good for this… I know that sounds crazy but either Rowney or Windsor and Newton do the paint in artists shops and I’ pretty sure that you can get it in the USA. This paint has the gooey property of oils but is water based. If you get it wrong and work on it quick while it is wet you can take it back off of a plastic structire painted with a non-acrylic pretty effectively. I have actually found that I can get some good effects by deliberately putting on toomuch nd taking it back off again. It needs experiment and practice.
It might be worth doing the thickening/blob in rust colour and then painting the bridge colour befoe sculpting back into the rust. I reckon this would be easier than trying to paint microscopic lines of rust into a bridge colured blob.
Even with years of joyful experience of rust I’d get lots of photos to have by me while I’m working. I find that its uch easier to get weathering of track and cars right with the visual aid rather than relying on my mind’s eye… and I’ve been on and around the track for 30 years.
Something else you might try for the area around the flake’s starburst - and elsewhere - is to get a good quality “deer’s foot” brush ( or a few in different sizes) and dry brush with a stippling effect rather than strokes. With a little practice I find it extremely easy to get small and large areas of that peppered looking rust effect this way.
Actually the dot/streak sort of rust weathering is done by a fairly old technique, at least for freight cars:
Place a dot of artist oil paint (burnt umber, burnt sienna, etc - colors from the dark red to dark brown range). Actually, place several dots of paint, aiming for places where rust would logically be starting from (e.g. damaged by being hit by equipment or lading, the end of a sliding door track, and so on).
Then, load a wide, soft brush up with turpentine, and sweeping down the side of the car toward the car’s bottom - keeping perpendicular to the ‘ground’ (OK, since you do this with the car on it’s side, pull the brush to the car’s bottom) - you want the resulting rust streaks to be pointing downward as straight as possible. IIRC, if you mess up, you have a small opportunity to wipe off the results and try again. This actually will give decent results and is hard to mess up (even I can do it). The key is to get very small dots of paint to start with, maybe the end of thin wire (28g), or maybe a needle tip, etc.
[QUOTE]The look I was attempting to go for is you know when paint bubbles and blisters from the rust popping through you almost get this start burst effect with the rusty center and the paint pealing away…[/QUOTE]On the other hand, I have yet to master what you were talking about here, which I interperate to mean small spots of rust ‘bubbles’ which have NOT streaked - for some reason bubbles and patches of rust are fairly common on old machinary, structural components, sign-posts, etc, and they do not have rust streaks (or very faint ones) - some guys have a talent to re-create these spots, sometimes here and there, sometimes peppering an entire area (both of which I see in the real world), but when I ask how they do it the answer is apparently more skill and motor control than I could ever muster.
Bubbly rust on an X-29 boxcar.
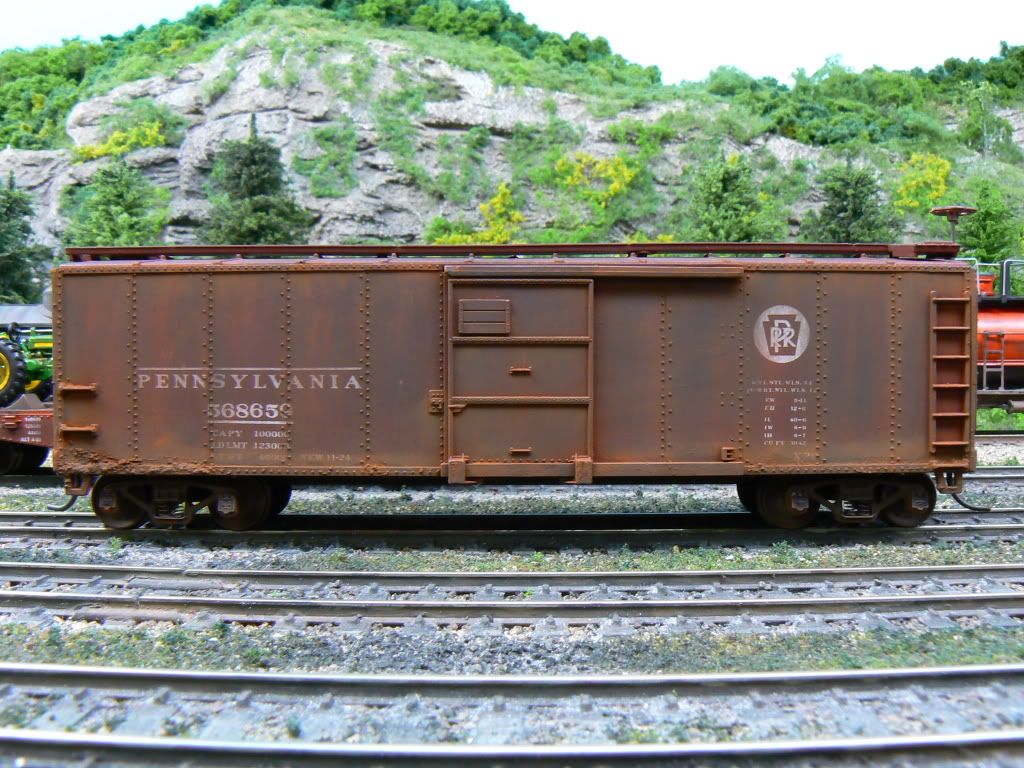
Nice work, DJ!
Here is an example of a turntable bridge rusted up with a heavy wash of acrylic craft paints. I would use a fine brush for this, and sometimes it requires an overcoat to make it look better.

Or, the same done on this combination through and deck girder.

-Crandell
It’s not politically correct (or necessarily healthy) but I don’t employ skill or motor control…
I have a seriously good meal, a few pints of quality ale and I play George Thoroughgood or ZZ top very loud. My neighbour comes round the next day to observe the latest work of art.
(This is the obverse face of my work which is safety critical and D&A random tested as soon as I head to the boundary). I work and play trains - totally seperately.
[8D]
Well being this isn’t a very expensive kit if I had to do it two time or so maybe even a third till it was just right It wouldn’t bother me too much as I would just use the others some place less obvious. As far as trying things one side then perfecting it and showing the other, You don’t want to see some of the back sides of building on my layout that face away from view… oh no.
Typically you get the rust streaks when water runs down over something exposed, these rust bubbles if we can call em that are when moister is trapped under the paint usually do to a poor primer job. I was contemplating painting or using the rust compound first then painting over it with grimy black to give the illusion of everything in that area under the paint is rusted and starting to lift. Just an idea that I thik is going to take a while to perfect.
I have to make a run over to Michaels this afternoon for some glue so I’ll pick up some of the Rust and give it a whirl
I use to “weather” a lot but kinda got away from it. I work more on my cars now, but if you want some rust…A few ways I use to do it.
The “Finish” is a liquid, and it goes on in layers. Its something you have to practice with (as far as small rust pits, and streaks), unless your doing a big area. I use it sometimes on the boxcars roofs. Its good stuff, and a quick way to have some rust.
“Bubbling” rust can be done by “sea salt”. You paint a boxcar, water tower, etc…add some “sea salt”, and let that dry (I’ve never done it, but I’ve seen a few pictures of it done. I’m guessing its mixed with water or a glue to get it to stay). Go over the spots with the new paint color and brush the area were the salt was. That will give you the “bubbled” effect. You will see the old paint, and the rust pits, and then the new paint. Kinda like in levels.
You can also layer your oil paints. Light to dark, is the way I do it. I use Bragdon powders, and AIM powders. The powders won’t give you a “texture feel”, but it gives the oils a different shade. It also helps the oils to dry.
As far as streaks…I use a VERY thin brush. Mix up some powders, and go from light to dark. I’ve used oil paints the same way. Just dip my brush in “mineral spirits”, and add some oil paints. Kinda drag the brush in the oil paints, and wipe off the brush on some paper towel (still keeping some on the brush thou). Drag straight down.
Here’s some pictures of cars I’ve done in the past. Might not be water towers, but you can see the streaks, rust.


Here’s a shot of “the finish”. I used a cheap brush so some of the bristles were left be