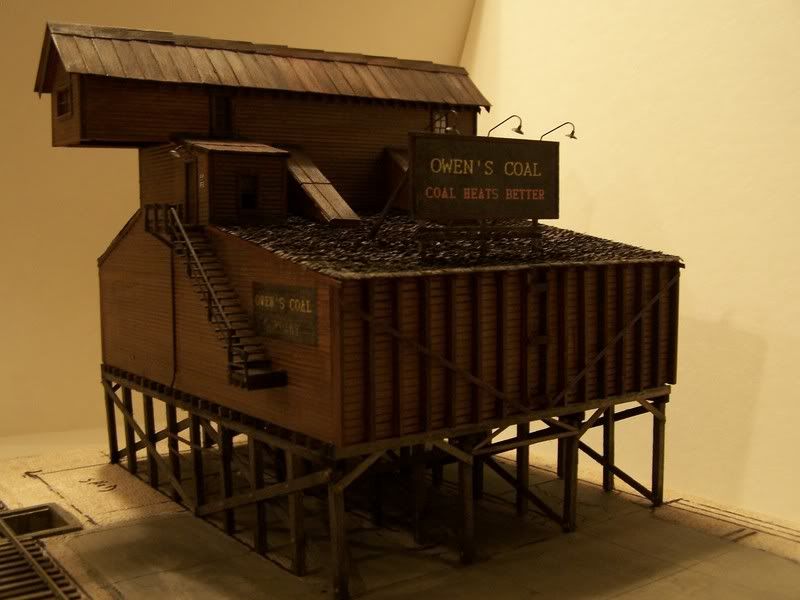
Here are a few pics showing my newest (scratch built) project. It’s a Coaling Company based on the new Fine Scale Miniatures kit due out this December (http://www.finescaleminiatures.com/).
The only thing I had to work with as far as plans, were the advertisement photos referenced above. So far, the hardest part of the project was fabricating the coal chutes and conveyor.
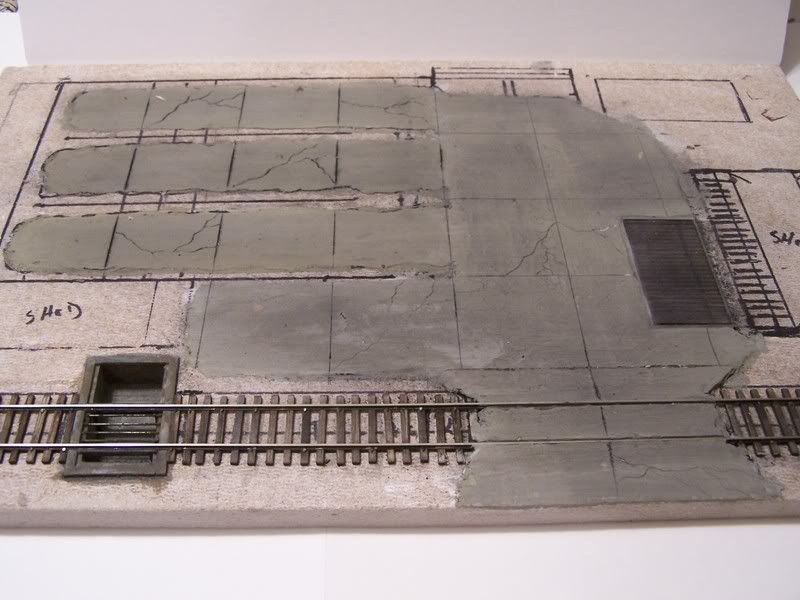
The first pic shows the building base, paved streets, and siding (track) installed:
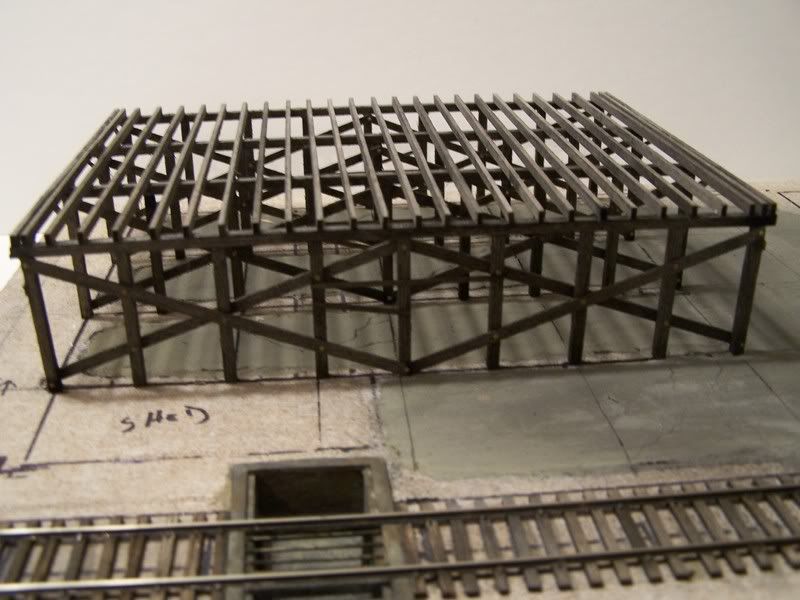
This next shot shows the support timbers in place:
These next two shots shows the main building. I added a company sign atop the roof as well as down spouts (not added on George’s model)
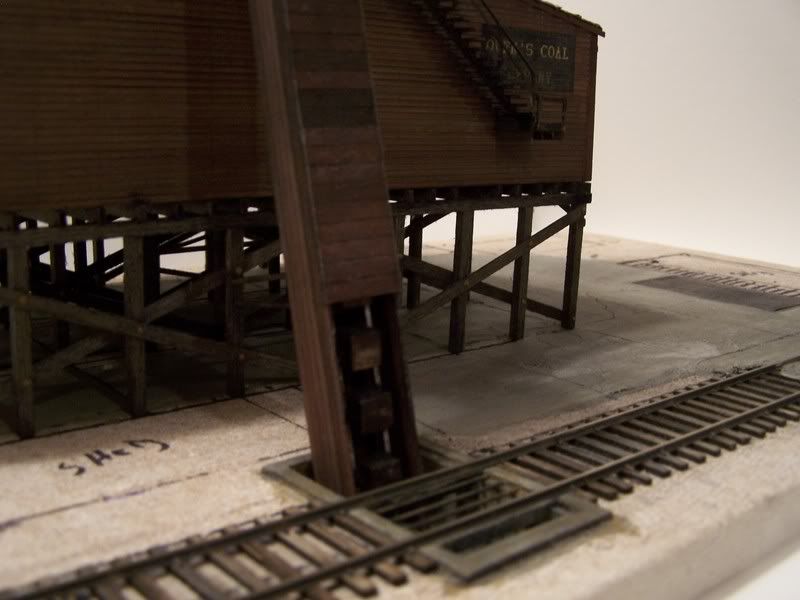
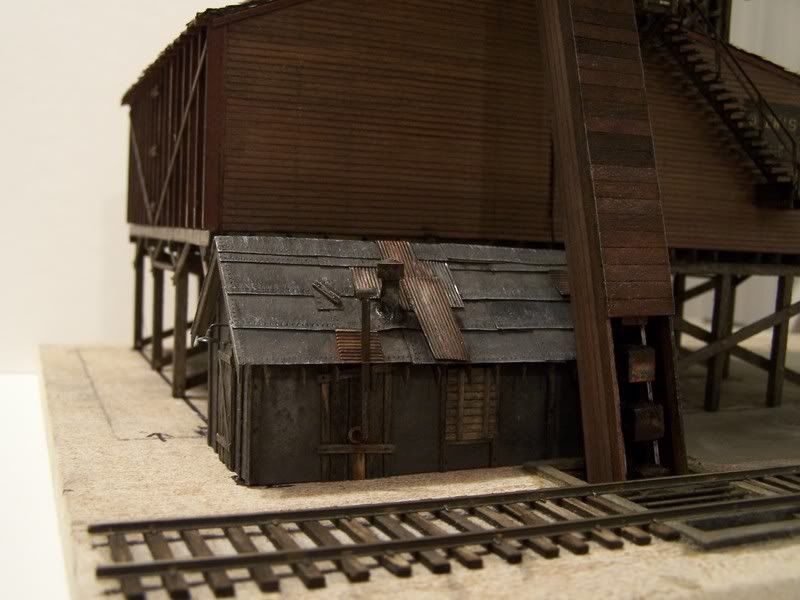
Here’s a close-up of the coal chutes. The chutes were formed using small blocks of wood, then lined with painted (black/rust) aluminum foil:
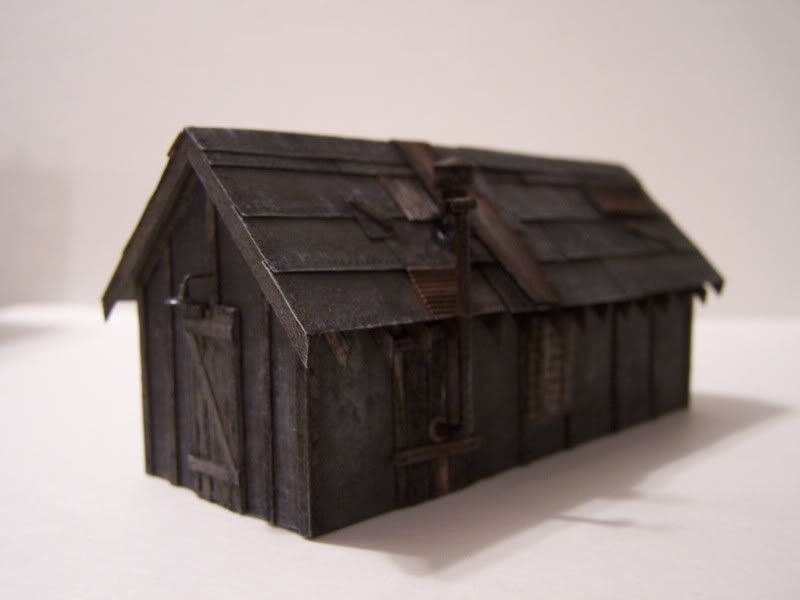
Here’s a detailed shot of the side shed, the “tar” paper was scratched using paper bag material:
This last shot shows where this small shed will go:
Today, I started the office and garage.
I’ll post pics of it when complete.
9/20/06:
The office and garage areas were completed this weekend. I also completed about 90% of the ground cover and scenery. Still to do are the power lines and the wooden fence that will run i
Wow! Looks great! What did you use for the pavement? It looks very realistic. You should really get your layout published in MRR magazine, at least in the Trackside Photos section. Very nice work.
That is so good. Where does it go on the layout or is it a diorama for another application.? I expected to see some of your work in one of the contests, but not yet. I do love the crinckly shingles.
The pavement was done using wall joint compound. Normally I would use “Durham’s” water putty, but I happen to have some compound on hand. The compound is a bit trickier to apply than the water putty. I found that it shrinks quite a bit, and will crack. I had to redo some of it to get a smooth finish. Once dry, I added the more prototypical cracks using a sharp scribe and a #11 Xacto blade. The pavement was colored with a mix of Floquils “concrete” and “reefer white”. I weathering the pavement using charchol powder followed by a coat of dullcoat.
Bob, thanks for posting these pictures. You always make me want to do better, though my skill level is somewhere between buying readymade structures and Lego… [:)]
Still, I always enjoy your posts and am forever looking for them.
I do have a question about Durhams water putty. Could you please explain how it is used, straight or mixed… just spread it thin, easy paintable, compatible with extruded foam (i.e. won’t eat through it like some adhesives will) etc.?
Water putty is used and mixed just like plaster. The only difference is that it won’t shrink, and will dry rock-hard. However, it is sandable so it works well for simulating paved roads. Another use for water putty is to simulate “stucco”. To do this, you simply stipple/jamb it on with your paint brush to form the uneven stucco look. This is how all my stucco buildings were done.
There are not many scratch builders out there today, and you surely have set a standard that I hope to be able to approach some day.
Can you share with us some of the detail on the techniques you use to scratch building structures, i.e. materials used, adhesives, planning, engineering, etc…
Bob, I have a question about the water putty, I have used it to make the parking lot at the Scoot-A-Boot and am very pleased with the results. I was wondering if you have ever tried mixing paint or something in with it to give it a natural color, that way if it does get a chip it wont be yellow. I have also used drywall mud with good results but it is a lot softer than the water putty. Thanks Mike
I have never tried to add color to my water putty mix. I like to control the color once it dries. In addition, I prefer my pavement to have an uneven look (as far as color goes) like the prototype. If a chip occurs, i just dab a bit of alcohol and ink on it in order to hide it. This also simulates oil dribbles / spills quite nicely.
The updated photos are great. Just goes to show how much the scenicking impacts the overall effect. How many hours do you think you have in this complete diorama? Will it be installed on the layout somewhere, or is it just a stand alone scene?
Bob, on building streets…or roads rather… and using the Durhams, how do you ‘contain’ the edges of the road or street, assuming it’s in an area where you’d want to do this? Not having worked with it I don’t know if you’d need some kind of edge such as tape. Do you just draw the street out, put the putty down and it stays… or what?
To layout your roads, you draw in the boundry lines directly on your layout surface. Then you apply the putty using a small small foam brush. If you allow the putty to harden somewhat before you pour it, it can be controlled fairly easy. Smooth the putty surface the best you can with a (water moistened) foam brush. Don’t worry if it doesn’t come out perfectly flat. The next step (once dry) is to sand the roads with #240 grit paper. This will give you a nice smooth and level surface. BTW, you want a 1/32 to1/16 inch thickness. Once sanded, vacuum the area clean. The next step is to add paint. I like using a mix of floquil’s concrete and a bit of white, or aged concrete mix with concrete. Once dry, scribe in your expansion joints (two inch squares for HO) and add any cracks using a sharp scribe and/or a #11 Xacto blade. The final step is to weather your roads. I use plain Bar-B-Que charchol powder. (take a piece of charchol and sand it to form a powder) Apply the powder using a soft brush. You’ll find it easy to move the powder around easily. Once you achieve the results you’re after, seal it with a mist of Dullcoat.
Simon:
The diorama was designed as a stand alone model. So far, i’ve spent aprox 3 and 1/2 weeks on it. I hope to have the project complete by this weekend. When I saw the ad for this kit, I thought to myself, this would make a great scratch building project. As it turned out, I was right. Its been alot of fun so far…
The antithesis of the ready made structure from Walthers. This is what sets a model apart. As I have grown in the hobby, I have become increasingly aware of seeing the same models over and over in MRR articles and on display layouts. It has started to bother me and so I find myself being more and more drawn to kit bashing and scratch building. Your model here is truly masterful work and something to aim at. Thanks for sharing.