What are some of the materials you guys use when scratch building? I know styrene is the popular choice, but what other materials have you used with good sucess?
Ed
What are some of the materials you guys use when scratch building? I know styrene is the popular choice, but what other materials have you used with good sucess?
Ed
I’d take a stab at answering by first asking two questions – what kind of kits are you most familiar with, wood or styrene? And, scratchbuilding what?: a structure (or part of one), a piece of rolling stock, a culvert, a bridge, a road?
I am most familiar with plastic kits for structures and rolling stock, as well as kitbashing plastic structures and rolling stock, and thus I find I am most comfortable working with with styrene. My largest scratchbuilt structure so far is a 4 unit apartment complex, and styrene was the obvious choice so that I could easily use commercial styrene brick sheet as well as clapboard “aluminum” siding sheet, windows, doors, gutters/downspouts and shutters (so in the opinion of some it is not truly scratchbuilt at all, but that is a different tussle).
When crafting the various pieces I “pretended” I was creating the parts to a kit, and the working drawings I created first rather resembled instructions to a kit (poorly written instructions I have to admit. And rather poor drawings as well.)
I have to say the “score and snap” capability of styrene is so efficient and nice to work with that I can easily understand those who work only with styrene. And I admit that buying an entire Plastruct “point of purchase” display of styrene shapes and strips at a hobby shop’s going out of business sale for $15 means most of what I need is already at hand.
I have also built a few wood kits and have scratchbuilt portions of structures and rolling stock using wood, mostly basswood, sometimes balsa, but also the leftover stuff from laser cut wood kits which I assume is micro plywood (not the easiest stuff to work with by the way, but it’s free … kind of). However I found it harder to approximate kit parts when working with wood, again perhaps due to my lesser familiarity with wood kits
I pretty-well stick with styrene (sheet, strips, and shapes), and metal (wire, strip, shapes, and sheet), and, since most of my work is not, in the original definition of scratchbuilding, true scratchbuilding, commercially-made castings in metal and plastic.
At one time, wood would have made the list, too, but I much prefer the materials listed above.
That said, a couple of nights ago, I was about to continue work on a freight car project and while searching for related materials, re-discovered a supply of stripwood.
Like a stupid cat distracted by a laser pointer, I forgot about the freight cars and spent the next nine hours-or-so constructing a lumber load for a boxcar. It’s no wonder I don’t get much done on the projects on my to-do list! [banghead][:-^]
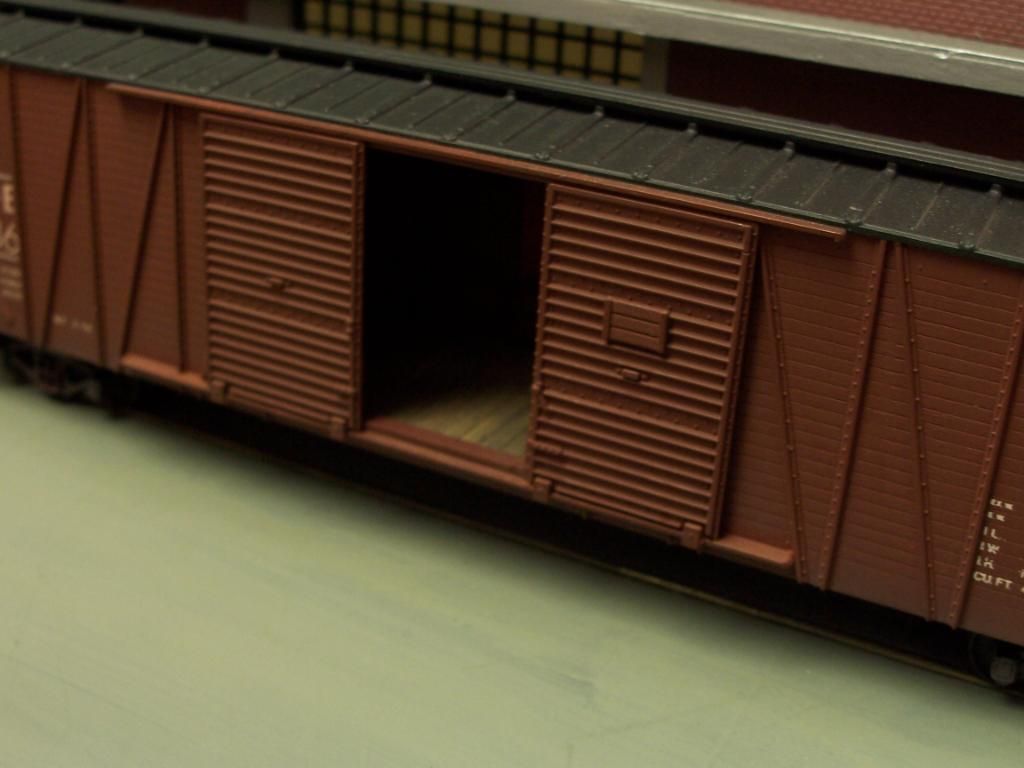
Here’s a car similar to the one for which I created the load…
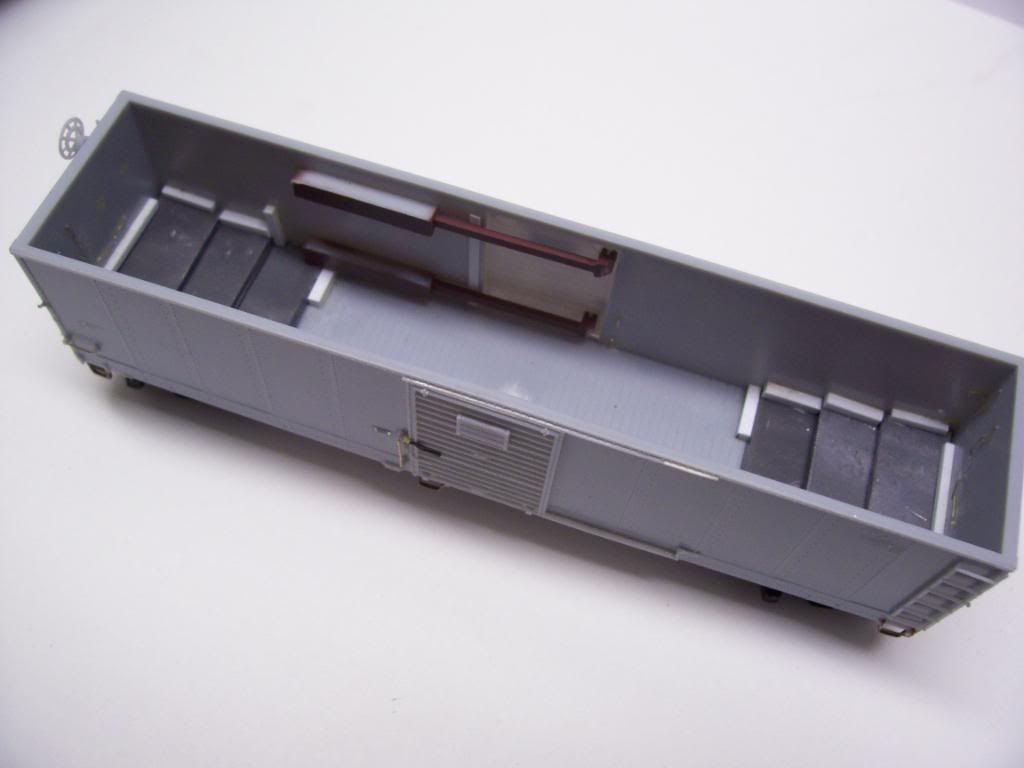
Building the load was simple enough, but making it fit while allowing for the door-operating mechanism took some thought. Here’s a different car equipped wth the same operating equipment (McKean and Front Range cars, as far as I’m aware, introduced this type of system, but with only one sliding rod-and-guide for each door). I had lots of such parts left-over from those kits, so used two per door…
Here’s the loaded car, meant to represent one that’s about to be unloaded. Looks like it got some rough handling en route, as the load has shifted somewhat…
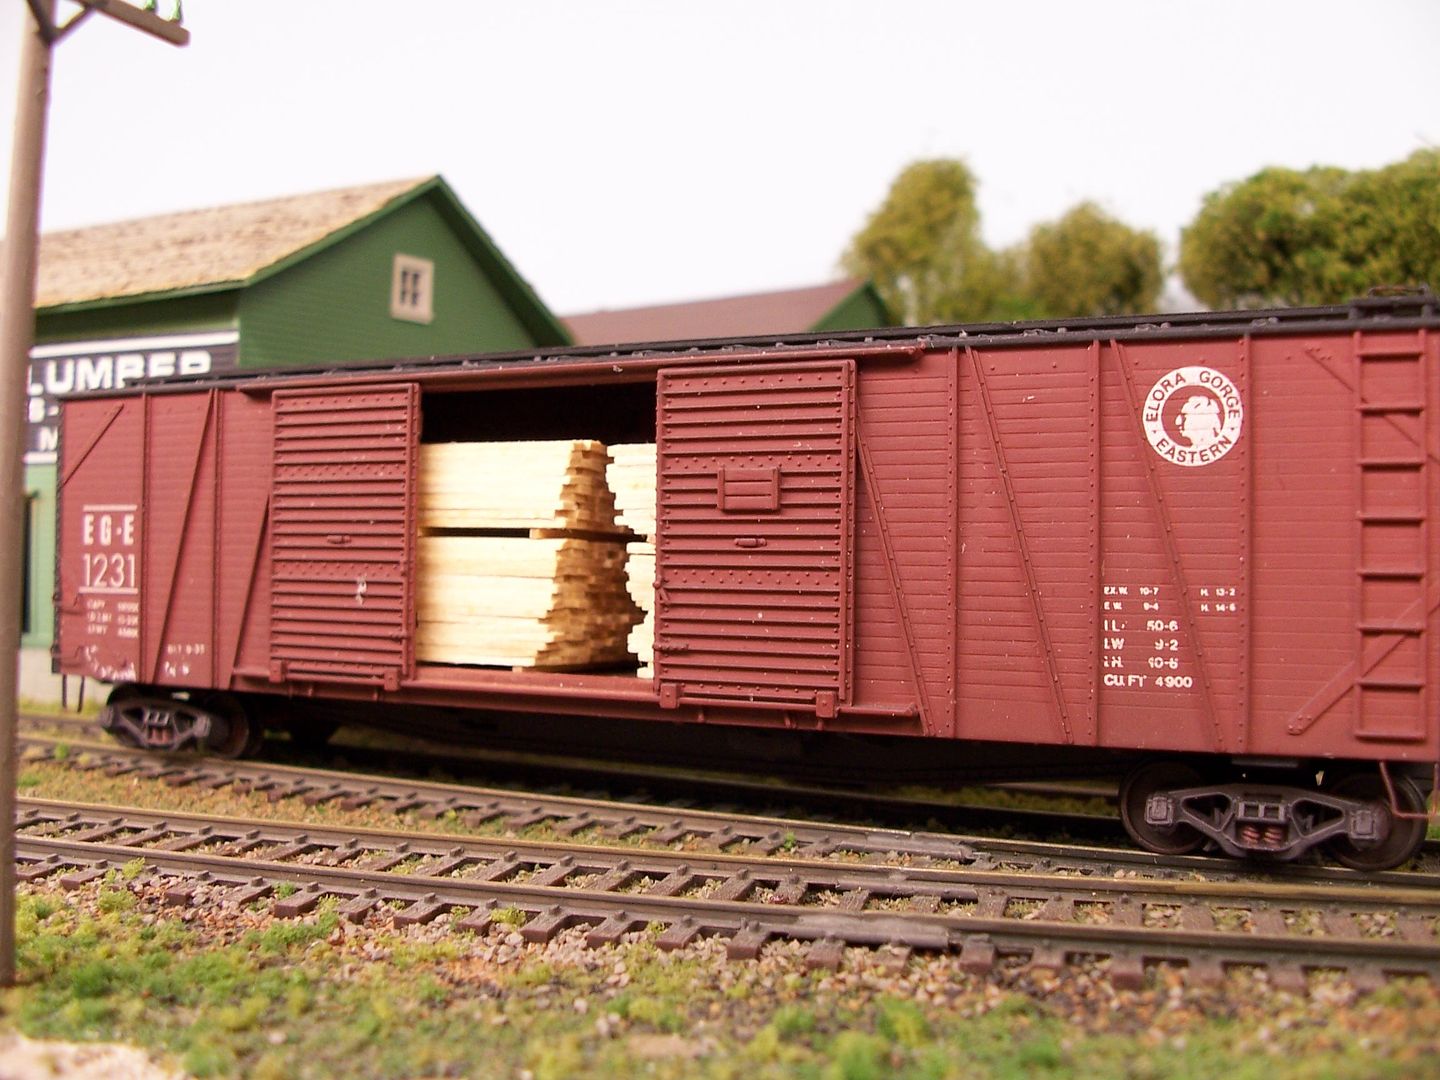
With the lumber in-place, those doors cannot be closed, but on a point-to-point layout like mine, it travels with the closed-doors (on the other side of the car) facing the aisle.
The load
I will respectfully disagree with that statement.How would anyone achieve a skill without "learning as you go’’
To the OP question; I build mostly structures and some equipment,truck bodies,farm equip.
I use styrene,all shapes and sizes. Wood,stripwood,milled sheets, and some I make myself. And paper, from tissue to matboard.
They all have thire own pros and cons, and characteristcs,witch will yeild different results. Some of my builds incorperate all three.
I suggest you dabble in all of them to see witch one will work for you.
I recall reading somewhere, of a guy who built a small simple building outof each material just to see the difference.
I use all of the material above when I’m scratch building. My norm is building pre 1950 homes from basswood. For other structures not so much wood, mostly Styrene. Lots of Styrene strip, rod and tubing.
For signals my primary material is brass and solder.
I also do a lot of Hydrocal and resin casting. Great for detail parts, concrete and brick walls.
I haven’t done much scratch building of rolling stock, mostly kitbashing with Styrene.
Mel

My Model Railroad
http://melvineperry.blogspot.com/
While I have far more experience with styrene, I committed myself to working with mainly wood for the last year - and I’m really enjoying the change.
One way to gain some traction in scratch building is to build some older kits like the Ambroid line. They can be found at shows for $5 to $15, and contain most of the materials you will need. You’ll work from basic plans, cut and sand wood to fit, use basic tools and bend wire for brake lines and handrails.
Painting or staining your model along with decals and added details to complete it will add or improve your skills along the way.
Same process with a structure craftsman kit or two will set you up for success on your first true scratch built model.
I suppose the original question wouldn’t have been asked if the OP wasn’t a beginner. If my supposition is correct, after you’ve taken your best guess at the material choice, I recommend starting with some simple projects.
My first one was a small “spring shed”. It was to represent a very small log-cabin style building. I chose balsa because I wanted to carve the log forms into the wood. I puzzled out a door and a roof. Since it was obviously a homemade building, any error on my part actually contributed to the authenticity. Well, up to a point, anyway. And, of course, since there was so little time and effort in the project, if it didn’t work, I could toss it and start over. But it did!
My next building was (naturally) a bit fancier. It was a three sided storage shed (one side open) for a roofing contractor. There was actually a prototype. It had board and bat siding, which I built myself. Carefully. And I covered the roof with carbide sandpaper. Which looked OK, but maybe was incorrect-ish. But still, the overall form was pretty simple. No doors. No windows. It, too, came out looking pretty good.
I think I’ve made my point.
Ed
Hi Ed,
Welcome to the wonderful world of scratchbuilding! You will have a ball!
Most of my structure scratchbuilding is done with styrene. It is easy and quick to work with and there is a huge variety of different sheets, shapes and strips available. However, I don’t hesitate to use whatever other materials suit the project. For example, I like to use wood for wood floors, coal trestles, older loading docks, etc., even though some will argue that the grain in real wood is way out of scale. To me, nothing looks better than a real wood floor if it is being stained as opposed to painted. I have also used real pine slabs that I cut myself to construct some buildings.
There are lots of things that are lying around the house that can be used. For example, I use the paper from manilla envelopes for rolled roofing. It is thick enough that the seams stand out just enough that they can be seen. Some people use fine sandpaper for roofing which also looks good, but it is a pain when it comes to getting the dust off.
I also use brass and phosphor bronze. The little HOn30 switcher engine in my avatar is scratchbuilt from brass sheet using a Bachmann N scale 4-4-0 steamer as a donor for the drive system. I use phosphor bronze wire for things like hand rails as opposed to brass. The phosphor bronze wire is stiffer than unhardened brass wire so it withstands handling much better, but it is also easy to bend and it solders beautifully.
By the way, I don’t hesitate to call my work ‘scratchbuilding’ even though I use lots of manufactured bits like windows and doors. I think that the argument that using those things isn’t real scratchbuilding is out of date and far too snobbish.
Please tell us what it is that you want to build. We will be happy to help.
Cheers!!
Dave
I did one build, that was 100% scratch,doors windows roofing ect. Just so I could say ‘‘I did it’’
But why work that hard, at that point it was no longer fun. When for a few bucks I can buy very nice window and door castings.
As Dave said, snobbish
Gidday Ed, welcome to the warped world of scratch building.
Well, I’m also going to take issue with Dave’s statement, so it just goes to show that there’s a first time for everything.
The basic question is, why does someone scratch build in the first place? The simple answer being, in my opinion that the item the modeller requires is not commercially available.
Therefore “learning as you go” is the only path available to those who need to scratch build. This is not to say, that one ignores the great “tutorials” on the forum, YouTube, etc, but reading/watching others scratch building efforts is not going to actually build your required item. You (read I) have to leave the comfort zone and make that first cut.
I’ve linked to two rambling threads, one of my own and one, I hijacked, in which I tried to explain my philosophy, which is to offer encouragement to prospective scratch builders, such as yourself. Join in, it can be very frustrating when things go wrong, but when you get it right…
I’ve done one of each, styrene and plastic. Both simple structures, styrene mulitplex outhouse:

And a wood loading dock

I suppose building kits was somewhat useful. I recommend starting with something small as you learn about making square corners an installing support to prevent warping.
No argument with your statement – unless you scratchbuild the same thing over and over then each example of scratchbuilding of course involves learning as you go, but as I thought I made clear, what I was saying is that your first scratchbuilding experience should involve a material you have already worked with (and learned from) to some extent in another context, such as kits or kitbashing. If you have never, ever worked with wood, but have worked with styrene, then I’d go with styrene for your first scratchbuilding attempt. If you have never soldering anything before in your life, even feeder wires to rail, then I would not suggest scratchbuilding a brass locomotive as a first project.
Dave Nelson
Here’s a LINK to a very simple scratchbuild in styrene.
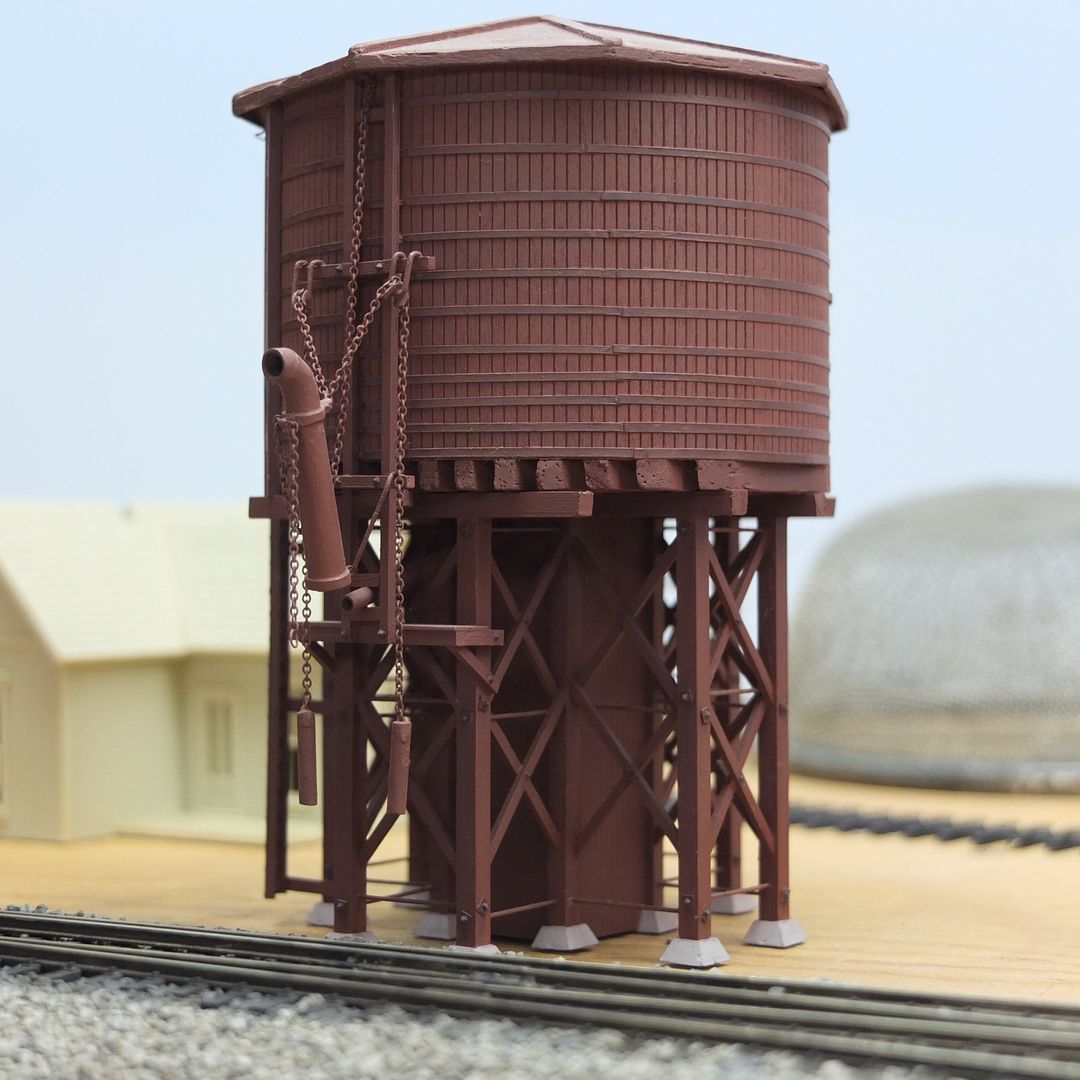
Pretty-well all of the materials are readily available (though scratchbuilding lends itself well to improvisation, both in materials and methods), and the same techniques can be applied to larger structures, like these…


Wayne
Thank you all so much for taking the time to reply. I guess I should clarify one thing. My thought is what are you using to create structures? What I am struggling with is “what can I do to make them look more real and not like plastic?” Thanks, Ed
Well, if you make them out of wood, they won’t look like plastic. They can still look not very good, though.
Whichever material you decide on:
Do a good job of assembly. Make everything properly squared away. Don’t be sloppy.
Use good components. Especially for windows and doors, you want the parts to be very finely made.
After the above, it’s all paint and weathering. Do a good job of each. If you use wood, you almost always should paint everything with a coat or two of sanding sealer before the color coat, separated by sanding. If you use plastic, you don’t have to.
It sounds like you haven’t built anything yet, as you provide no examples. Your first attempts probably won’t be so great. They’ll get better if you analyze your mistakes and correct them. As I said earlier, pick something that looks easy to start with.
Ed
Well, if you’re not satisfied that paint can do that job, you could use whatever material would have been used on a similar real structure: form your scale bricks from clay, then bake them, and lay them with real mortar. I doubt, though, that that technique would be all that convincing, at least in HO or smaller.
Real wood, in my opinion, doesn’t do that good of a job looking like scaled-down wood, so you’re on your own for that one. Painting may help, but you’d need to seal the wood to hide the unrealistic grain and so that it takes an even coat of paint all over - by the time you’ve done that, it’ll probably look like plastic, too.
Metal? Yeah, you can get all sorts of metal with which to build stuff, like bridges, but after you solder (or weld/rivet, depending on the type of metal) it all together, it’ll still need to be painted, just like the real ones were. Would a visitor to your layout recognise it as one scratchbuild in metal, or simply ask whose plastic kit it was?
Perhaps the structures in the pictures which I posted aren’t battered enough for your tastes, but I’m not sure it would make them look any less plastic.
Offhand, I can think of only one wooden structure on my layout, and only 3 or 4 with any major amount of metal in their make-up.
Wood (mostly)…
Metal roof…

Metal roof…

Metal roof…

<
I think that perhaps what you really mean is you want to make your structures look less toylike. There are a couple of things that will make your scratchbuilt structures (or any structures for that matter) look better than the unpainted plastic kits.
The first is the paint job. If you study Wayne’s work for example, you will notice that he doesn’t use just one colour to paint a boxcar or a roof. There are subtle differences in the shading and weathering that make things look much more realistic. For example, if you look at the rivet lines on the sides of most of his boxcars you will see that they are ever so slightly darker than the surrounding paint. The effect is not obvious but it still gives the impression of a car that has been in service for a while and has accumulated some ‘grunge’. It is not overdone.
You can do something similar on your structures with a wash of heavily diluted India Ink. I repeat, heavily diluted! Start out with just a couple of drops in a few ounces of distilled water with some alcohol to break the surface tension. You may have to make several applications to get the effect that you want. Don’t make the mixture too dark. It is easy to add another coat but it is much harder to take one away.
India Ink is just one example of how you can add depth to your models. There are lots of other methods like using pastels.
Wayne’s boxcar seams are done with an airbrush and some masks, but the India Ink wash can be applied with a brush on your structures. The wash will add depth to the model by creating ‘shadows’ in the details just like a real building in natural light would have.
By the way, if you don’t have an airbrush you might consider investing in one. They don’t have to cost a lot of money. You can paint a much straighter, cleaner line with an airbrush
Hi guys,
I really appreciated the input. After a couple of months of trial and error, I came to some conclusions and why some my kit projects didn’t come out so well:
I think I really need more workbench time before tackling any big project. Just another case of trying to run before I can walk!
Ed
Hi Ed,
There is definitely a learning curve to doing this stuff well, but the good thing is that you are already well into that learning curve. You are fully aware of what you need to improve on. That is great! With a little patience and some more practise you will be quite capable of tackling bigger projects.
I might suggest that, if you are unsure of how to do any particular task, then ask us! Maybe post some pictures of what you are working on. As you have discovered already, there are a lot of talented people on the forums (and some rank amateurs like me) who are all too willing to help.
Dave
Thanks Dave