Some time ago, how long exactly is hardly important, I posted a message expressing my interest in scratch-building a model of Point of Rocks. Since then, I acquired a set of plans I found on eBay which are good but the rear wall is missing! I’ll work on that later. Aside the imperfect but still very useful plans here are other observations and comments. This is no snap-together project and I’m going to compromise here and there. For one thing, no one makes windows, that I know of, that are accurate for this model so I decided to try some Tichy windows that were approximately the right size, and though I am not to picky about size I am picky that making them arched like the real thing has been quite a pain, so I am going to compromise again by cutting the windows out of the plans super carefully, or make photo copies, mount to acetate and have them recessed in the walls.
For brick sheet, I first picked up a couple sheets of Plastruct brick sheet and found that I am not the happiest with that so I am going to try Clever Models printable brick and stone sheets.
Cutting out window openings looks kind of tricky, I first tried drilling holes then scribing between each line and snapping them out that way. I think if I work on refining that method I should make progress.
Shingles are something else I am still figuring how to make happen, I’d love it if I can find dark gray slate shingle paper sheets that roughly match. For my module, since I am not modelling Point Of Rocks I am just building a station inspired by the real thing for an N&W layout (I don’t care if it’s a B&O station, it’s one of my favorites).
A couple times when it seemingly took me a long time to get a few parts cut out I took a breath and reminded myself I am on no deadline to finish this model, it’ll be done when it is done, though the more I do the more accomplished I feel. So far, I have just cut out a few of the wall sections. If all else fails, at least it is a learning experience and I do hope
You are absolutely right. Scratch-building IS fun! [Y] I’ve only done a few small scratch-building projects: A watchman’s shanty, a picket fence, exterior light poles, and a simple ball signal and complex ball signal. It’s obvious that they are far from perfect and I want to refine the fabrication process. However, I really have enjoyed researching, designing, and putting them together.
As terrific as some of the new kits are that are currently available on the market, I agree that it’s great to have some unique items on one’s layout because you have either scratch-built it or kitbashed it yourself. That’s what sets your layout apart from everyone else’s.
Keep at it, Alvie. I would enjoy seeing some of your progress when you have an opportunity to post some pics.
I use to follow Allen and Moore. That was a different era of scratch building. They did not have near instant communication with others like we do today. It was telephone, that big black thing with wires coming out of it and snail mail. They got their ideas from magazine or newspaper articles plus photos they probably took. No doubt they spent a lot of time doing research about the project.
We will never know how many times they re-did a project until we saw the final one.
Today we have a lot of material they did not have and probably expect to have the same results.
I see questions like, how do I scratch build something? It looks like some want to scratch build something the first time. Scratch building takes a lot of time and patience.
The ability to scratchbuild unique items for one’s layout is not only highly enjoyable, it’s a basic aspect of what goes into making one a true model railroader, rather than just a collector of commercial models.
I’ve been scratchbuilding from basic wood sheets and shapes for decades and over time the pursuit has become ever more enjoyable and statisfying. Scratchbuilding takes the hobbyist from the position of thinking; “I wish I had one of those (whatever) on my layout” after seeing some car or structure elsewhere, to knowing that they always can have it and it will be as a result of their own skill and creativity. You don’t get that with out-of-the-box RTR!
By example:
Concerning the creation of window openings and windows with curved upper portions, I always approach such by rough cutting out the wood, or brick sheet, wall about 1/32" inside the lines for the correct final opening size. I then use my selection of curved files to work the opening to the final dimentions. Employing a standard rectangular Titchy window, one can add a curved top by forming Plastruct stock to a small curved template, attaching the formed piece to the commercial window while still in the template. Any curve brickwork above the window is made with a small strip if sheet brick with each brick cut about half way free, allowing the piece to flex and conform to the arch.
Alvie: Keep on Scratch-Building. I don’t know if this will be helpful on the windows, but with in the last two years RMC magazine had an article on scratch-building windows. I love scratch-building and kit-bashing of structures and freight cars, cabooses. I have only a few customer that want a kit built as pictured on the box. If you want excellent back drop buildings, use the Walthers kits. With the components rearranged you can come up with buildings 18" and longer, 1 1/2" deep. Again, keep it up!
Two suggestions: plot out where you need the windows, and drill holes one next to the other, inside the window outlines, sort of like the perforations on a sheet of stamps. When you have done this all around the outline, cut out the openings, and file the edges to the outline.
Or…
Plot out where the windows go, and use a nibbler. Drill a hole to accommodate the tool, and use the tool to “nibble” the material to the window outlines. I got mine from Radio Shack; I’m sure Micro-Mark carries them; look around.
I’ve done a fair amount of scratchbuilding; I’m a model builder and not a model railroad operator. Some commercial kits are of interest to me, but I don’t really have an interest in paying several hundred dollars for one, as I know I can do a reasonable facimile on my own.
Case in point:
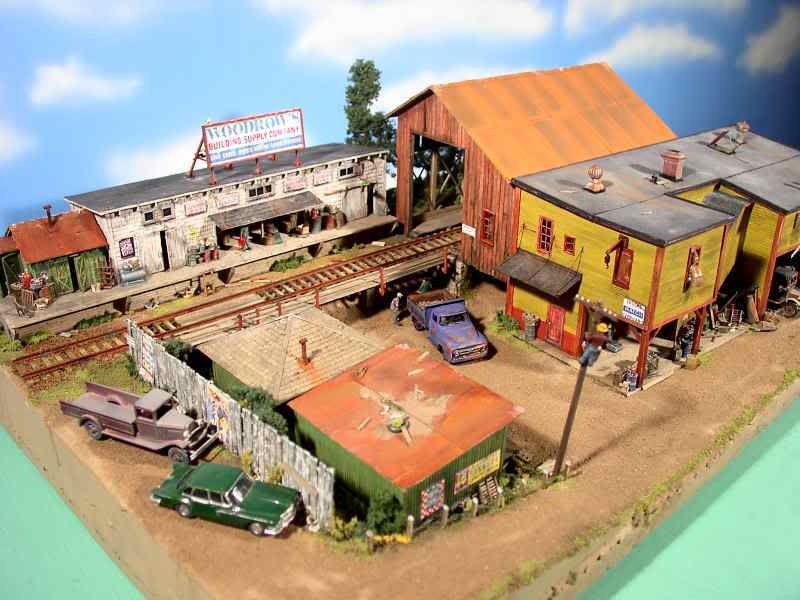
This is my version of the Fine Scale Miniatures “Baxters’ Building Supplies”. I keep a fair amount of scratchbuilding materials on hand, and was able to make this diorama with what I had on hand. Not a exact copy, but fairly close. I used photos from FSM ads in magazines and those on their website to guide me.
If you have not already purchased your brick, Walthers make very nice brick panels. They have much sharper detail than the Plastruct stuff. They are also thick enough to stay straight without tons of internal bracing.
I have always wondered how you take scale drawings and apply them to brick sheet or siding or what ever wall type is going to be used for the project. That always confused me.
One way is to make a photocopy and cut them out and glue them to the back side of the material. Rubber cement allows you to peel them off after you cutout the part.
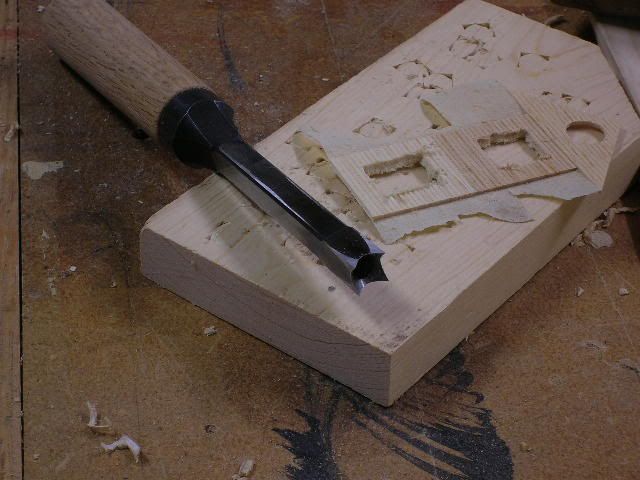
Regarding window openings, I’ve found a method that works well for me. I take old hollow chisels (used in woodworking mortising machines), sharpen them with a cone shaped stone in a dremel tool, and drive them through the sheetstock with a mallet. Here’s the tool (I added a handle to it):
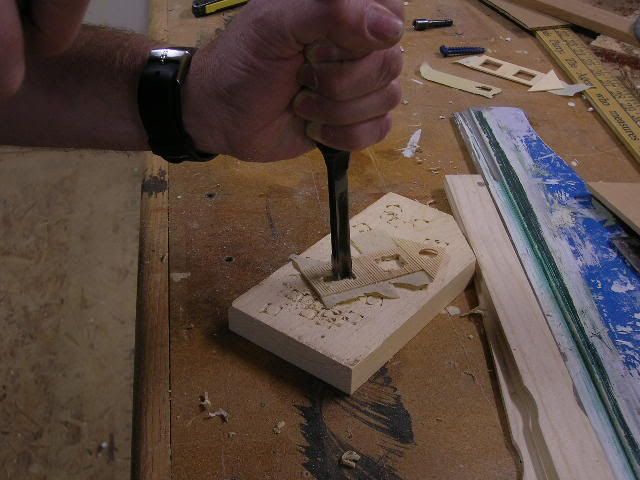
and this is it in use. I find that it is best to drill out the center of the opening to allow relief for the chips as the chisel passes through; also, masking tape on the back side helps keep the wood from splitting:
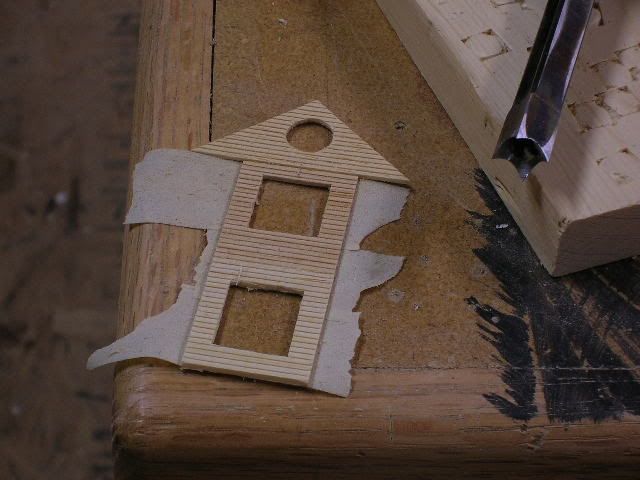
Here are my results using this method:
My guess is that the method would also work with plastic, but I haven’t tried it. The chisels can be purchased new, but they aren’t cheap (about $35 each). If you know a woodworker or a shop teacher and let them know that you want their old hollow mortising chisels, you may get them for free. They come in sizes ranging from 1/4 inch up to 3/4 inch, in 1/16 inch increments.
Micromark used to market a tool that works similarly, but it’s just an L shaped chisel, so each window opening requires 4 cuts (one in each corner).
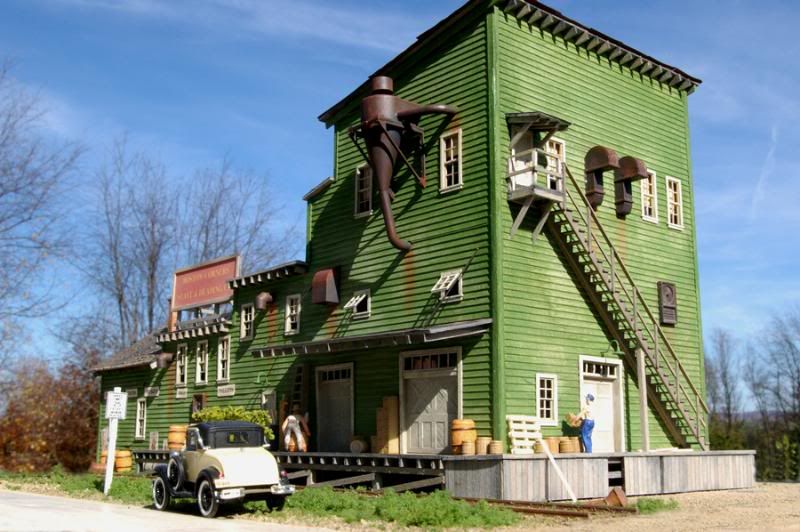
Scarpia, the car, people and the barrels, too, are commercial. The windows in the structure pictured are Tichy’s, but I have made my own examples - about as delicate as the Tichy ones - when I’m not in a hurry to finish up a model.
As to applying adhesives, I commonly use canopy glue to bond my wooden models, often applying it by dipping the tip of a fine straight pin in a small drop of adhesive and touching the pin to the item to be glued. This gives extremely fine control in the application.
Likewise, in using glue applicators like the Micromark one, between glue applications I stick an appropriately sized straight pin (ones with the bulbous ends are best) all the way into the end of the glue applicator’s needle to temporarily seal it. Depending on the adhesive used, it is only necessary to clean the pin off occasionally and the applicator it self remains free of clogs and drips.
Specifically, I use Formula ‘560’ Canopy Glue, manufactured by Pacer. It is superior to any other adhesive I’ve tried for model building of all sorts. It can even be used to simulate window glass in such as Tichy windows when applied properly. In that application it is similar to, but much better than, the MicroScale stuff.