Hey everyone, ive been searching through old threads trying to get some information on this, but I can’t seem to find anything detailed. I want to know more about soaking cork to lay curves. I’ve read people saying boiling water, others just warm water.
Anyone here do this? And how long should you let the cork soak for before laying? And do you have to lay IMMEDIATELY following soaking, or can you let it dry at all? I’m using foam as my subroadbed, and worry about the combination of latex caulk and foam with wet cork.
The only purpose of soaking cork that I have ever heard of is to remove old ballast and glue. I can’t see where soaking cork would serve any other purpose unless it is really old, dried out, and brittle; and if I had cork like that, I’d buy new or use Woodland Scenics foam roadbed.
I remember hearing a long time ago that you were supposed to even soak new cork, but I never heard a good reason WHY you should do it. I’ve never soaked mine. Probably wouldn’t work very well with using latex caulk to hold it down.
Corks so cheap, don’t know why anyone would chance using old dried out stuff.
Funny you should mention this. I also read ages ago about soaking cork and as I’m building my new layout and I thought I had better check it out. I’ve never soaked cork and found no reason to either, so down it went, as it came, no soaking. Served me very well last time. I’m happy as it is.
I use sheets of cork that I cut into strips. To go through curves, I cut half way through staggered on each side at about 3/4" intervals. I cut in slight angles on the inside curve so it will curve. I use PVA to stick it down held down with as many one year bundles of MRR as it takes. I then sand it with a block along the top and along the edges to get a continuous flat surface and eased edges for latter ballasting.
DeadheadGreg, it is always a little difficult to admit denseness-between-the-ears but I’m having a little bit of trouble understanding just what you are talking about in your topic.
You can’t be talking about cork roadbed because it is designed to bend once you get it split and reformed to roadbed profile; I’ve brought N Scale cork down to less than 10 inch radius. If, on the other hand, you are talking about sheet cork then what you need to do is jigsaw you some templates of appropriate radius, lay it down on your sheet cork, and knife away.
I did find an old thread on this Forum where someone reported that when they bent their cork roadbed to a very tight radius, it cracked. There was speculation that the cork might have been old and brittle. Or it might be that the curve was just impossibly tight. In any event on that old thread someone did suggest soaking the cork in hot water to make it more pliable.
Under ordinary circumstances, with regular cork roadbed and something resembling normal model railroad curves, it should not be necessary, and anything that introduces moisture into the layout poses a degree of risk.
What I mean is soaking cork to make it flexible so that when you lay a curve, it doesn’t buckle up anywhere due to its inability to lay flat while curved. I know that you split cork down the middle to lay it; i’ve also heard people talk about soaking it to get the pieces to just simply fall apart from each other. The soaking apparently is to take place of cutting halfway through on one side and taking out a little bit so that it has space to move into when you curve it; i don’t know the correct term.
i used cork on the layout my dad and i built when i was younger, but i don’t remember how it all worked out.
The “soaking the cork roadbed” story has been around for years.
It may have been, back in the day, that the cork bed was not as flexible as the “rubberized” cork bed we are used to using today. So you had to soak the cork to make it pliable.
I have some cork sheet that my parents had for furniture inlays that’s probably 55+ years old. If you look at it funny it crumbles.
Thankfully, they don’t make cork like they used to.
Rotor
edit: Just noticed that was my 500th post. [wow][swg]
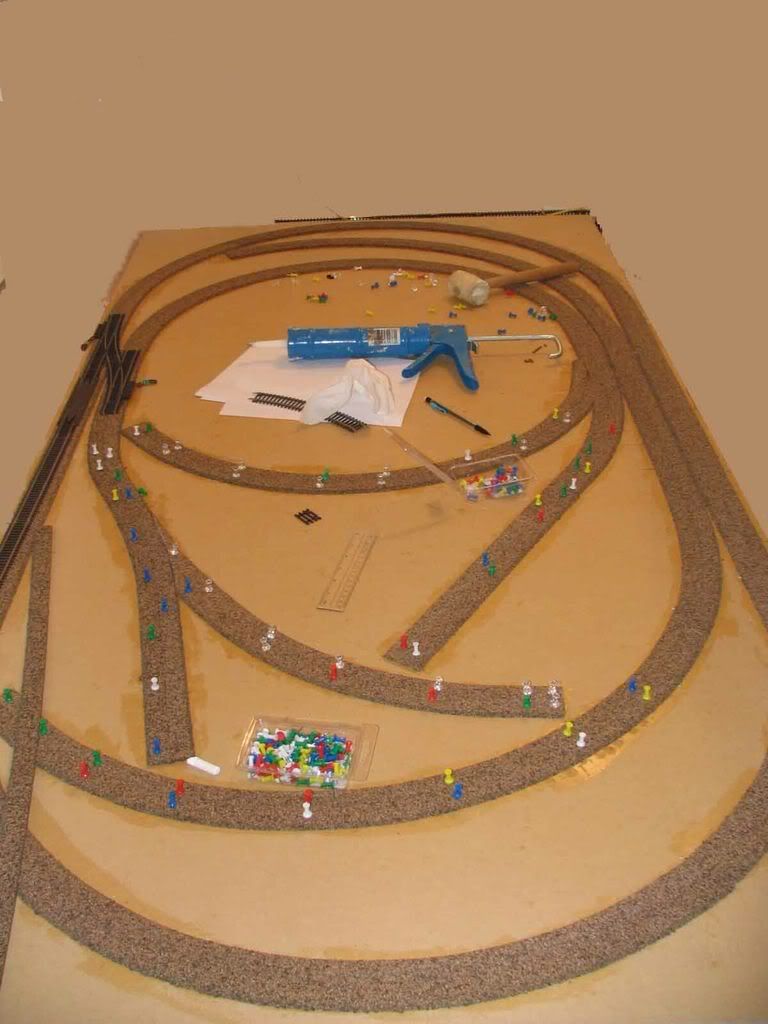
Barry, you certainly are making it hard on yourself. I am not quite sure why you would go to this trouble rather than laying roadbed cork designed for the job. I set down and glued more than 100 feet of this in an afternoon. The only time consuming part was tapping in the push pins to hold it in the curves on the latex caulk I used for glue. No sanding required either.
Greg, there is no way that roadbed cork buckles, or cracks when set into curves as tight as 15" radius or more. Never had a problem. Not sure what info you got ahold of.
Okay! Somehow or other this apparently slipped past me in the darkness. I have heard of ‘old’ cork getting brittle but all I ever remember hearing about concerning repairing it is to chisel it up and relay your trackwork.
Well, this layout is going to be my last and I’m going all out to make sure my trackwork is bullet proof and long lasting. Maybe it’s me, but laying cork this way, I’m making sure everything is really flat and the right of way is as perfect as I can get. So far, it’s looking VERY good and my trains are running perfectly on what I’ve laid so far. Anyway, I have the time to do it like this.
There was a while in the late 1960s when Atlas seemed to lose faith in cork roadbed, perhaps because of the brittle qualities mentioned above, and offered a line of rubber roadbed. I bought some and one difference was that it was not split down the middle – so a bit tricker to lay to the curve you had penciled on the benchwork. Years later it was still fairly flexible. I remember how funny it smelled when it was new.
Curiously enough, roadbed was just a little thicker back then too.
hmmm… interesting. my only concern is that when I go to lay a curve, the inside part of the cork will ripple up and down because that side is being compressed, and the cork has no give or any place to go, if that makes sense. basically i don’t want it looking like that tongue thing people can do where they make like 3 ripples with it haha.
i bought latex caulk… do I need a lot of it, or is a thin spread of it fine? I have a putty knife that I’m going to use and a bunch of push pins, so I should be all set.
Are you using Mid West cork roadbed? You do know that the 2" wide roadbed that’s square on the edges is meant to be split down the middle at the “perforation” right?? You break it in half and it gives two 1" strips that have 45 degree angled shoulders on them. These are the edges of your roadbed. You don’t lay it down as a whole 2" wide piece. It won’t bend around your turns that way.
If your making your own roadbed from sheets of cork, you need to make your strips around 1"+ wide and lay 2 of them side by side and sand an angled shoulder on the edges.
in my case I cut it into strips the width of the track for the straight sections and then cut these in half for use on curves. a half section was layed along the track centreline mark on the plywood. I found that the cork had to be stretched a little to make it lay flat and not have the little bumps that you mentioned. I used white glue to stick the cork but also used small nails to hold it in place while the glue sets and removed them later.I have also used the same method just using the nails and not glueing and it worked just as well.
if you do have any bumps etc just sand them off.
I didn`t bother making the strips wider and sanding a slope on them as I just use a little more ballast
The cork bends and stretches so the ripple effect you fear simply should not happen with any kind of normal curve radius. As to latex adhesive caulk, I spread a bead smaller than the diameter of a pencil down the length; I spread it the width of the track using one of those “your name here” plastic credit cards that comes in the junk mail. It really only needs a “film” of the adhesive to hold the track in place – the latest MR shows how to do it in fact and they use a small roller as in for wallpaper to push the track down into the caulk.
I find the credit card accumulates caulk which I then use for the next piece of track.
I nail my cork roadbed down, I use Midwest and I’ve never had it kink or ripple even on tight curves. The only time I ever heard of soaking cork was way back in 70’s when you had to soak it to make it pliable enough to bend.
Barry, as long as it gives you peace of mind, lay cork any way you please.
Greg, here is a shot of the central panel of my first layout. Those curves are 15" (as tight as you would want to go) and 18". There is nary a ripple and no need for weights…filled soda pop bottles etc. etc. Only a push down with my thumb and I tap it along the length with a rubber mallet as I put in the push pins. It is still perfectly level and hasn’t moved in any noticeable way now that it is in use.
Just use a bare skim of acrylic caulk for glue (use the clear kind unless you want to paint if for some reason. It goes on white then turns transparent). When I spread it, I can still see the pencil line down the center of the roadway…that tells you how much to use. And, of course, it is handy to still be able to see that line…especially when laying the curves.
In fact, when I had the opportunity to remove some after a year when expanding the layout it was a very tightly stuck down.