I’m building several blocks of a downtown urban layout using a few dozen 5+ story City Classics, Lunde, DPM, and a few Bachmann buildings. I want them snugged up close as they would be in any downtown, clustered 5 or 6 in a row.
I’ve dressed all mating surfaces and used pony clamps top & bottom on all 2-wall joints, plus Irwin bar clamps to snug ‘em up and fix any concave bends, then glued with Tenax 7R. All joints are tighter ‘n’ a bull’s hiney. With all that, some are still a degree or two off 90.
I’ll install multiple floors of heavy poster board in each and cut ‘em on an office paper cutter as square as possible.
Anyone have any cute tricks to insure good square corners top to bottom so there’ll be no gaps between buildings? I don’t want to actually attach buildings to each other. Are City Classics corners the answer? Haven’t tried those.
BTW, a little disappointed to see that the Tenax still leached out onto my pre-painted exteriors so some touchup will be necessary, but I still like painting wall sections before assembly.
This will not help existing buildings, but I have a carpenters square that is about 18" on a side. I use it to square up building corners when I assemble them. Another product is the Rite Clamp, sold on Micro Mark and other stores. It is a right angled clamp that holds the building corners while gluing.
Yes, the City Classics corners will help. I also use Rite-Way magnetic clamps and steele 3-2-1 blocks while gluing wall sections but perfection is hard to come by.
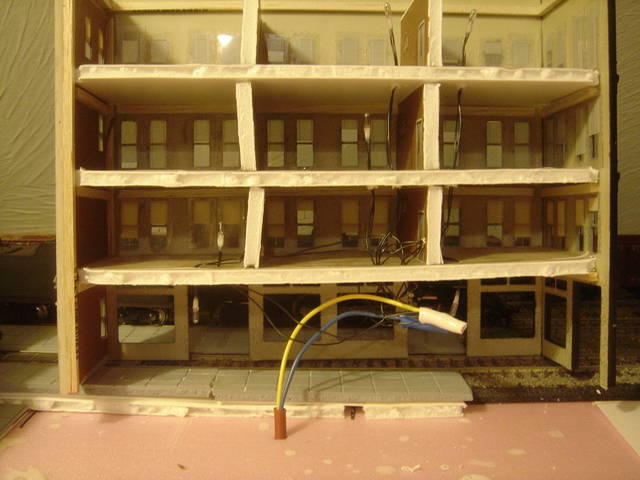
I use balsa strips inside the corners of my structures. I put them together with CA. This gives me a better gluing surface than trying to use a plastic glue to hold together those thin diagonal wall joints, and the balsa strip provides a complete light-block in the corners in case there is a small gap in the plastic joint. You can see some of the interior balsa strips in this DPM “M.T. Arms Hotel” model.
I like to put interiors in my kits, so I build bases, floors and walls from foamboard. The rectangular interior floors help square up the building. The balsa corner strips have some flexibility, so even if I’m off a bit on the wall assembly, there’s enough give that the building will square up when I add the interior floors and the roof.
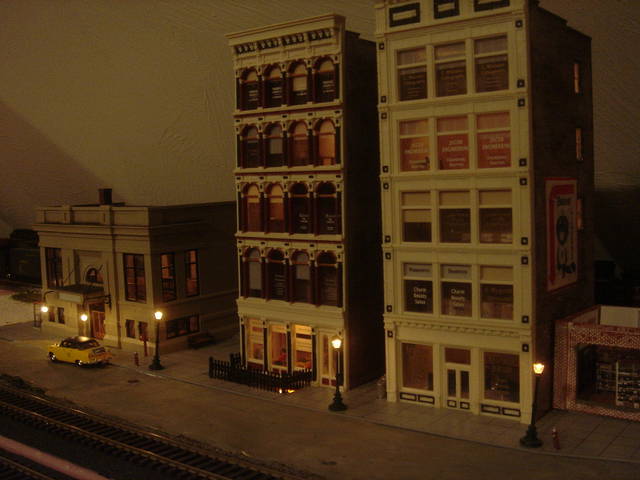
I typically don’t butt adjacent buildings right against each other. The narrow alley between these two City Classics models provides a “modeling opportunity” with some junk at the back and a couple of garbage cans nearer the street.
I intentionally placed the streetlight in front of the alley to illuminate it. Since the main line runs directly behind these buildings, the viewer sees the trains peeking through the gap as they pass.
Some good tips here. Roger’s mentioned using steel blocks to aligh the walls. That presumes there will be a steel surface their magnets can adhere to, so thought I’d mention that. You can find such magnet-augmented steel blocking in the welding section of the hardware or other wedlding supply store.
I’ve got a small steel plate with a dozen or more miniature steel blocks. It has raised lips on two side, so you can use the corner they converge in to square things up when gluing. Or you can go by the scribed crosshatch markings and rely on the magnets alone to square things. Most glues don’t stick to the surface, another plus. Available through tool guy sales at train shows and maybe Micro-Mark?
When using these, it’s often useful to make up two Ls out of mating pairs of walls, getting them square and letting them dry. Then take the two Ls and glue them together. This simplifies getting everything square.
It depend on the task at hand. I use either the Coffmann corner clamp or the Rite Way magnetic clamb or the machinist 123 blocks. My preference goes to the 123 blocks.
All worthy suggestions and I appreciate them. I’m inclined to go with the Coffman/Rite type clamp. Bear in mind the top & bottom are already secured with Pony clamps raunched up tight plus the bar clamps. Not convinced magnets would be any stronger. Mr B, your walls & floors are the stuff I plan on using. Mike, I’m making the two Ls as you suggest and the joints are super strong. The Tenax has out-performed my expectations. I’ve waited 24 hours before removing the clamps though that’s probably longer than necessary. The Tenax directions say to hold the joint for 10 seconds! I’d never chance that. Might be enough to just tack the joint in a couple of places and apply more later if needed.
If you’re building styrene structures, use the same material for the floors and bracing - much easier with which to work and you can use the same adhesive, creating an even stronger model. Evergreen sells strip styrene in a variety of shapes and sizes, and any plastics supplier has sheet styrene in 4’x8’ sheets - I prefer it .060" thick, but it’s available in many thicknesses. Use a utility knife to cut it into the required sizes.
This latter material is perfect for making roofs and floors, and for adding foundations to existing structures. It’s also a great material for replacing those walls on kits which will not otherwise be seen on your layout if it’s an around-the-room type. Those surplus walls can be used to enlarge the structure from which they were taken, or kitbashed with similar walls from other structures to create totally new ones. You can also cut strips 1/2" or 1" wide from the large sheet, and by gluing them at 90° to the back side of structure walls, use them as bracing.
Another important consideration when trying to build structures truly square is that the mating corner sufaces are themselves square. For butt joints, the mating edges need to be square with the bottom of the walls, but also square across their face. For corner joints in which the mating faces are at 45°, ensure that both are truly 45°.
An easier method is to file or sand these edges to an angle sharper than 45°, then, after ensuring that the side of those edges which will be visible are 90° to the bottom edge, apply solvent-type cement to both mating edges, bringing the pieces together while both surfaces are still soft. Press them tightly together (some material may ooze out - don’t touch it) and then position the assembled pieces within the arms of a suitable machinist’s or carpenter’s square. This is not a particularly strong joint, though, so when the cement has cured som
I build my own little corner braces by squaring up two pieces of square styene with a hobby square and glueing and then when set, glue a diagonal brace, much cheaper than the ready made ones and can be modified when made for special circumstances.
Thanks Wayne. Some great looking buildings there. Actually, was going to cut the foamboard very precisely and wedge it in snug without glue so I can pull out the floors and install lights, furniture, etc down the road, as it appears Mr. B has done. But your point’s well taken.Good points about prepping the mating surfaces and I’ve been fussy about doing that. The Tenax is so thin and sets so fast I’d prefer to take my time fitting the corners together dry under no pressure, clamp them up tight, and the Tenax will still find its way into the joint, even leach through to the outside no matter how tight the clamping. Again, love your work.
You too, rr, especially the part about the diagonal and CHEAP. Speaking of cheap, Home Depot has 3/4x3/4 aluminum angle for $4. Thinking I could make something like the Coffman corner brace with 3" pieces wedged into the Pony clamps top and bottom, inside & out. Four bucks instead of forty and no shipping.