An old Mantua 2-6-2, recently acquired, needed cleaning and lube, so I followed instructions to remove the long 2-56 screw holding the chassis to the boiler. It was tight enough before, but now when I go to replace it the threads don’t grab. The screw goes through the chassis and all the way into the boiler down to the head, and won’t grab on anything.
The guy at the hardware didn’t have a 2-56 that long, but he studied the screw carefully and noted that the threads seemed to be in fine condition, which might indicate that the problem is that the hole threads are stripped. Maybe the screw was holding on by just a thread or two, which eroded or broke when I removed the screw. This sounded plausible since I imagine the screw threads are probably harder than the cast metal (what Ed or Mel or someone here called “pot metal”)
It looks like my options are either filling the hole with some epoxy and then tapping a new hole, or tapping the hole for a larger screw. I’d be interested in hearing what you would do. I could also get a new screw and just see if it grabs better, and maybe that would be the first thing to try. Thoughts?
As a final note, the only time the screw is actually doing any work is when you pick the engine up off the track, or out of its box. While running, the boiler sits on the chassis by its own weight.
I would go with filling the hole with epoxy and retapping it. You might try getting a slightly larger screw and trying it to see if it will actually fit all the was through.
Well the only threads that mater on the screw is where it is tappreed.
This was a self tapping screw(gessing here a bit) and when you try to screw it back into the boiler it just will not catch a thread. You might get lucky just by using a new machine screw without the tapper.
I would remove the front boiler (smoke box cover) and look inside.
insert a new screw into the boiler then thread a brass nut onto the screw and tighten it a bit, then solder the nut into place inside the boiler.
That screw goes through the smoke box, and into the weight.
The threads in the weight may be to blame. Depending on what metal the weight is made out of, you could just melt some solder and pour it into the hole. Then use the screw to re-tap the threads.
I would look for a slighly larger/coarser screw and see if you can work the tip into the topmost orifice into which it’s tip normally inserts. Retap if you must.
Or, bore oversized that topmost orifice, fill it with a plug (brass tubing…too soft??) that is tapped to the screw’s exisiting specs, and you’re back in business.
If all else fails, you could drill the hole all the way through the weight in the boiler weight. Get a length of 2-56 threaded rod and make a length that would reach through it, to a nut on top of the weight and another under the plate you need to hold up. (Unless you can find a 2-56 screw long enough.)
Or you could run the rod up into the smoke stack and epoxy or superglue it and just put the nut under the bottom of the plate.
Guys, wow, thanks! So much good insight here. I didn’t know, for example, that I could get into the boiler. I haven’t tried it, but when I get a chance to get to the garage I will do so.
And who knew there was a weight in there? That give me a new thought… what if the reason the screw is not biting is because it is only intended to bite in the weight, and since the locomotive is upside down in the work cradle, the weight fell down, or moved just enough that the screw cannot reach it? Possible? If that’s the case, I may be able to get the screw back in just be trying it while holding the loco upside right.
Anyway, lots of good ideas here. I’m very grateful.
Self tapping screws are good for the first assembly. After that if the threads don’t catch in exactly the same orientation they wind up cutting out even more precious material.
As others pointed out you might want to find a machine screw with full threads to the very end which would give you more engagement with the metal. Perhaps there’s a chance to find or make a screw that’s an eighth of an inch longer.
The easiest fix (not necessarily permanent, but easily redo-able) is to slip a small strip of styrene, perhaps .010"x.030" and roughly as long as the screw, into the hole, then re-install the screw.
This generally creates enough interference to keep everything held together. If you later need to remove the boiler for maintenance, I’d suggest removing the styrene strip, and replace it with an identical one when re-assembling the loco.
Filling the original hole with epoxy and trying to re-tap it to the original size will likely result in the same sloppy fit.
If you want a permanent fix, I’d opt for a larger diameter screw…either a 3-56 or a 4-40.
Wayne, I had actually considered wrapping the tip of the screw with some of that very thin “washy tape” my daughters use to decorate stuff, thinking along the same lines as your idea of adding resistence. I didn’t know you could get styrene that thin. I may look into that, and the heli-coil inserts that several of you have mentioned…
But first, here’s the new weird news: I was curious about what people were saying about a weight inside the boiler so I removed the boiler and its front cover to have a look. The weight doesn’t move and there’s not room “above” it for a nut, and no way even to see where the screw ends. But get this – when I put the screw in JUST the boiler hole – that is, without going through the chassis first – and turned it gently it grabbed immediately and firmly.
I’m not sure what to make of this. It’s the same screw, and this screw used to bite, and it’s the same screw that now doesn’t bite when inserted through the chassis, even though I checked to make sure the chassis was seated firmly against the boiler. But it suggests that if I had a slightly longer screw it might hold the chassis and boiler together.
So I have a number of simple fixes to try and then a stairway of increasingly drastic measures I can try.
From Your description of how the screw does not seem to bite threads in the hole leads Me to believe that the weight did almost exactly what You describe. You’re missing the hole when You attempt to tighten the screw.
Good Luck! [swg]
Frank
Matt,
I put in the above before reading whole thread. I’ll blame it on My age…lol.
Anyway, after reading the whole thread, I believe You have a part of the Locomotive not seating properly in the assembly stopping the screw from grabbing any threads in the hole. Could be a wire or part. I had a similar experince with a old AHM Dockside I was repairing for a friend. Somehow the screw got shorter???
Nothing like a good mystery novel, that You may have created without knowing.[swg]
Somewhat akin to Dr Wayne’s suggestion – I have used this on big things like screws on a garage door that came loose and could not be tightened, so obviously the inner threads were stripped – a small tip of a toothpick into the hole, with just a bit of glue or cement on the wood. The screw crushes the wood enough that it finds the “good” threads for lack of a better term. This might be easier than finding a larger screw that will otherwise work given what else the typical Mantua/Tyco design expects that screw to do
Thanks for everyone’s input here. Just to provide some temporary closure on this, I think I may have figured out all the bizarre twists (threads) in this mystery. For one thing, I tried putting the screw in while holding the loco right-side-up, thinking maybe the weight would sit tighter against the bottom of the boiler, but this didn’t work and really, I didn’t expect it to once I had the front of the boiler off. The weight is cylindrical and fills up the boiler’s interior space, so it doesn’t move.
However, there was that piece of info I supplied in my last post – that the screw still bites when it doesn’t have to go through the chassis. This suggests that there are still threads in the hole in the boiler (or the weight, whichever).
Looking at the screw through a magnifier I believe I could see that the very first two or three threads (where the self-tapping part is) are worn away. I think this explains why the screw will not bite through the chassis but will bite through just the boiler. Those missing threads mean that the screw’s “grabbing length” is shortened and it cannot reach the threads in the hole.
I ordered a replacement screw. Nine cents, and eight dollars shipping. The new one will not have the taper because it is not self-tapping, so I am hoping that it will be wide enough to grab the sides of the hole at the bottom. I figured this is the easiest and least disruptive thing so I’m trying that first.
I’ll follow up here in a week or three to let everyone know how the quest is going.
Matt, if you can reach the thread and engage the screw directly on the boiler, without the armature, then you should be able to assemble the piece together.
With the loco on its back (get a good craddle if you don’t have one), insert the screw through the armature. Lift the armature with one hand and look underneath to align the screw in the hole of the boiler. Once aligned, gently push the armature down against the boiler and turn the screw. There should be no gap between the boiler and the armature once the screw is tight. If there is a gap, something is preventing that - could be a loose wire or flash.
By the way, there are two other screws at the other end of the engine, as you know. Put these in last. But I’ve had Mantuas where I had to insert all the 3 screws and engage them in their holes, without tightening them completely before all of them were engaged in their respective holes. Otherwhise, the angle would prevent the insertion of the other screws.
Hi Simon. Your whole middle paragraph is what I have been doing, I promise. There is abso-LOOT-ly no gap between the chassis and the boiler when I am trying to seat the screw. However, I have not tried loosening any other screws at the other end of the loco, and that’s because I have not noticed any. The sole screw in question holds the boilder on and when you remove that screw the boiler comes completely away. I’m a work right now, but I will later go and have a look to see what you might be referring to, although I don’t see how any other screws on the underside of the loco can have any effect on this issue if they’re not reaching through to the boiler.
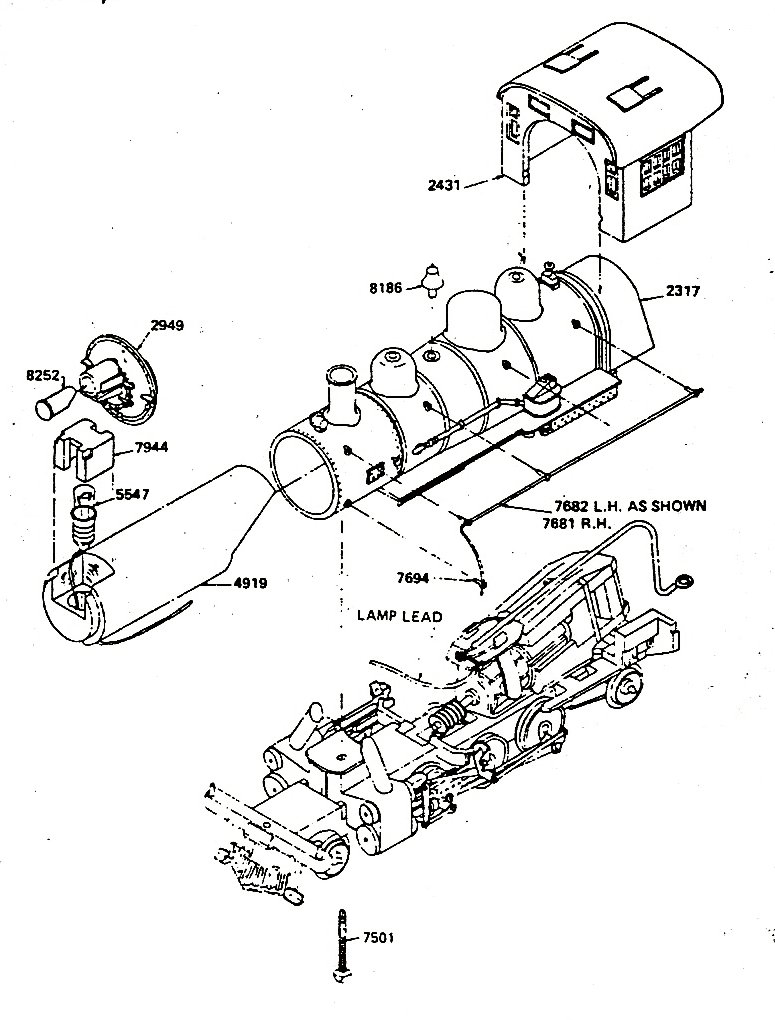
I do know that there are four screws aft of the one we’ve been talking about, all in a short line. Two of these hold the pilot truck and the trailing truck to the chassis, one holds the plate over the axles, and the fourth reaches through to hold the motor in place.</
My mistake. There are not four but five screws in a line behind the problematic one (A), and one at the very back of the loco to make sure the tender comes with. So total of seven screws.
A = This hole is where Ye Vexsome Fastener goeth.
B = Short screw holding the pilot truck, temporarily removed.
C = This screw holds the plate over the axles.
D = D for ‘ditto’
E = This screw reaches through the chassis to hold the motor plate.
F = This screw holds the back end of the plate over the axles, and also holds the trailing truck.
G = Short screw holding the tender bar.
As far as I can tell, only A and E go all the way through the chassis. If you remove A, you leave the boiler on the cradle. If you remove A and E, you leave the motor lying in the boiler.