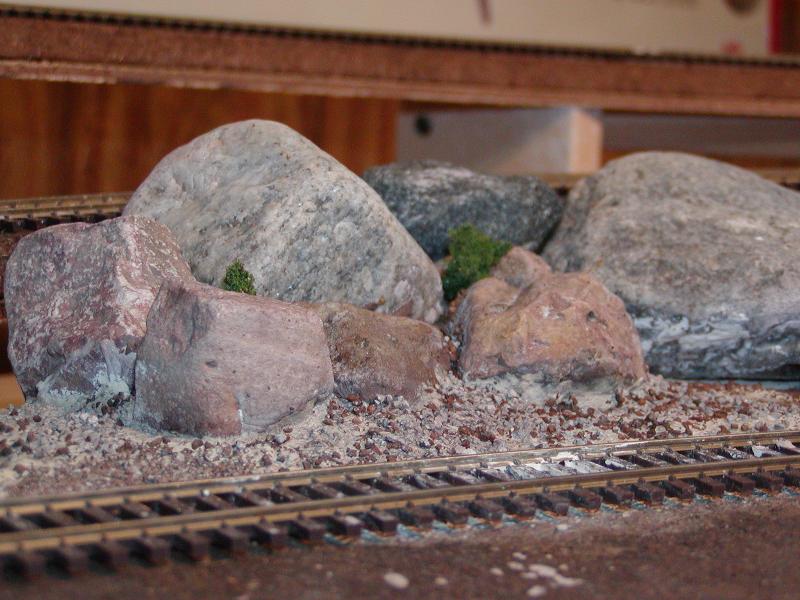
I’m starting to do some scenery on my layout and am trying to capture a southwestern look. Below are a couple of pictures showing my first attempt.
Please let me know what I did wrong.
Thanks.
Tom
I’m starting to do some scenery on my layout and am trying to capture a southwestern look. Below are a couple of pictures showing my first attempt.
Please let me know what I did wrong.
Thanks.
Tom
I think that there is too much contrast in scale, and that the material, itself, does not scale well. While the smaller pebbles are probably fine, the larger ones just look like you gathered them from a local stream bed. Perhaps you could sculpt hoodoos and other things using plaster? Still, you have the basic idea, and if you can replace the larger boulders, the rest looks quite good!
-Crandell
Unfortunately, real rocks don’t look right on a model railroad. You’d probably be better off making your hills out of carved styrofoam covered with plaster and painted.
I have come up with my own mixture of scenery material to replicate Arizona terrain, but this is by no means the only way –
I use real sifted dirt from my back yard mixed with casting plaster, white glue, cinnamon brown paint, thin set mortar, shredded aspen gerbil bedding, sawdust, powdered drywall compound, and shredded paper.
First, I make mountains out of styrofoam carved into an appropriate shape with a hot wire cutter and glued down with latex caulking. I cover this with wet paper towels, newspapers, or plaster cloth and the cover it all with my version of ground goop.
Scenic Express or Woodland Scenics ground foam is sprinkled on while the goop is still wet, and is pressed into the material so it is firmly attached as the mixture dries.
It takes a couple of days for the goop to dry, but it lightens up as it does.
One of our own members may have just the ticket for you. hminky has a nice western layout and his website has some great tutorials. He does first class work. You can find his site at;
http://www.pacificcoastairlinerr.com
Here’s the part about making rocks out of ceiling tiles;
http://www.pacificcoastairlinerr.com/more_rocks/
To give you a taste (I hope you don’t mind hminky) this is how great this looks;

Awesome work hminky!
Anyways, it is all spelled out for you on this site, along with many other useful tips. Check it out.
Texas Canyon in Arizona has round rock piles like that BUT, the rocks are all the same color, grey, but not the same size and the piles are less even. Google Texas Canyon and you will get pics. Also there needs to be a source for the rocks. They will not be pushed there by a glacier as in the midwest. They have to fall from a cliff or be the result of erosion as in Texas Canyon, the same way hoodoos are formed. Thus, no small random piles, they must be part of the whole system of geology.
I think I get the idea. Tomorrow I will try again. Thanks for all your input.
One more thing, what’s a hoodoo?
Tom
Hodoo defined: A column or pillar of bizarre shape caused by differential erosion on rocks of different hardness.
It could be related to an “ad hominem” though. [:D]
Thanks, but I don’t thinlk I’ll get involved in the ad hominem thing. I do appreciate the other info. I wasn’t sure if it was the same as a henway. [:o)]
Tom
if you’ve ever been to or seen pictures of Bryce Canyon ,Utah then you’ve seen a bunch of hoodoos…the park is full of them…they look good but probably won’t work in model railroading …they are just too bizarre and seeing them by tracks is not prototypical…and to answer your question, nix the real rocks…they are out of scale and don’t look good on real railroads, not to mention, if you get enough of them on the layout they’re going to be way too heavy for your bench work, there are two techniques that work, one is as mentioned, carve the rocks from stacked blue or pink foam and fill any gaps with celluclay or ground paper mache and paint as mentioned below) or you can build a skeleton frame shaped like a mountain or hill woven together with strips of cardboard and then use plaster cloth or strips of newspaper or paper towels dipped in plaster of paris or hydrocal and lay them over the skeleton frame until it is completely sealed…you may even want to purchase or make your own rock face castings molds that you can pour plaster into and incooorperate them into the mountain …after the plaster dries, put in the rock face pieces from the molds, paint the entire thing flat white, let it dry, give it a few randon squirts with a spray bottle of india ink diluted with alcohol and water and let it dry again… now take some earth tone acrylic paints and mix them 50%/50% paint and water and stain the mountain…try to use three different earth tone colors…for eastern colors use two shades of gray and tan colors…for southw
looks like pc had a nice link http://www.pacificcoastairlinerr.com/more_rocks this is how we can save a lot of time
I was looking at rocks to but seem to heavy
K
Isn’t that stuff awesome. hminky is truly an excellent artist. It’s great that he shares his techniques too.
And this stuff is light weight too. Ceiling tiles weigh very little. I’ll bet that rock formation doesn’t weigh much more then a pound, paint and all.
Cacole is right, real ''Stones" do not look right, another comment is it may look unique in a photo or real life, but on a layout it looks plain goofy, it’s a sort of trial and error method and lots of reading and listening to geniuses like us eh?
Thank you all for your input. I really appreciate it.
About the genius part, I’m not so sure. I’ll get back to you on that. [:D]
Tom
your work looks fine to me. you may need more of it though.
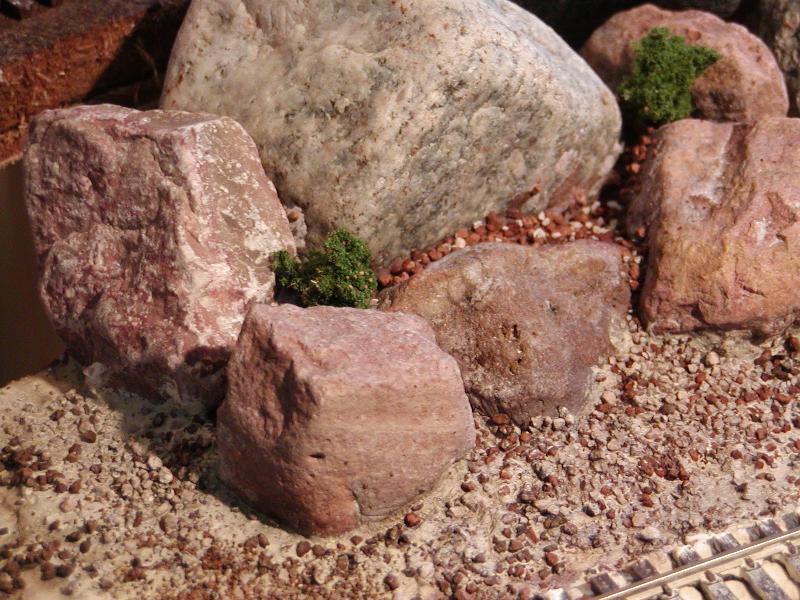
How’s this for a second try?
Again, I’m looking for honest evaluation here. I know the ground is a little too yellow. I need to make another batch of india ink/alcohol to tone that down a little. Thanks.
Tom
I think it is a substantial improvement. Just my 2-cents. Although, to be completely honest, the red material does not seem to belong, now that the finer soil and rocks that are around it are of a different hue.
that looks a lot better,now stain them, you want southwest colors then use yellow ochre and some raw sienna and at the very bottom some red iron oxide…mix the paint 50 /50 water / paint …paint the top of the rock with the yellow ochre and work in the raw sienna towards the middle and the red iron oxide at the bottom…another thing you can do is spread some ground goop around the rock face, to make ground goop use 1 part celluclay, one part vermaculite (you can get that at a nursery) 1 part earth tone latex paint and 3/4 part elmers glue…it’s really easy to spread and working it in is a breeze…you can also “Zip texture” it…wet the scene with a spray bottle of water with a couple of drops of dish washing soap in it and then sprinkle in some dry plaster of paris over the scene , you might even want to add some dry tempra paints to the plaster before you sprinkle it in…it will color the plaster to give it a nice earth tone when you are done…chuck
For ceiling tiles, don’t forget to check out a local (if you have one) Habitat for Humanity store. While I was in the one in Austin the other day, I noted they had boxes of this stuff.
Thanks, everyone for all your help. About the red, I had orginally intended just a few but they kinda got away from me. I think I’m headed in the right direction now.
Thanks again everyone for your evaluations. I really appreciate it.
Tom