I have 2 curved industry leads/spurs (paper mill) coming off of an already-lower-than-mainline siding. I shoved some bits of cut up foam and cork underneath it for now, but what is the best solution for this? Or at least I could use some ideas…
I may need to do this in other, more straight, areas, so any advice on that is appreciated too. I’ve already decided to raise my main yard up using a cork sheet, so that won’t be too big of a problem, just a small grade on the yard lead.
I cut out the foam on a slope and lower the cork into it. Easy peasy. I use caulk to secure the cork as it is a good leveler for errant cuts in the foam.
I’ve used several things that have worked out really well. One was tapered door/ window shims that you can get at most building supply and big box stores. Another was cork roadbed filed down with a rasp. Another one was sheet rock cement smoothed on with a putty knife and that was coming off foam roadbed that was thinner than the cork. Once hidden by ballast and scenery you can’t tell what was used. What ever you use just make sure there are no sharp transition. A small sanding block is your best friend.
It looks like the tracks that you want to transition down to the foam are on a curve. Straight shims will work if you cut them into segments, but another approach would be to put successive layers of masking tape down on the curve. Start with a long piece that runs the entire length of the transition and then use progressively shorter pieces to build the grade. If you are worried about the tape drying out over time, use card stock cut to match the curve and glue it down.
Ed must do as I do…lay the track, ballast, adjust the track on the ballast to ensure the grade and transitions are good, then glue it and wait for the glue to harden. Once this happens, the tracks are firmly in place and you needn’t shim at all. If you must shim, get door jamb/framing shims, but the grade they’ll impart is rather steep, in excess of 4%. You could try sanding cork underlay. I think you might be considering cork roadbed anyway? So, just sand a ramp into a strip and lay it over the lower layer, near the junction.
Regular building shims can be cut down to the proper height. If the slope is still too severe you can overlay cardboard strips cut from ceral boxes at the narrow end of the shim to lessen the slope.
Since it appears you are using cork roadbed sanding a grade is a common practice with this material.
With these being on a curve I would begin by sanding the straight piece of cork roadbed.
Once satisfied with the grade, cut small triangular sections- -kerfing- -opposite each other spaced approximately 1/4- to 1/2-inches apart, similar to the zig-zag pattern of Woodland Scenics risers.
This will allow you to make a curved transition without kinking the roadbed. The larger the cuts and closer the spacing will allow for tighter curves.
Before laying down the track and ballasting, use sheets of facial tissue or bathroom tissue to cover the kerfing so ballast won’t fall into the gaps.
Use the same glue/water mixture you would with ballasting. You can trim any errant edges to match the slope of the roadbed.
Install the track and ballast as you would normally.
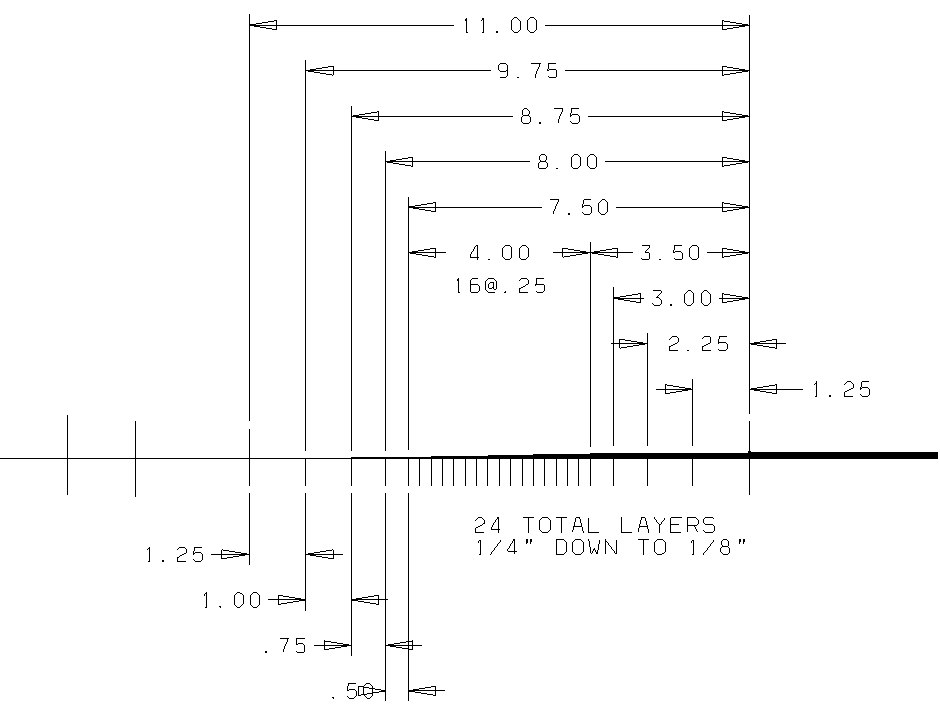
I layer 1/4" masking tape in longer and longer pieces to create a taper from the thicker roadbed to the elevation I want for the spur / siding. Works great. I use 1/4" because anything wider tends to wrinkle up on curves.
Here’s my diagram for going from Midwest HO cork roadbed to their N scale cork roadbed. As you can see, the ramp is 11 inches long.
Masking tape is about .0035 inches thick per layer, but this varies a bit from one brand to another.
I use Woodland Scenic’s 2% incline “starters” for these transitions. They curve nicely and are accurately moulded. They also come in 3% and 4%. In the right place you can combine two slopes to make a 1% incline (or a steeper incline if you need to).
The 2% reaches 1/2" over 24". If you have 1/4" to reach you use only half the piece. Longer than 24" you use two inclines and a 1/2" riser. And so on, very simple and handy to use. The inclines and risers just glue down. WS even makes a good adhesive they call Foam Tack Glue.
This is off the topic, but I’m curious about your photos. Where do you post your photos that allow us to zoom on the photo itself. I don’t see any photo hosting site for your picture, so I assume you are doing this yourself. I like it that we have the ability to zoom on your photos.
I upload my photos to a “public” folder on Google Drive. Then I click “open in new window”, and then copy the embed code and paste it into the source code feature on the forum. It’s a little bit of work but it’s worth it, especially since I have unlimited Google Drive space…
He seems to have a handle on all kinds of things that confuse me. I hope he does a thread on using Google to host pictures. It sure seems to work great for him.
Mark Pruitt and I both suggested using 1/4" masking tape earlier in this thread. If you want to see an example of Mark’s work, go to the last page of his layout thread and look at his last video #27. Starting at the 10:15 mark you will be able to see how he uses 1/4" masking tape to superelevate his curves and to make the grade adjustment between the main line and a spur track.
His method is especially suited to your needs because your spur is curved. With all due respect to previous posters, using straight materials like door frame shims on a curved track would be a lot of work.