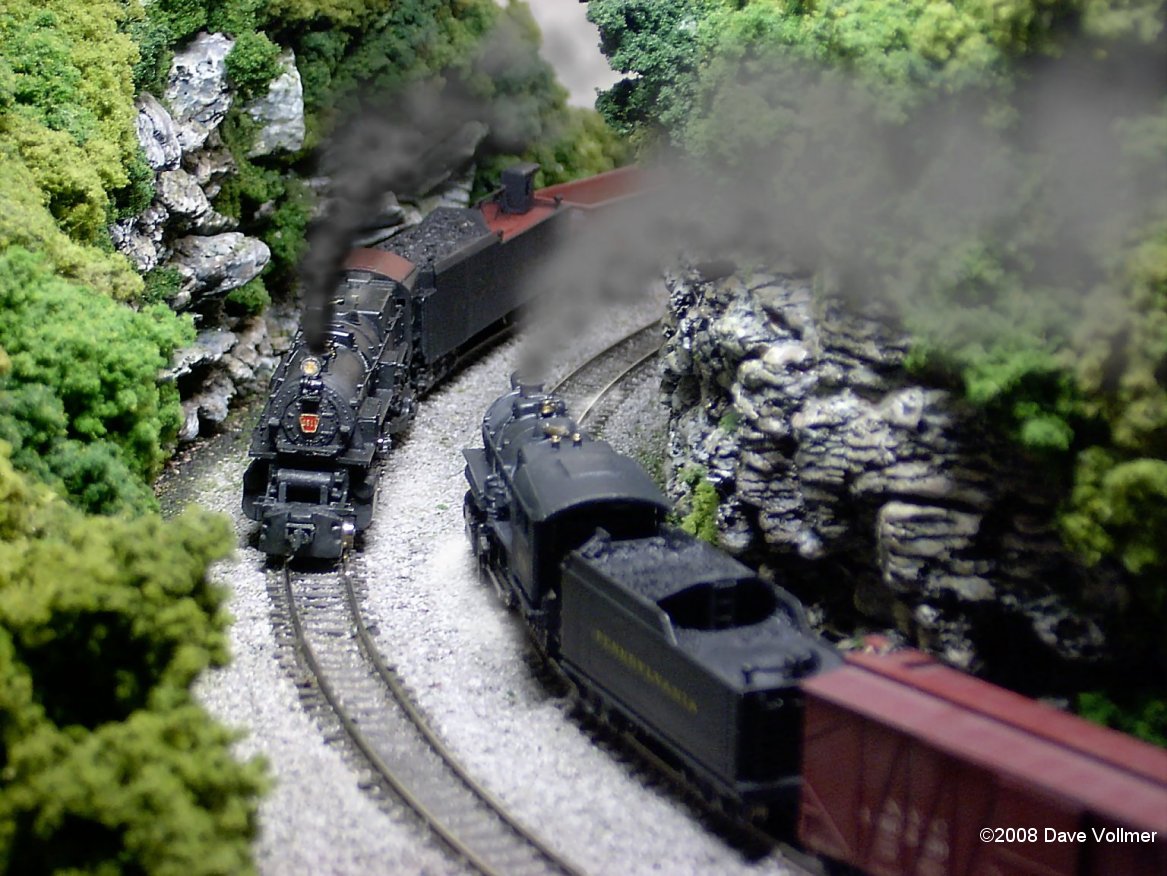
One of the most common comments I get from people who visit my website is that they are surprised to learn that my layout is only 36 by 80 inches. They say they can’t tell that just from the photographs. I take that as a compliment, because I generally photograph the layout in such a way as to disguise the small size.
But I have to come clean… The only reason I can get away with making such an obviously tiny layout (the table is simply a hollow-core interior door mounted on folding legs) look larger is because I used tried-and-true techniques for making it look bigger. None of these techniques are my own; they were discovered by other modelers just like yourselves.
My layout is very heavily based (that is to say probably 80-90%) on Lou Sassi’s Mohawk Division project layout in the December 1993 Model Railroader. It’s a tribute to Lou Sassi’s genius (not mine) that the layout incorporates so many tricks essential to making the small look big. It also shows that a plan made for 70’s Conrail in NY is useable for a 50’s PRR in PA!
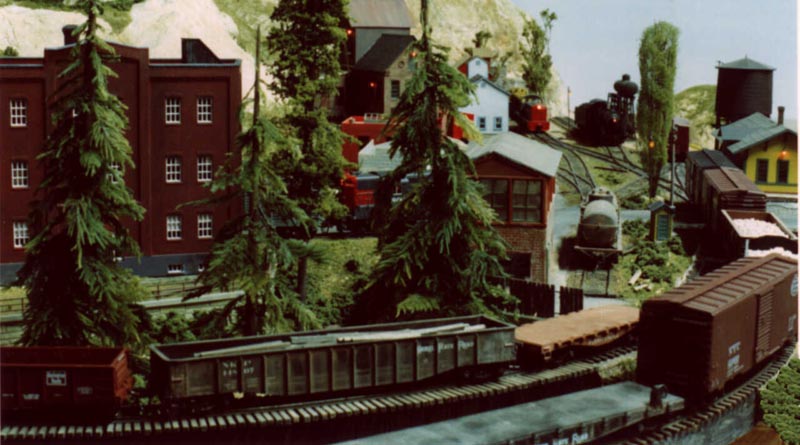
1. Scenic divider: This is a big one for roundy-round table layouts like mine. Most MR project layouts use one, and they range from the low ridge of trees on the N scale Carolina Central to a no-kidding backdrop down the middle like on the HO Alkali Central. Lou Sassi’s plan for the Mohawk Division used the town and a low ridge to divide the layout in half and make the loopy-nature of the layout less obvious. I ended up making the low ridge much higher to hide a coal mine, but it serves the same purpose. The layout is effectively split in half, making both sides appear farther apart.
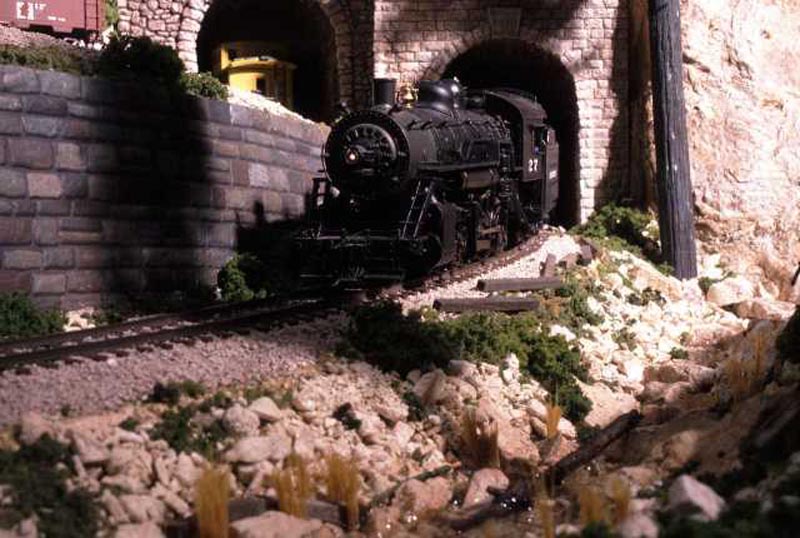
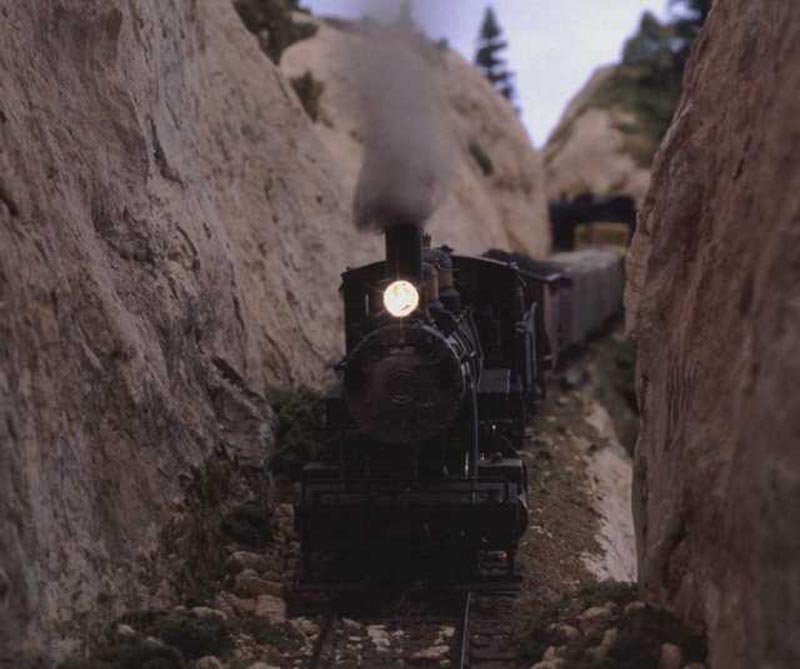
2. Scenery above and below track-level: Any time you can add some vertical elements to an otherwise horizontal endeavor, you can make it appear bigger. Lou’s plan includes two scenes that go below track level; both invol
Dave has some good insights into making a small layout seem bigger. Here are a few more thoughts on the subject.
My first complete (well track work was completed) layout was a HO 4x8 twice around. By dividing up the railroad into a series of vignettes it seemed much bigger than it was (especially to a camera!)
An absolutely flat trackplan will tend to seem smaller. I think my layout seemed bigger because the two laps of the twice around went up and down to different levels.
There was a row of hills/mountains running down the length of the layout that separated it into a front side and back side.
Front side of the hills (hills on left)
Back side of hills (previous picture taken over the hills on the left)
Warning! If you put a view block down the center of the layout (hills or backdrop) you’ll need to walk around the layout to see what’s happening over there! Be sure the controls for electrically controlled turnouts (and electromagnet uncouplers) are on the same side you’ll be on when running trains there (yep, been there, done that, rewired the controls…)
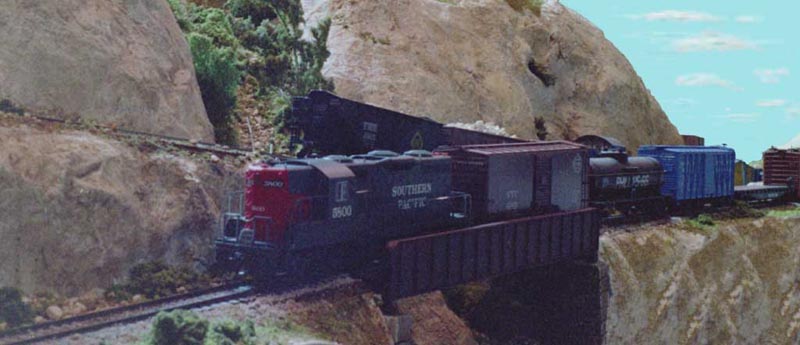
Bridges can further divide a layout into separate scenes - left of bridge, right of bridge, and under the bridge.
Tracks that are at different levels will seem to further away from each other. This is true even if the elevation difference is only an inch. John Allen used this in the Port area of his final G&D.
The bridges and mini-gulch break up this scene into three parts. The elevation difference between front and rear tracks created a further division of the scene making it appear that the two tracks were going very different places.
I really appreciate learning how you have perfected the highlighted model railroading techniques and reading this short “how to” from your first hand research and knowledge is even better.
This is a perfect example of giving back to the hobby with a positive contribution.
Now that’s what I’m talking about…! I wouldn’t have guessed 4x8. Looks like a 5x10 at least. Great job on taking advantage of the vertical!
Good call on cuts dividing scenes, too.
I have one as well:
This cut seperates East Mifflin from LEW Interlocking at the west end of Lewisport, PA, and hides the end of the narrow ridge that seperates the town.
The rocks, BTW (I know, off-topic) are Flexrock foam castings. I never could get plaster castings to look right. So, I took the easy-way out. With a few layers and colors of paint, you can’t tell they’re foam.
I read the title to this thread, without seeing Dave’s name as the poster. I though, Dave Vollmer would be the guy to talk about that! Then, I saw, HE WAS!
John Allen discovered that by using large mirrors strategicly placed around the layout backdrop, he could use the reflections of other areas to make the layout seem infinitely larger.
I know this is a bit off topic, but it’s the second time today I have typed these questions for you, I started a while ago and got caught up with work and when I went to post the thread had been locked. ( not surprised )
How do you create the smoke in your photos ? Can you manipulate the smoke to get it to “lay down” across the top of the train or “push out” from the engine like there is a strong wind blowing ? Just curious as I think it enhances the sense of realism of your model steam photos, and it’s something I want to play around with till I get the time to start building a proper layout in the garage.
[i]One of the most common comments I get from people who visit my website is that they are surprised to learn that my layout is only 36 by 80 inches. They say they can’t tell that just from the photographs. I take that as a compliment, because I generally photograph the layout in such a way as to disguise the small size.
But I have to come clean… The only reason I can get away with making such an obviously tiny layout (the table is simply a hollow-core interior door mounted on folding legs) look larger is because I used tried-and-true techniques for making it look bigger. None of these techniques are my own; they were discovered by other modelers just like yourselves.[/i]
I was about to say that Dave was able to create the impression that his layout was larger because, like Sir Isaac Newton, he “stood on the shoulders of giants”. It then occurred to me that if Dave actually did stand on the shoulders of giants, it would have the effect of making his layout seem smaller.
[12 step meeting]
Hi, my name is Andre and I have a warped sense of humor. It’s been 3 days since I created my last pun, 2 days and 3 hours since I wrote a twisted limerick, 23 hours and 12 minutes since I told the joke that ended with a line about a frog in a blender and only 5 minutes since I quoted Marx. That’s Groucho, not Karl.
I’d like to give myself over to a higher power, but unfortunately that higher power went by the name of William Claude Fields. I’m doomed.
It’s done with the airbrush tool in Paint Shop Pro 7. You can manipulate the sharpness, transparency, and color as well as the size of the spray.
I don’t think my smoke looks as good as it could if I cropped in real smoke, but it helps the steamers look less like plastic and more like the living, breathing steel creatures they represent.
I have done this allot in the past Dave, and you are right. I never thought of it that way either. There is nothing nicer than seeing a loco come storming out along a tree line, it does make things seem bigger and more open. I don’t mind making them either. I still do make all my own trees by hand, with bell wire, lichen and clay or a hot glue gun. Was telling steinjr about it a week ago. I have to figure out how to post a picture or two of one of my older layouts.
One thing I’ve tried to do on my layout…was to not run the roads parallel to the edges. Many of the streets are angled. Not only does it look more interesting, but it makes it more difficult to see where the layout ends.
You guys want to know what i think?, Dave is really trying to mislead us, he really uses elfin magic to get his layout to look so big, Ernie and his boys have got to be behind this, its some kind of elfin/meteorologist conspiricy and when i get proof i am busting this wide open[soapbox].
We have a mad poet at work who chalks limericks on the forge furnaces and supplements the assigned equipment numbers with comic nicknames. These are largely unprintable. The most recent verse involved a man from Nantucket.
One thing to keep in mind, when using trees and other elements to make a small layout look big, is to keep the trees and other elements small. While real trees do come in a range of sizes, a small hill that looks acceptably forested with small, bushy foliage and small saplings might look pretty ridiculous with 100-foot pines on it. The same goes for buildings - small or compressed structures help a small layout look bigger than it is.
I think were also overlooking the obvious. An N scale layout of a given physical size can support a lot more scenes than an HO one of the same size which can support more scenes than an O scale layout, etc.
Even so, the same tricks apply to all scales, whether you want to make a 2 x 4 Z layout or a 12x20 G layout look bigger than it is. Often people pick a small scale because they have a small space. Sometimes people like the detailing possibilities of a bigger scale like O, even if they don’t have a lot of room.