I have an opportunity to build a new HO scale layout, basically starting over from scratch. I’d like to build it around-the-walls, but the cost of “traditional” benchwork is outside of the available budget, so I’m considering using “L” brackets attached to the walls every 18" to 24" to support 24" wide, 2" thick blue foam board.
My questions are:
How can I attach the foam to the brackets so it doesn’t slide off onto the floor?
How far apart should the brackets be to support the foam board (and trains, track, scenery, etc.)?
Any recommendations about make or model of brackets?
How can I join the foam board segments end-to-end?
Please feel free to ask me any questions for clarification, via either public post or private message.
Thanks in advance for your ideas, experiences, etc.
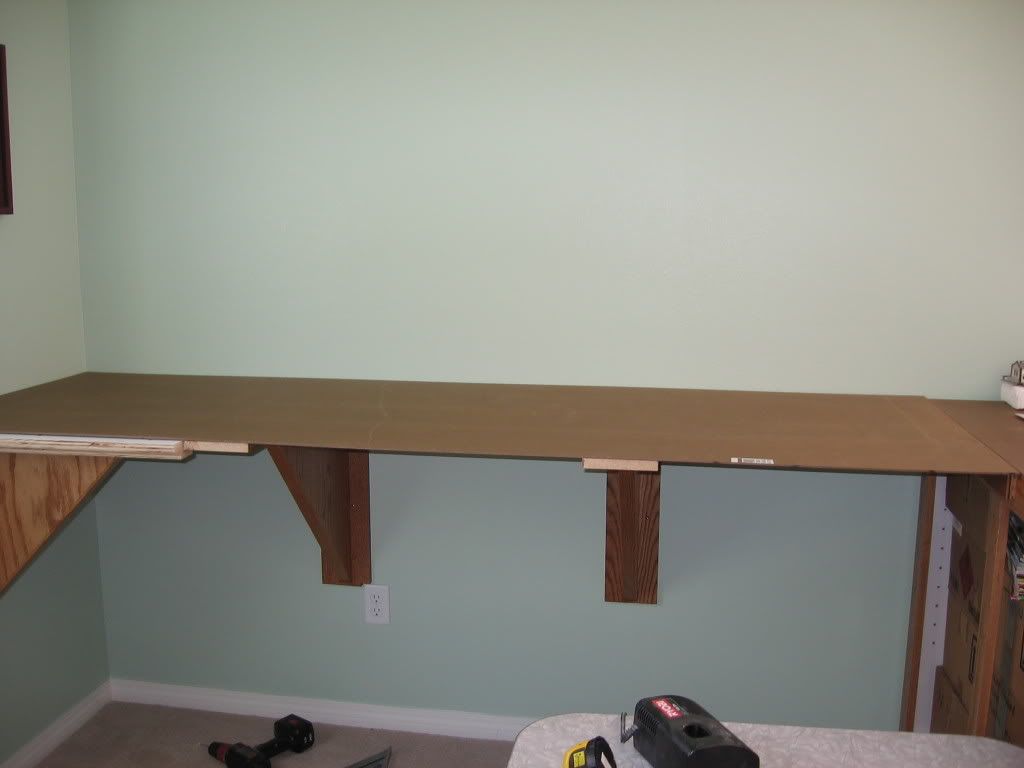
My along-the-wall benchwork is supported by shelf brackets - the kind that go into slotted tracks that are, in turn, screwed through the drywall into the studs behind it. They also support storage shelves above and below the benchwork.
The brackets come in lengths up to 16", and should have something with a flat surface screwed to them to extend them to your desired width and to support the foam since they are only about 1/16" thick. I use steel stud material. 1x2 strapping would also work.
If you are using only foam, it can be stuck to the bracket wideners with latex caulk. I have a thin layer of plywood under thinner foam (to provide solid mounting for switch throw mechanisms) and use screws driven up from beneath a’ la Westcott. The foam is caulked to the plywood, ballast former is caulked to the foam and flex is caulked to the ballast former.
I would add a board along the front, to protect the edge of the foam and improve its appearance. The foam should be able to span 24 inches without sagging if you’re running HO or smaller. For O-gauge, I’d recommend more solid benchwork, though.
Mount heavy items like power supplies on the wall. Don’t hang them out at the edge of the layout.
I would refer you to an article by Don Spiro in the October 2005 issue of Railroad Model Craftsman (starting on page 72) in which he describes his method for wall-attached benchwork. In this method he uses a shelf bracket system by Dorfile available at Home Depot. These brackets support boxes constructed of 1 x 3 lumber with plywood as a top surface.
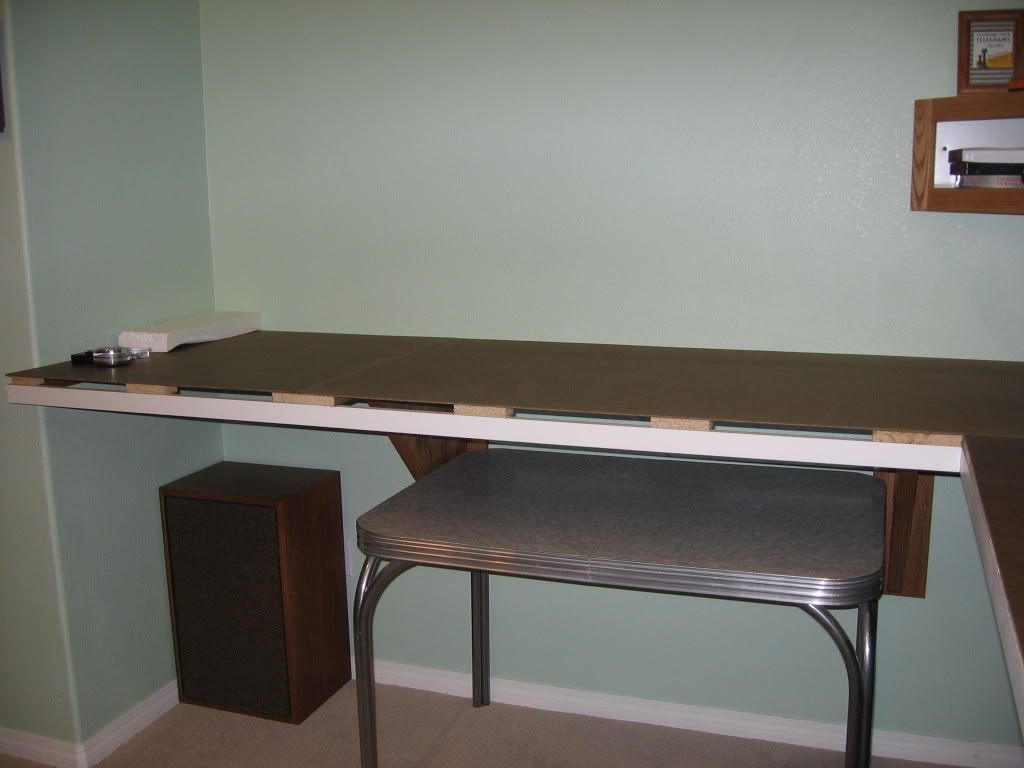
I used 1/8 masonite under the 2 inch foam. I used carpenders glue to attach the foam. A cleat on the back wall and a cleat on the front where the facia goes. Have had no problems bowing. There is no weight and the foam keeps it nice and level. The supports are 2 pieces of 3/4 oak glued together with a thin strip of oak glued to the front to cover the joint. I know its overkill for the support but I wanted the beefy look. I have something to screw, stick, glue to under the foam like tortoise switches, 3m wire tie supports for wires, etc. To get the feeders through just drill a hole through and insert a straw for a sleeve and glue it in.
Use thin plywood between the foam and the bracket (1/4" is usually $10 a sheet, which will give you 16 linear feet of support). Use short screws to fasten the plywood to the brackets, and a foam safe adhesive between the plywood and the foam (I prefer silicone caulk or wood glue).
This is the basic support for my old layout, which was a 12x25 triple decker. My new layout, a 25x25 double deck, will have 1x3s between the bracket and the ply, so I can mount a fascia to the front edge of the layout. The 1x3s will also add support the outer edge of the foam for those areas wider than 20".
If you’re mounting the layout directly to the wall, add a bracket to every stud, which should be spaced 16" apart.
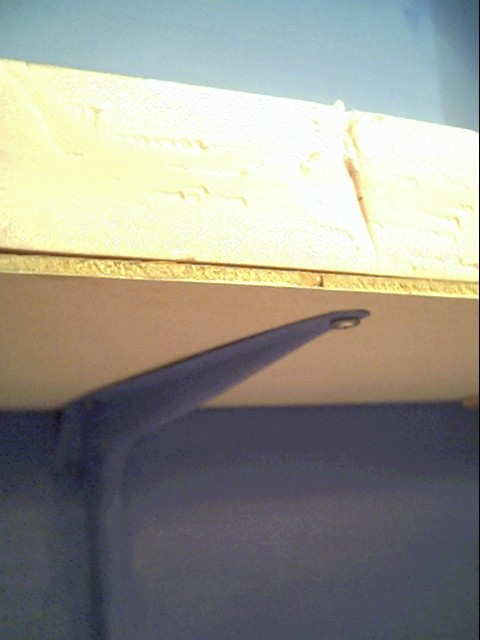
I prefer plain Jane: 10"x12" U-channel metal shelf brackets (see the photo above). They’re cheap, readily available, and easier to install than the brackets that come as a “rail and bracket” system. They’re usually load rated for 200-300 pounds, which is more than enough for our itty bitty trains. I picked up the last batch at Menard’s for less than a buck a pop.
Simple: don’t bother. Use plywood under the foam, stagger the plywood and foam joints so they’re not right on top of each other, and just glue down the foam. You’ll likely have to sand the edges smooth, since the foam isn’t quite flat along it’s face. Glue along the edges will help, but not much. Locating pegs in the edges won’t work at all, unless they’r
How can I attach the foam to the brackets so it doesn’t slide off onto the floor?
I lay my modules on the brackets without glue. Mine have never come close to sliding off. I suppose if the New Madrid fault gives way…
How far apart should the brackets be to support the foam board (and trains, track, scenery, etc.)?
Regular wall stud spacing (18 inches on center) has worked fine for me with 2-inch thick foam. I do have some 1/8-in Masonite panels laminated to the base of the foam. (See question 4.)
I have also used 2-inch foam without any base on 18-inch centers. The proviso here is that I’m not using a lot of plaster, etc for scenery on top of the foam as I model the Midwest. If you put a lot of goop, plaster castings, rocks, etc on top of the foam, your weight could increase to where you’d need a base for the foam or thicker foam.
Any recommendations about make or model of brackets?
Whatever is cheap and wide enough. I use the doubleslotted adjustables just to give me some freedom in adjusting heights and adding other shelves.
How can I join the foam board segments end-to-end?
I glue Masonite splice plates to the bottom of the foam, extending beyond the joints by at least 6 inches. Any gaps between foam ends can be filled with your preferred scenic goop.
I have have an around the walls layout 24" deep, built with 1" foam on 3/4" ply on top of a box made of 1"x4"s. My wall brackets are 2"x2" verticals screwed into every other stud (32" span) with a 1x4 wood strut angled at about 45 degrees from the outer edge of the layout down to the 2x2 vertical.
My design is probably overkill, but it’s stayed sturdy for 6+ years, even with part of the structure moved to a new house. It’s also in a finished basement that has HVAC most of the year - in Michigan - so humidity hasn’t been a big factor for me. Others who live in higher humidity environments may have better suggestions on specific materials.
I would recommend some solid material (ie: plywood) under the foam. With 24" depth, you WILL lean on the edge of the layout occasionally - trust me - and the foam is brittle. Too much vertical pressure and it will deform and/or snap on you. You might want to consider 1" foam on top of 5/8" particle board or 1/2" ply. The lower cost of 1" foam vs 2" will help offset the cost of the wood. 1" foam is easier to cut too - cut about 1/2" deep or so and then snap.
For cost control, use standard steel L brackets, which are much cheaper than the adjustable type that snap into slotted vertical tracks. Get the biggest ones you can find - not for strength but to put support as far out from the wall as possible. You will have to drill the holes out on the vertical part of the bracket to accept at least 1/4" dia wood bolts (3/8" is better). These need to be at least 1 1/2" long, to get through the drywall and get a good bite into the stud (unless you don’t have drywall - then 1" will work). You absolutely have to get into the studs - so t
Get brackets that have provisons for screwing up into a shelf from the bottom. Then pre-drill and screw strips of 1x3 flat onto the brackets. The foam can be glued/caulked to the 1x3s, and you can even put screws through the 1x3, and into the foam, to hold the foam in position while drying. Also, the ends of the 1x3s can serve as fastening points (in addition to glue/caulk on the foam edges) for a strip of 1/8" masonite for a facia.
Invest in a cheap stud finder…let your studs determine your spacing. Do not waste your time mounting the brackets other than on the studs. I’ve seen the stud finders as as cheap as $10…and I believe B&D makes a combination stud finder and laser level that is not too expensive, which would be a big help in getting your brackets in line.
http://www.johnsterling.com/FMshelfbrackets1.htm They have a wide variety, and look very sturdy. For a utility room shelving project, I used a white finish double notched tracks-on-the-wall system from Home Depot…they were rated at like 100lbs per bracket. ebay is worth a look to…I got commercial shelf brackets by the case for a wall of collectables shelves for about 1/2 the price quoted by supply web sites.
Plan your joints to fall on a bracket. On those brackets use a wider 1X. again, those screws up through the 1Xs, into the foam, will keep the foam positioned while the glue/caulk dries.
I’m thinking of doing something simular. The track will hug the walls, allowing the room to serve as a guest room when needed. Hence no islands or peninsulas filling up the center of the room. Foam is soft and needs a wood frame to protect it from getting leaned on. I’m thinking of wood modules four feet long made from 1*4 wood, with a 1/4" plywood filler to stiffen the thing, and give me something to mount under table switch machines too. The foam sits on top of the plywood. Arrange the wood sides to rise an inch or so above the plywood filler so the foam has something to hold it in place and protect the edges. Probably want to secure the foam with adhesive. Each module could have a vertical piece of masonite on the wall side to carry a backdrop if you don’t want to paint the backdrop on the wall.
The angle brackets that hold it up HAVE to screw into the studs, every stud. Studs come 16 inches on center most of the time. So you have brackets every 16 inches all the way rou
I would go with a bracket screwed into each wall stud (usually 16" apart). Use screws about 3" long (depending on the size of studs, and the thickness of the drywall).
Once you have installed the brackets, take your level and see if the horizontal part is indeed level. You may find that the free end is slightly higher than the end fixed to the wall. Brackets are often made that way so that when you add weight to them, they will bend down to a level position (otherwise, the fee end might sag and be lower than the fixed end). Some shims may be needed to make the foam lie level (front-to-back).
Instead of using 2" thick foam, go with two layersof 1" foam and stagger the joints at least 12 ". Latex caulk or any foam-friendly construction adhesive will work well to glue the layers together. Be sure to lay the foam on a flat, even surface (eg: the floor) and put weights (eg: magazines; phone books; canned food, etc.) evenly over the surface to weigh down the foam as the glue sets. Some foam is made with tongue-and-groove edges which will make for stronger joints, but I would not rely on the tongue-and-groove alone – stagger the joints.