I think the pics of some of the people of there weathered trains LOOK GREAT!!! I am jealous and would love to learn how to. I know it will take practice and some book reading. But how hard was it? I see people making money on Ebay with there trains, and I would like to just use it on my layout. What kind of paints would I need, and what kind of air brush gun would I need. Should I start off kinda cheap as far as a gun, and get use to painting. Maybe then move up to a better brand. Maybe oneday I can make some great looking cars as most of ya’ll. [:D]
Don’t be jealous, get a chalk set and some brushes to get started on some old piece of equipment, locomotive, freight car or building and start praticing. I use a combination of grimy also with an air gun along with sand and dirt for the drivers and trucks. This is in conjuction with the chalk sets. After the chalk is on and worked, a little overcoat will keep it from wearing off when you handle it. The whole procedure is not hard, just takes time to get the effect.
You might not get what you want at first, but all of us learned how to weather at some point and we don’t show all of our early work to everyone.
Start small and cheap. Find an old boxcar you don’t care about much, or even better, pick up a $3 junker at a train show, or maybe just buy an Athearn blue-box kit. Go to Wal-Mart and get some cheap acrylic craft paints - black, gray, and rust red. Get a cheap, small paintbrush while you’re there.
Now go buy a 30-pack of Bud. Open it up, take out the top layer and put it in the fridge. Keep the rest in the garage. What you want is the piece of cardboard between the layers. Tear it into 4 roughly equal pieces. This is your artists’ palatte.
Now get a small container of yogurt, and find someone to eat it for you. Clean out the container. Squirt in a bit of black paint, just a small amount. Dribble in some water, about 2 parts water to 1 part paint. Mix it up and you’ve got a “wash.” Put another few drops of full-strength paint on the cardboard palette.
Now get your boxcar and try it out. First, brush on a bit of the black wash on the end of the car, and see how it flows around, settling in the cracks and not quite covering anything. Next take a dab of the straight paint off the palatte, and add a bit to the bottom of the car. It covers a lot better. Wipe almost, but not quite, all of the paint off the brush and apply what’s left to the side of the car.
Does it look OK? No, well, go wash it off. Acrylic paint is water-based, so for a while, you can just take it to the sink and start again. After a while, you’ll realize that you can do this, pretty easily, and it didn’t cost a bundle. By the way, you’ve learned how to use straight paint, washes and “dry brushing.” Try it again with the gray and rust paints.
For now, practice weathering with these simple tools, or maybe try some chalk. Save your money for a nice digital camera, and post some pictures of your weathered models for us, OK?
You’ll find it is one of the easiest things to learn to do because it is so forgiving. You have a large margin for error. There is no right amount of weathering. The trick is to make it look natural so you are trying to simulate something that took time to accumulate and do it in a few minutes. Just think of how various elements get there on the prototype. Dust, grime, rust etc. Also realize that rain water will wash a lot of these elements down the sides so tha figures in as well.
If you don’t like the effect you get, stay with it until it does look right. Wash it off or cover it up with another layer. You’ll find the best results usually happen by accident.
Mr. B is right about the 30 pack , I prefer Red Stripe… I have been going to. www.modeltrainsweathered.com there is a ton of info in the forums section and step by step posted by some truly gifted people who are more then happy to talk about what they do as well as feeling good about posting photos of your work… the guys will tell you what looks good what you need to wotk on etc… Check it out… Joseph
http://www.bragdonent.com/weather.htm
Save yourself the learning curve and experiments. Just buy these. You’ll save money in the long run.

I’ve had a grand time playing with my Bragdon powders. I bought the little four colour starter set and the next time I was back in the city I bought the bigger 12 colour set. I found it very easy to use, try it out on some old cars or scraps first but you’ll get the hang of it quickly.
I did get advised to try wetting the powders - for me this turned out to be a bad idea. I don’t recommend it. They are designed to be used dry. I do spray the model with dull coat to seal it afterwards, most of the time. If you don’t your fingers may become dirty handling the cars and finger prints are more likely.
Hardest part is not going over board and learning to just lightly dust the cars. I highly recommend them. (and Bragdon has yet to send me anything for this glowing endorsement - you listening Mr. Bragdon??).

You see how these powders tone down that plasticy look.

I’ve posted my model railroad roster at : http://fortkentdad.fotopic.net/
The freight cars are the most weathered, I’ve only weathered a few of my loco’s and none of my “varnish” passenger cars.
I’ve just started to use an airbrush and should try weathering with it someday soon. At the moment I’m just learning to control it and am spray painting buildings I’m assembling for my town.
It’s not that hard, just needed some patience and a goo pair of eyes especially eyes for detail. Go get yourself a set of weathering kit from Tamiya (3 kits available; A,B and C) which has 3 different tone for different environment and it comes with a double ended brush and sponge and the results are great and you will learn to weather in no time. And don’t worry about it too much, just go for it but use some photo reference at the beginning because the thing with weathering is that it can never go wrong and it might just looked natural anyway!
While I’ll tend to agree with previous posters that “some sort” of basic application of weathering can be easily be mastered by the novice, producing truly realistic and prototypical weathering on rolling stock is quite another matter, requiring an understanding of the governing factors of the particular era modeled. It takes considerable time and effort to develop such a talent…so you really can’t call it “easy”.
A great many hobbyists’ weathering jobs in HO are grossly over done and bordering on the caricaturish, with reporting marks and most of the car’s features totally obscured and/or the car appearing to have all but totally rusted away. This is an especially unrealistic weathering “technique” when it comes to representing rolling stock from the 1910’s through the 1940’s, where it is often seen in the hobby, as, by necessity, cars (largely because of the materials used to construct them) needed to maintained to keep them sturdy and operational. You’ll see more cars with patching, or having been rebuilt to one degree or another, during this period than in any state of filth on the prototype. Even in the case of modern rolling stock, one is unlikely to find a train consisting of nothing but a bunch of rolling wrecks (as is sometimes seen modeled).
In model weathering, “restraint” is a key word!
CNJ831
I totally agree. It is not hard at all to dust on some powders, splash on an ink wash and dab on some rust. Almost anyone can achieve a simple weathered effect with little effort which is a big improvement over a shiny new freight car.
My son Christopher, who is 7 did this one with some guidance from me.

My personal efforts are no better. IMO there is a huge gulf between this simple basic weathering and the truly realistic models that one sometimes sees. I have enormous respect for someone that has the patience and the skill to truly seek realism in this artistic aspect of the hobby.
I see some nice work in there (okay, really nice).
I agree with the tenet that one must get one’s hands dirty with actually tackling weathering, keep a sharp eye on the real thing (safely), and that you can make it look lousy by overdoing it. For one thing, even a few swipes with a dry brush will improve an out-of-the-package car. Later, with some thought and more observing, pick up the item and have at it for another cautious round. It may take six such encounters, but at some point it should look darned good…and not overdone.
I have found that rust coloured acrykic paint heavy washes do a good job on trucks, and they do a good job on girders. The trick is to use a fine brush, not too much of the wash, and be patient about placing it where the rust ought to be…near rivets, welds, holes left for any purpose, where pintles, hooks, and chains might abrade painted surfaces, and so on.
If a person tackles a car in an evening, there is no reason for it not to look darned good the very next day. You can do a wash application, let it dry for 30-60 mins, go back and do another, and by bedtime, you have one more of your fleet ready to be in a good photo.
Nothing in the world is hard - if you know how to do it! Like when the sculptor was asked how he made the fantastic statues from blocks of granite. His reply was to take a block of granite and chip away everything that doesn’t look like the subject - easy!
Weathering like any hobby activitie takes PRACTICE. The more you practice, the better you should be at whatever you are doing.
I use two methods to weather my Rollingstock and Buildings on my layout. I use chalks and washes.
With the chalks, just go out to your favorite craft store and pick up a set of chalks. I have two sets. The first set has about 8-12 different shades of greys. These I use for shading. The other set that I have has earth tone shades in it. Also when you are picking up your chalk set,pick up a firm paint brush with a short stubby bristles. This will be used to dab on the chalks. You can also rub the chalkstick directly onto the car or building and feather the line out by blending it.
The washes are with alcohol.
I have washes with Paint mixed with Rubbing alcohal and India ink mixed with rubbing alcohal.
Just go to your fav WM or drugstore and pick up the bottles for .97 cents. Pick up 2-3 bottles of the stuff. Open one of the bottles up and start adding dropes of Black India ink to it.
Keep track of the numbers of drops that you put into the bottle, and with a perminate marker write down your wash formula for future referance. Say I think I added 25 -30 drops of black ink to the bottle.
I also have a bottle of PollyS concrete and alcohol that I use for my brick mortar.
I got this from JR last weekend as we were going to an open house.
You get 2 bottles of PollyS Concrete and 1 bottle of Grimey engine black. 3 bottles of alcohol.
Pour one bottle of alcohol out into a clean container. Pour one of the Polly Concrete paint into the empty alcohol container and refill it with alcohol. This mix will give your mortar a fresh look.
The next bottle, you will add the Concete with the grimey engine black. This will give a aged apperance to the mortar.
I hope this will help ya in your weathering endevers. Remember that each time you weather a building or a piece of stock you get better.
Also keep a eye outside as you are driving or walking to see how things actually weath
You’ll need a series of brushes, sponges, and mabey a double action airbrush. Various shades of oil paints, gouche, acrylics, and inks. And set of weathering powders.
Master washes, drybrushing, stippling, and airbrushing…and along the way you’ll come up with ways to cross and combine elements to make you desired effects.
First thing if you are into current railroads take a camera and photograph cars from the sides & ends. Also if you can get some shots of the roofs from a bridge. Do not go on the “railroad property” but find safe areas next to the right away. You can also find photos on line at…
http://www.rr-fallenflags.org/
Look at the photos and you can see where dirt, rust, grime ect is on the cars. You can see how some colors fade and how the wheels of the next car sends a splatter pattern up on the ends of the car.
I start most of my weathering with a thin wash of black india ink or acrylic paints to fill in all the lines to give contrast. Then I use chalks a little at a time. Take your time, stop and look, you can always add a little more if you are not happy. You can find cars at train shows for well under $5.00 and try out on them first. As you get better you can add heavy scaring, rust, fading lettering, over-paints, patches, ect. But remember out of the box the cars all look like “toy trains” when you add some weathering then you have scale model railroad cars!

Robby - as a newbie to the hobby I’ve justed experimenting with painting & weathering of rolling stock, structures and people. I’ve taken the MisterBeasley approach (heck, his advice this past year has helped on numerous occasions!) and combined it with Brian Fayle methods of painting (www.brifayle.ca).
For $10 (that’s Cdn) at Walmart I bought the Reeves Acrylic 24 tube paint starter set and some brushes from Dollarama. My seven year old and I have started on some Plasticville and second hand ebay rolling stock - we’re both pleasantly surprised with the results.
For me, it’s all about keeping a K.I.S.S. learning curve so the entire family can participate.
Derek
I like this answer best.
It’s all about looking, really seeing what is there, and replicating it. I think where people get into trouble is they imitate the modeler, not the prototype.
Many of us would like to weather like Agro or Mellow Mike–but don’t copy their models. See what they see.
Chip said: It’s all about looking, really seeing what is there, and replicating it. I think where people get into trouble is they imitate the modeler, not the prototype.
=====================================================================
Hear! Hear! Well said!
The only thing I can add when railfaning observed the whole train and not just the locomotives as they go by.
Remember not all cars are rust buckets in fact most are in good but weathered shape and locomotives are not rusted up either as a rule.
There are several on line freight car sites that will help us in deciding how much weathering is needed for our freight car roster to look “right”.
Here are some ideas to get you started.
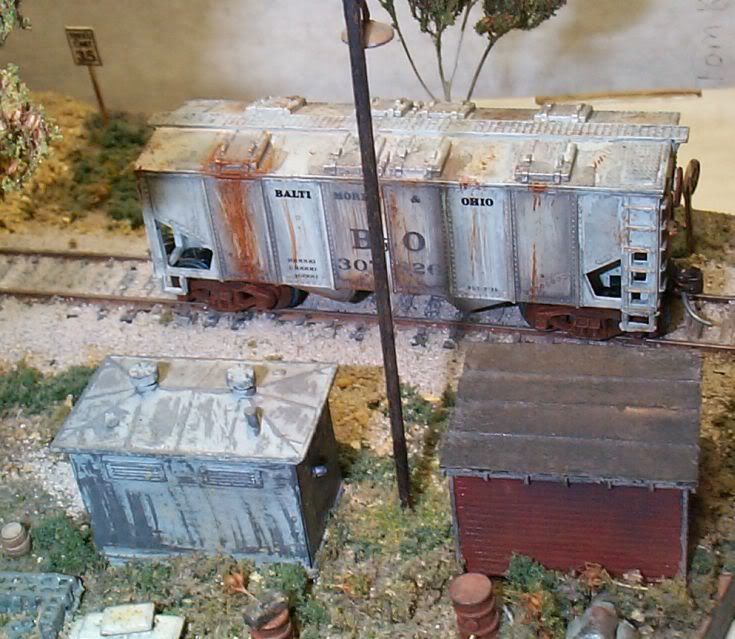
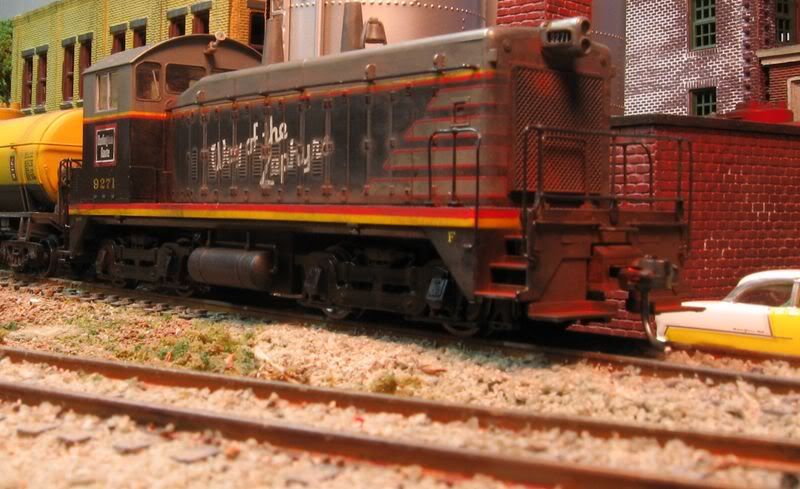
Thanks for all of the tips. Right now I am trying the wet and dry brush. Heres a couple of pics. This is my first try. I am going to have a coal layout an I kinda like them with the coal dust look. Mine dont look like masterpieces like I have seen on here, but I will keep it up. Thanks agagin every body…

