I’ve got a few N scale Fox Valley boxcars, (3 canstock, one Railbox) and I need to know how I can weather them using pastels.
Not pastels but I weather using the $.50 acrylic paint from walmart ( I forget the name) and just thin it with water and brush on as heavy or light as you want. You can always take it off if too heavy.


Maybe someone can chime in with more experiance using pastels
hope this helped
I use weathering powders from AIM. I have only a few colors, but that’s enough.
The model needs to be clean, but it helps to give it a light coating of Dul-Coat which gives the powders something to stick to, known as “tooth.”. This is done before any weathering. Remember, if you don’t like the result, you can still wash it off.
I use a small, beat-up old paintbrush for the weathering powder. Once you do get a weathering job you’re happy with, give it another coat of Dul-Coat which will seal the powder in. No more washing off at this point. You may find that the effect is reduced a bit by the second coat of Dul-Coat seal.
I find it’s better to weather too lightly than too heavily.
I keep my weathering powders in this plastic case. I just weather the car right over it.


I also love the AK Interactive weathering pencils.


-Kevin
Hello CNW Sall Lake Spur,
IMHO experimentation with various methods and mediums and finding what combinations work best for you is key to fun and rewarding weathering. Watching how-to videos and pictorials by the masters and working from prototype photos are a great help. A continual learning process, and I’ve but scratched the surface.
Most of BN 320008 & MILW 50309’s weathering was done in layers with Pan Pastels, though AK water color pencils, pigment powders and artist oil paint were also employed. Truck weathering a la Jeremy St. Peter.
Pan Pastels are reversible to some degree depending on how heavy and or vigorous the application.
Much agree with Mister B, go lightly.
'So much to weather, so little time."
Regards, Peter


This is a great topic with a lot of different insights. I too use a variety of paint methods. Artist chalk powders that I shave go after I spray the car with dullcoate. Next I add tiny dots or streaks of artist paint (in tubes) burnt umber and burnt sienna. I do that with toothpicks. This creates the rust impressions.
Roofs also get weathered based on the type of car. Plenty of ways to achieve that. Even looking at real pictures help. Can’t do weathering right immediately, so I worked on some cheap models to try out techniques.
Right now, most of my weathering processes are about speed and simplicity.
As my production of freight cars slows down, I plan to add more time consuming and detailed weathering techniques in the future.
-Kevin
Some of the best weathering advice I know is on the Proto:48 list (used to be Yahoo Groups, now groups.io. If there is not something pictured and described that rings the bell, ask at several of the greatest minds in the field will happily answer you personally and advise.
My preference would be to use old makeup brushes of various kinds and sizes to do pastels. They have the right characteristics to work with intricate shading using powders. Bachelors might have to buy new… [(-D]
The best advice I was ever given is “go much lighter than you think”. Most weathering that is not rust is dust, not dirt, and it is usually very light, almost white. This is not a trick of the lighting, but daylight certainly enhances the ‘paleness’ of dusting.
The best weathering advice will always come from historical military modelers. These guys are the best at weathering and are great to learn from.
I would suggest we post pictures of some of our best weathering examples and the techniques we used to get there. Peter posted a couple of amazing examples of what can be done with pan pastels.
My BALTIMORE AND OHIO boxcar was built from a Funaro & Camerlengo kit. It was “panel faded” using ribald priming as an undercoat. Then it was washed with an oil paint dot filter. Finally, panel lines were emphasized.
Those military guys are bountiful with great techniques. The dot filter is incredible for bringing life to single color flat surfaces.
This freight car is no longer in my collection. It has been transferred to my friend Carl in Naples, Florida for his layout.

-Kevin
What is ribald priming?
Priming the model using pitch black and bright white.
Then you paint with a thinned layer of the final color, which will appear darker over the black areas and lighter over the white areas.
It is a great way to simulate paint fading on flat surfaces. You can see the effect very clearly on the sides of the B&O boxcar.
It can also be used to “force” the color shift when sunlight bounces off a large flat surface that cannot be reproduced in miniature with photo lighting.
-Kevin
I agree, and there are some excellent YouTube videos done by some British Modelers that I learn a lot from.
I tend to just use powders now. This TT was done with just powders.


Brent. Excellent looking turntable. Well done.
David
I found a picture of ribald priming in progress.
Obviously, this is not the same B&O boxcar I posted earlier, but the undercoat would look the same.
This produces great looking faded variations in the final color.

-Kevin
Go lightly is great advice. To that I would add - do not feel you have to do the entire job at one sitting. An initial weathering, then live with the results for a while. (Keep notes as to just what you did).
Pay some attention to how “old” the car would be compared to your era. Sometimes the only real sign of weathering is a slight chalkiness – a texture – to the paint.
This means a simple application of DullCoat can sometimes be enough. There will be time later to get into the specific areas of weathering that the real masters at it notice and replicate. For example, WHERE on a freight car does rust tend to originate? That can wait.
Dave Nelson
Thanks, David, I am pretty happy with how it turned out.
I’m more inclined to use an airbrush for weathering, but have done some freight cars using oil-based pastels. I use black, grey, and white, along with a fairly wide selection of browns and reds (no bright reds, but lots of earthtones. I simple peel off the paper, then rub the pastel stick on some fairly coarse sandpaper, then dump resultant dust into a plastic blister like those used with a cardboard backing for packaging small items, like Krazy Glue.
I then select a brush (nothing high-quality necessary for this) sized appropriately for what I wish to do.
For general dirt-ifying, I use a soft 1/2" or 3/4" brush…simply dip it into the collected pastel-dust of your choice, brush or daub it onto the car, then use the brush to push it where you want it or to brush off the excess (do that over the container of that colour - no point in wasting it, even though the pastel sticks are not at all expensive).
You can add multiple layers of the same, or different, colours or simply brush it more vigorously to remove as much of it as possible.
I’m certainly no expert in pastel application, but here are a few examples…
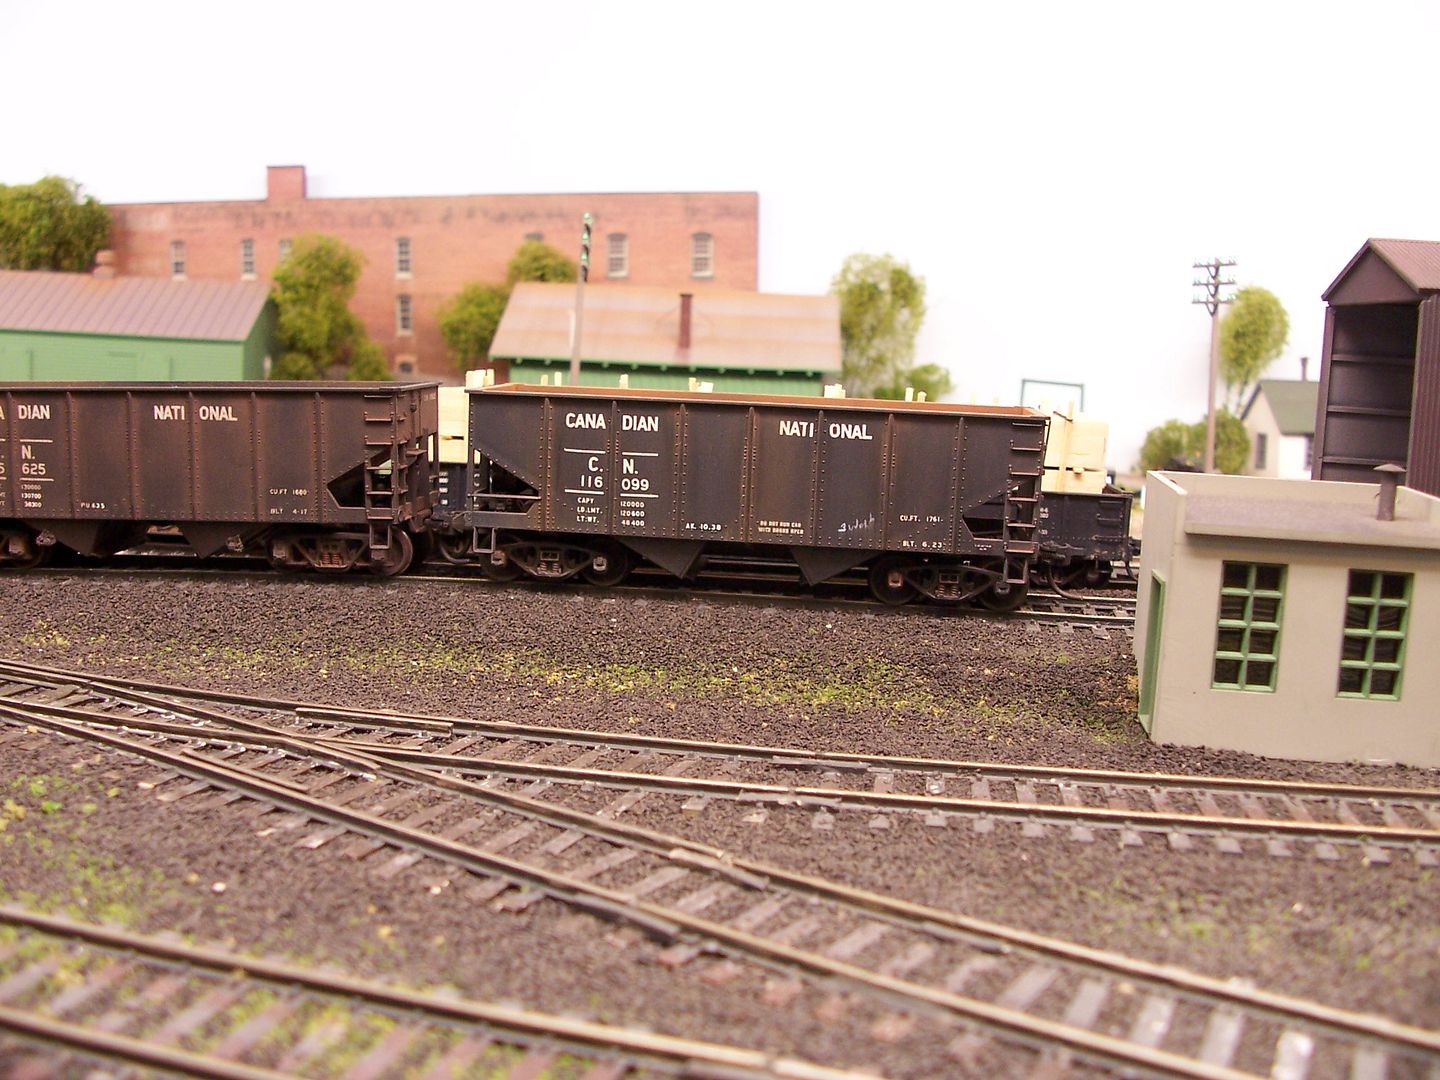
For these Accurail hoppers, with C-D-S dry tranfer lettering. I used a medium-sized brush to put rust-coloured pastels along the exterior ribs of the cars, where the rivets and joints between the various parts would be among the first areas to rust. I then used a slightly stiffer brush to remove excess pastels from the face of the individual panels - rust from the joints above the panels might stain the panels somewhat, but the panels themselves are not yet rusting, while the areas around the ribs are…
(The pictures should enlarge if you click on them)
This Athearn hopper, one of two bargains off the “used” table at a forme