I have a number of Accurail cars. All of them use metal wheelsets. I’ve tried Kadee, ExactRail, Intermountain, and Jaybee - all with success. Of those, I’d recommend ExactRail or Intermountain for best performance. The stock one-piece wheelsets are probably the worst part of any Accurail kit, and deserve to go straight to the trash. They don’t roll especially well and tend to wobble.
I also replace the couplers with Kadees. Both the older style (e.g. #5) and newer whisker couplers work great. In operating session service, I found the stock Accumate couplers to deliver unacceptable perfomance, so I don’t use them in anything.
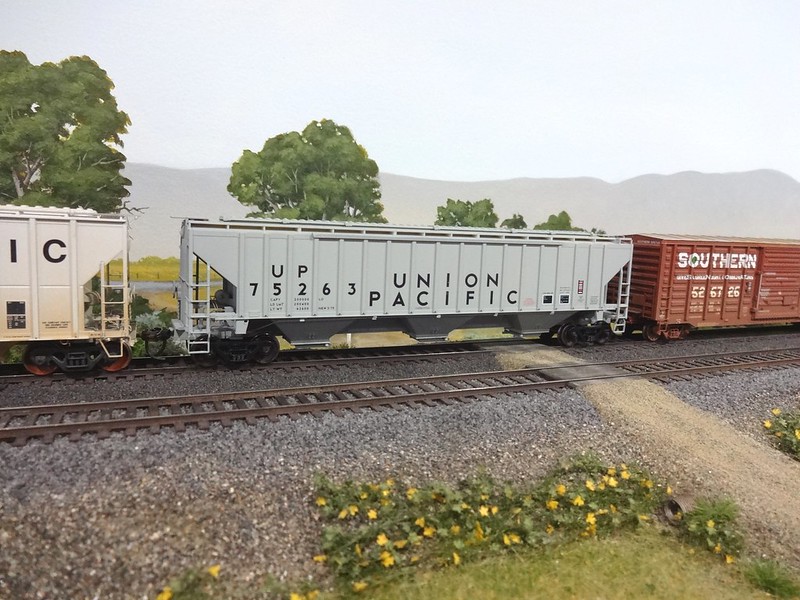
Here’s an Accurail PS-4750 hopper. I added and/or modified some road-specific details, and added some extra decals for ACI labels. This car uses ExactRail wheelsets and Kadee #148 couplers.
Well, Mr. Shay, it’s now 23 hours later and your yesterday’s “tomorrow” is now today. And unless you’e in Alaska or Hawaii, your LHS has been closed for hours.
The suspense is unbearable. Just what did you get? [8-|]
So far I’m getting some Testors Dullcote, Kadee 148s, a stiff short haired brush, Testors liquid cement, 2 MDC shay promotional train cars (I already have the other boxcar, they’re 5 dollars a piece, I can’t pass them up).
At the moment I’m sitting on a mound of about 15 Accurail kits I’ve all picked up at local shows for about $12 a piece or less. I found a whole thing of xacto blades from when my father was building his car models in the 90s. I also scored myself a proto 2000 Mathers stock car kit at an antique shop (for $1!) and a couple Tichy kits from a Hobbytown USA that was closing down.
The most challenging piece I have is an MDC Hon3 “3-1 Moose Jaws Static Locomotive” kit. This is more of a “here’s a pile of parts from various kits we’ve made, you can make an 0-8-0 out of it!” kitbashing kit. In all honesty I think I’m going to pay a professional to build and paint it for me, although this seems to be kind of a difficult task in itself to find someone who does this stuff.
I also got my hands on a whole bunch of pastel chalks so I think I’m going to play around with weathering a couple of my junky old toy quality boxcars I have sitting around from when I was a kid.
Pretty much everything you need has been covered. I have assembled numerous Accurail kits, mostly boxcars, and I can throw one together in about 10 minutes. I replace their plastic wheels with metal ones. A while back I purchased a reaming tool from Micro Mark which reams out the axle pocket in the truck. This isn’t necessary but it does seem to make them more free rolling. I don’t put a piece of equipment on my layout anymore than doesn’t have KD couplers, #5s or the whisker equivalent which if I remember is a #148. I’m snooty about my couplers and to me KDs are the only acceptable choice. I would recommend a coupler height gauge, also available from Kadee. As long as you adjust the coupler to proper height, the hoses shouldn’t cause you any problems. Make sure the metal weight is perfectly flat. It it is bowed, the floor and underframe will bend to its contour and you will have difficulty getting the couplers to the right height. I found this to be a common problem with the old Athearn BB kits but not so much with Accurail. Still, I check them before assembly. If they are bowed, you can easily flatten them out just by standing on them. Lastly I spend a few minutes to weather my cars using weathering powders. For a little time and cost it makes a big difference in appearance. Accurail has filled the void left when Athearn quit making the shake the box kits. I think theirs is a better product for no other reason than the coupler pockets.
The Mather was a score indeed, and you can’t beat Tichy cars for the price, even at retail. I never thought of scrounging antique shops before. Thanks for the idea.
As for the 0-8-0, I’d think that unless you’re way out there in the hinterlands, there’s probably someone relatively close who can both do it and whose quality of work is available for viewing. If your LHS specializes in trains, they’ll have a few leads, as will a robust local club.
Throwing this out there, but Mr Shay are you in Northwest Indiana by chance?
Also all the above suggestions were good as well. Best friends for performance are a Kadee coupler height gauge, NMRA standard gauge and a postal scale.
So i have come to a new dilema. I was able to complete 1 kit, a NP 40’ steel boxcar where you glue on the doors yourself completely fine. I started a second kit, an ATSF 40’ boxcar, and now I cannot seem to get the “Box” to be able to attach to the car underframe. I tried using a second kit that was exactly the same and both underframes would not fit into the boxes. The NP kit worked perfectly fine but these kits do not. The boxes are just way too narrow to fit in. Is there way to fix this? Googling around came up with nothing.
You don’t mention the kit manufacturer, but the sides of some one-piece kit carbodies can sometimes draw together somewhat at their mid-points. The easiest way to get the underframe/floor assembly into place is to start at one end, where the car’s end has prevented the width of the opening from decreasing. Hold the floor at an angle so that only one end can be inserted, then gradually decrease the angle of separation as more of the floor forces the car’s sides apart, allowing it to fit into place.
If you’re building a craftsman-type resin car, floor castings sometimes need to be sanded to width or length. For the former, try to remove an equal amount of material from both sides, so that the centre sill (and truck and coupler mounting points) remain centred.
For building Accurail cars, I usually replace some or all of the cast-on grabirons, and usually replace the sill steps with metal ones from A-Line. I also add roofwalk grabs to house cars, and add brake detail and rigging to most cars, too. I don’t, however, replace the wheels with metal ones - the plastic ones work fine for me, and are quieter than metal.
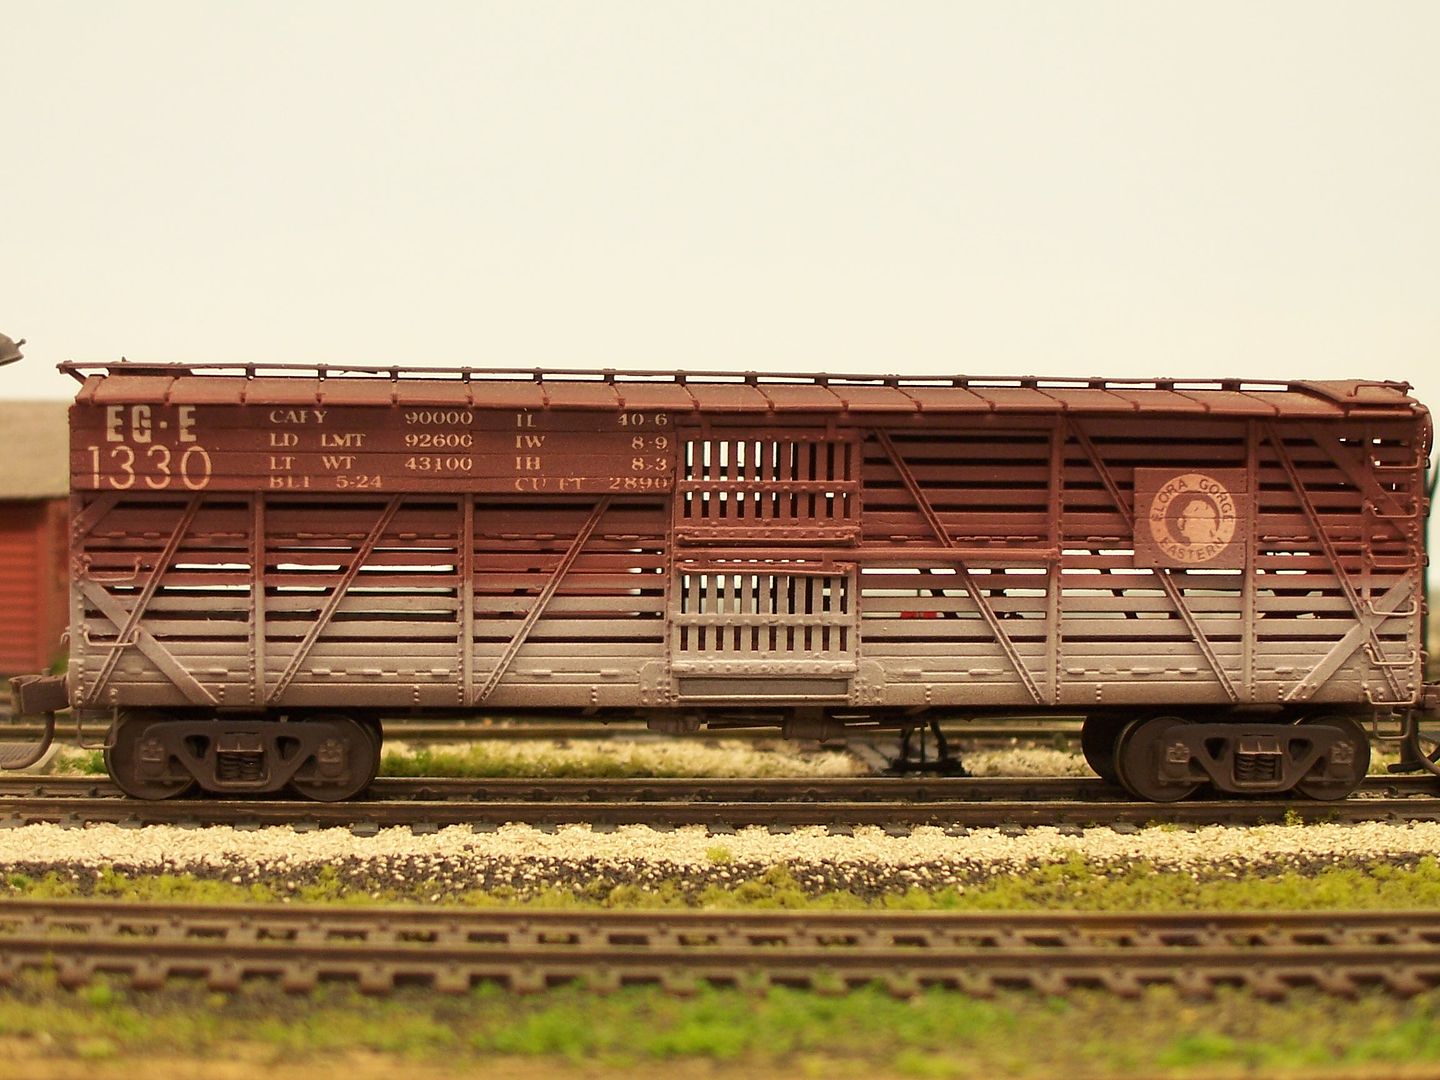
This one got a little more attention than most of mine…
Accurail cars are among my favourites because they offer a lot which are suitable for my late-'30s era layout, and can be useable as-is or modified to suit, depending on one’s needs and skills.
The underframe, if cut off from a sprue along the edge of the crossmembers, may have flash on the edges which makes it seem too wide to fit under the body. Look at the edges of both sides - they should lookj the same, if one has spare bumps of plastic - that needs to be carefully filed down smooth. That’s anoother commoon reason for the underframe not fitting under the carbody.
Do a whole bunch of those Accurail kits before trying the P2K kit. Unless it’s the Timesaver type, there are very delicate individual grabs to cut off the sprues (sprue cutters are far too big - I use a single edge razor blade for this) and glue in place. It may be better to get A-Line or Tichy metal parts to replace these, but then you will need to find matching paint to paint them. Even if you do get the car assembled without breaking any, they are quite delicate and easily damaged in normal handling of the car. Metal ones look equally good (scale size) and are fairly indestructible.
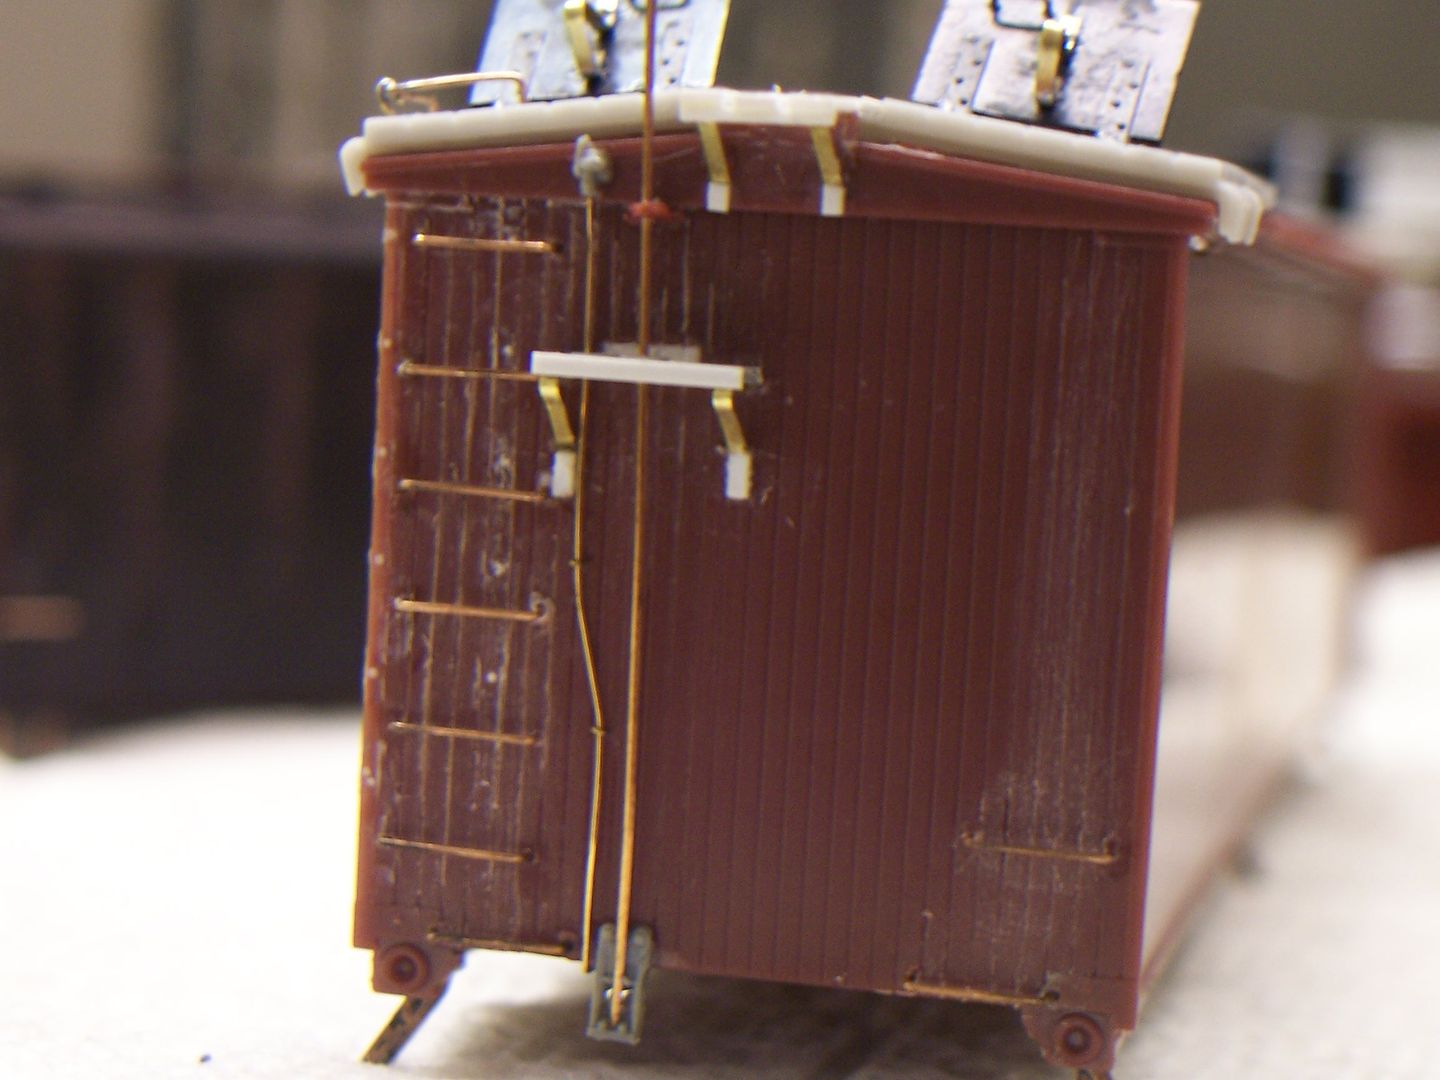
The Proto stock cars do look better with wire grabs, but the cast-in mounting holes for the kit’s plastic ones need to be filled first, as the holes for the plastic grabs are much bigger than needed for wire ones.
I use styrene rod from Evergreen to fill the existing holes, then, when the plugs are well-hardened, slice off any excess and drill them to accept Tichy .012" wire grabs. You can also bend your own using .012" phosphor bronze wire, also available from Tichy.
Here’s a kit that I found on the “used” table at a LHS. It was in an unmarked plastic bag, with no instructions and no trucks or couplers. According the store’s owner, it was a pre-production sample, and I couldn’t resist the dollar or two price tag.
Other than the extra time needed for filling and drilling, the wire grabs are much easier with which to work than the supplied plastic ones, and that holds true for all Proto2000 kits, especially the tank cars, and for the Proto1000 Dominion/Fowler boxcars.
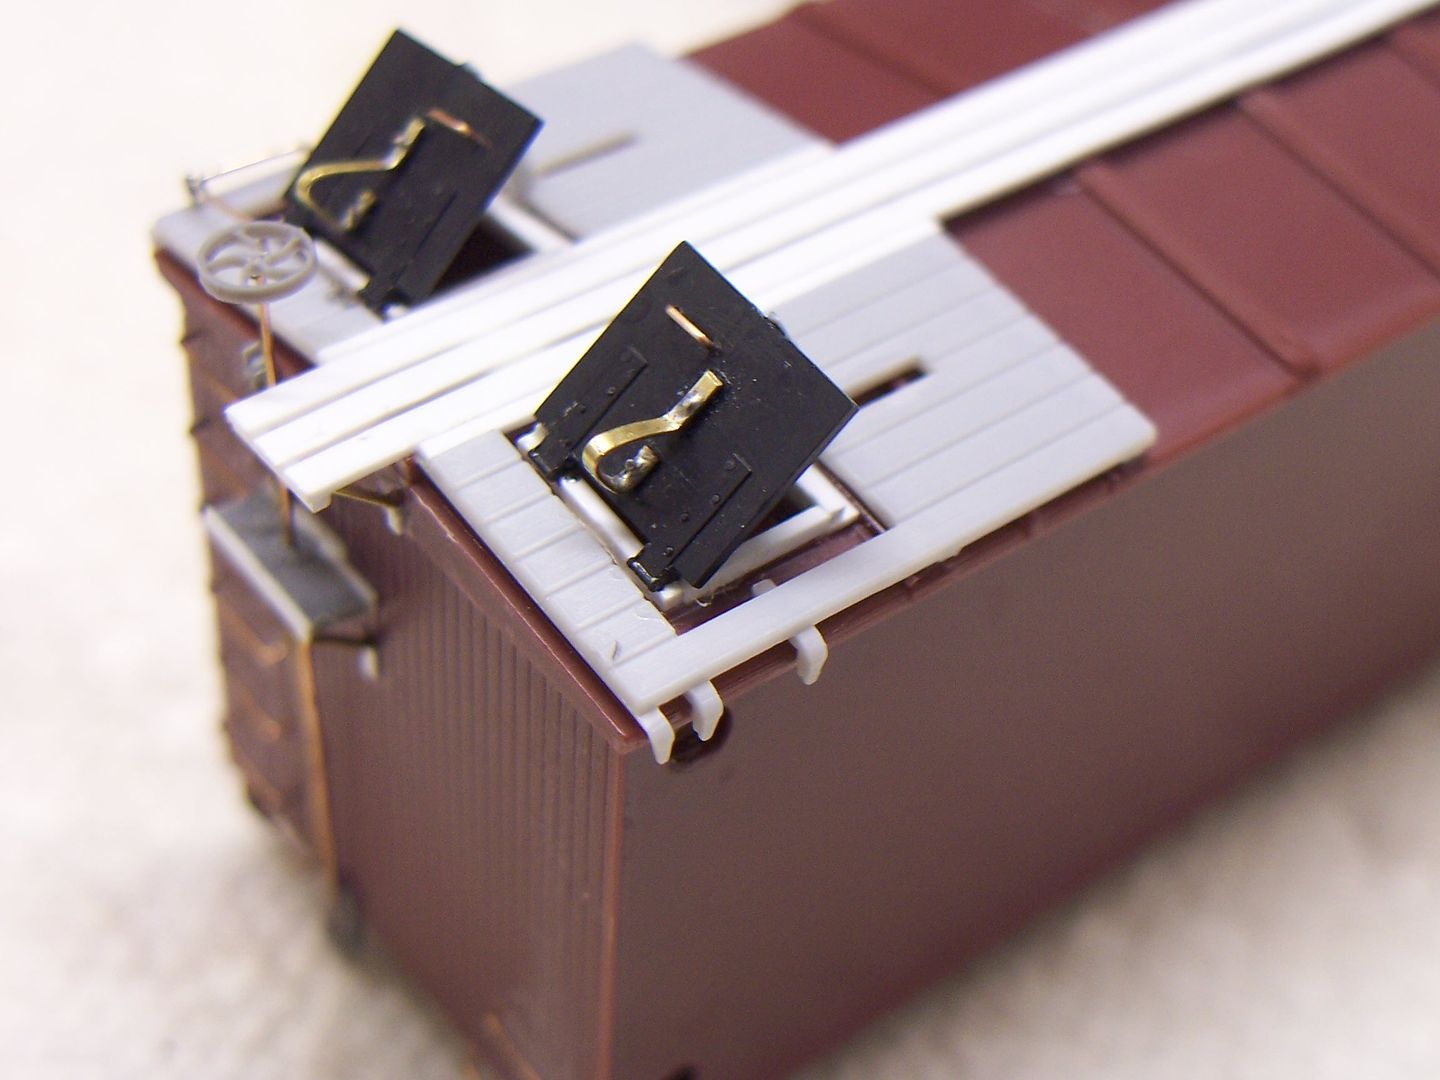
However, the r-t-r Fowler cars, like their prototypes, have grabirons of a non-standard size, and you’ll need to make your own. Each car has 36 grabirons (72 holes-worth - 78 if you also add the corner grabs on the roofwalk)…
…and I have, so far, done a dozen of them…
Don’t worry too much about matching paint on the steps and grabirons, either - with a little weathering, any difference will be unnoticeable. Remember, too, that if a railroad received an off-line car with damaged grabirons or sill steps, it was
I have all sorts of sprue nippers, but not the tweezer kind, and all of them are too big to nip off P2K grabs without breaking half of them. And since you can;t exactly sand flash off them… a razor blade and magnifier let me slice them off precisely. After I started using the razor blade, I only ever lost one - even with my hand over the soon to part grab, it still managed to fly off onto the floor somewhere and was gone.
Wayne - the P2K tank ares, of all the P2K kits I’ve done, are the ones I DIDN’T have problems with the grabs - after the first one which I initially gave up on in frustration. After I returned to it and completed it, I did like a half dozen of them an got the process down pretty well - mostly by not exactly following the instructions. I put some of the tank grabs on before assembling the rank - and drill the holes all the way through so I can glue them fromt he inside, then put the tank together. I do another step or two out of order as well as I found it make the assembly go easier. Been a while since I’ve done any - I think it’s the tank saddles. My way may result in a slight gap you’d only see if you pick the car up and turn it over - but no one but me is going to be doing that. I still have about a half dozen in the unbuilt kit inventory, but besides actually getting a layout under way, my next rolling stock project it to finish my home-built covered hoppers for cement traffic - and that means more Accurail 55 ton USRA hoppers which are the starting point, prototype and model.
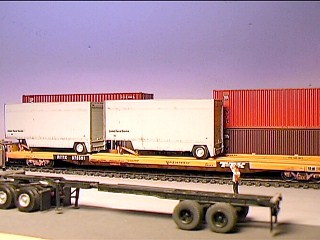
The only Accurail kits I have are flatcars for piggyback trailers. They are a lot nicer than the old Athearn Blue Box kits. I use an Xacto knife to cut the parts off of the spur. That and a small screwdriver is all I needed. For glue I use Medium Zap a Gap CA (super glue). I squeeze a drop of glue out onto the end of the bottle neck and then touch the part to the drop of glue so I use less than a drop. I used the stock trucks and wheels and they are fine. I used Kadee #5 couplers. This was before #148 came out.
A little weathering always helps the car’s black colored trucks from disappearing. I also add a little rust, dust and dirt. Also grease on the fifth wheels and some tire makers on the flat bed.