I finally had success in printing off white decal lettering. A friends son sorted it out for me. [:)]
Why you might ask? Well, most of my private logging/mining engines are black and I need white lettering to decal them, so I decided to print my lettering on white decal paper with a black background. I’m hoping that the decal edge will disappear when applied. I haven’t tried boxcar red background yet, but that is next, if I can get the red the right shade. [:)]
You need to use the “Font” and “Highlighter” functions in Word or whatever program you are using.
Once you have your document ready, “Select” the whole document and then select the “Font” function and select white. Next, select the “Highlighter” function and select black.
That was all there was to it. I’ve printed off the decals and am letting them dry right now. They’ll get at least three coats of acrylic gloss sealer before I use them. I’ll post the results in a couple of days.
The highlighter function has limitied colors. Another method, still using Word or PowerPoint, what I normally use, is to make a text box. Type your words and then pick the color for the fill and line, and then select your text and pick the color (white). Many more choices in color and it might get closer to the boxcar red.
I use a guy with an ALPS printer to do my white lettering.
Prints a white foil on clear paper. Even does the tiny print… note the markings to the right of the door. “Return when empty to Laurel Valley RY, Ligonier, PA” Also useful for adding new end numbers to cars that have been re-numbered.
You should check it out. Not terribly expensive, and you can get a whole sheet of lettering for your entire fleet. The trick is putting some thought into what you need and laying out the sheet in Publisher or some other formatting program.
Great discussion. More options cropping up all the time. [:)]
I’m working on the text box suggestion. Looks promising. The key with this method is to play with the colours and print out test sheets on normal paper until you get the colour you want.
Yes, the decal paper must be white, that’s a given. [;)]
ALPS used to market inkjet printers and they were the only ones to offer white ink cartridges. As you have noticed, the only way to get white lettered decals is to start with white decal paper and use white color for letters in Word, PowerPoint PhotoShop etc.
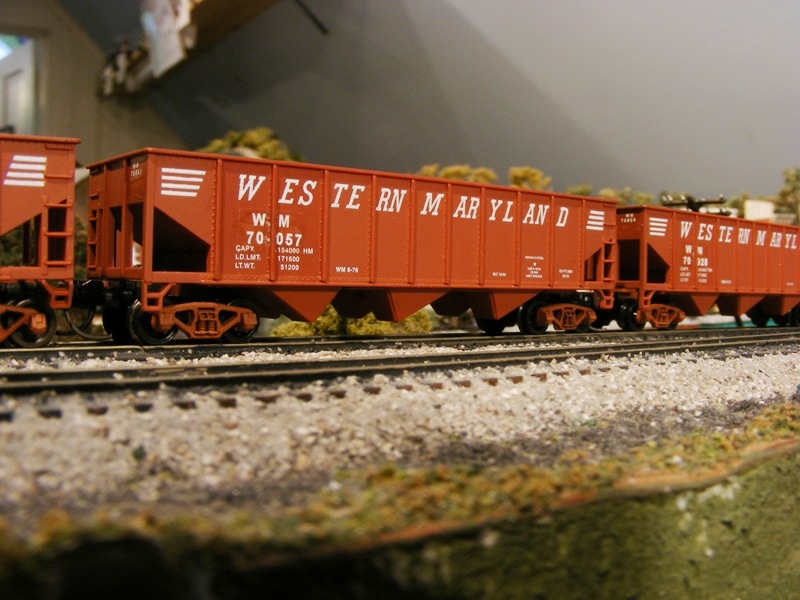
These hopper cars were done with white decal paper and black printed background. Be sure to use decal softener to flatten the decal film well, finish with a coat of clear flat. I apply chalk dust weathering over the top. The edges are “hard to see” to “invisible.”
Be sure not to short cut the clear gloss over your newly printed decals. I’ve found that the edges want to curl up when the setting solution starts to dry and that’s a real bugger to straighten out.[:(!]
One other way to print white on clear decals is to use a silk-screen process. A kit that will print hundreds of decal sheets costs about $35. What you do is create your decals in black and white (black lettering on white paper) then use photo sensitive stencil material to make a screen to print the decals. This is pretty low-tech and requires no photo chemicals.
Once you have the screen/stencil you place it on your decal paper and use a squeegee to press ink through the screen onto the paper. Lift off the screen and let it dry, then spray on decal lacquer as usual.
This link takes you to more detailed instructions:
Time for an update on the experiment. Good news and bad news.
I was successful in getting white lettering with a black background printed on white decal paper. Over a period of 24 hours I gave the decal sheet three coats of gloss sealer and then tried a sample. Here’s where things started to go awry.
With three coats of sealer I found the decals somewhat difficult to cut with a new blade. I attributed this to the backing paper. No big deal, just have to use more care in the cutting process to get a clean cut. The decals separated nicely and I was able to get them settled onto the car reasonably quickly with Micro Set. Unfortunately, the moisture penetrated the edges of the decal and the ink ran. Off they came. [sigh]
I cut out the next decals I wanted to apply and gave them and the sheet three more coats of sealer, ensuring that the edges were sealed. Concerned, you bet; these decals are starting to get thick. Anyway, after the third coat of sealer had dried I again apllied the decals, or at least tried to. The decal I cut out wouldn’t separate from the backing paper because of the sealed edges and the decal I cut out of the sheet was even more difficult to cut and once again the ink ran due to moisture seepage in from the edges. Now I’m getting irritated. [:(!]
I gave the sheet of decals two more coats of gloss and allowed the last coat to dry overnight. It was immediately apparent that the decals were going to be thicker than I wanted. They were difficult to cut and the edges still bled a bit. I tried to touch up the edges with a bit of paint, but the effect wasn’t satisfactory. The decal was obvious and just didn’t disappear into the model.[soapbox]
Summary:
I suspect that the decal film thickness problem arises from two factors. One, the film I was using was just too thick and not suitable for model railroading. Two, there were just to ma
If you don’t need to letter very many cars or locos, why not simply buy suitable decals or dry transfers? Several firms offer alphabet and number sets in various fonts, sizes, and colours, and dimensional data is also available in different styles and colours, too. Champ even offers decals for commonly used private name words.
While I’ve had custom dry transfers made in white, all of my passenger equipment (well over 100 cars over the years) was done using dry transfer alphabet sets. For your handful of cars and locos, this would be a viable (and cheaper) option.
One of the issues I’m running into is trying to do decals for an L&N DIner, and AFT 1’s tool car tender. No dry trasfer for ether, I’ve had fits trying to match the blue, and the AFT decal did a funny splaying on it’s edge.
Wow Wayne, those are great photos. I have done dry transfers in the past and they have worked well. Recently though I’ve just not been able to get them the way I want them on the equipment. I also wanted to try and make decals, just for the challenge. I’m talking a couple of 8.5x11 sheets so I’ll likely just bite the bullet and have them made. With engines and rolling stock I figure I’
If you have a Kinko’s, Office Depot or such nearby, have them print your decal with a laser printer. You will have to get the right decal paper made for it, Hobby Town normally stocks it. Make sure you get your sheet filled up to make is cost effective even though its still fairly reasonable. It should olny take one coar, two at the most for sealer and the ink won’t run when you soak it.
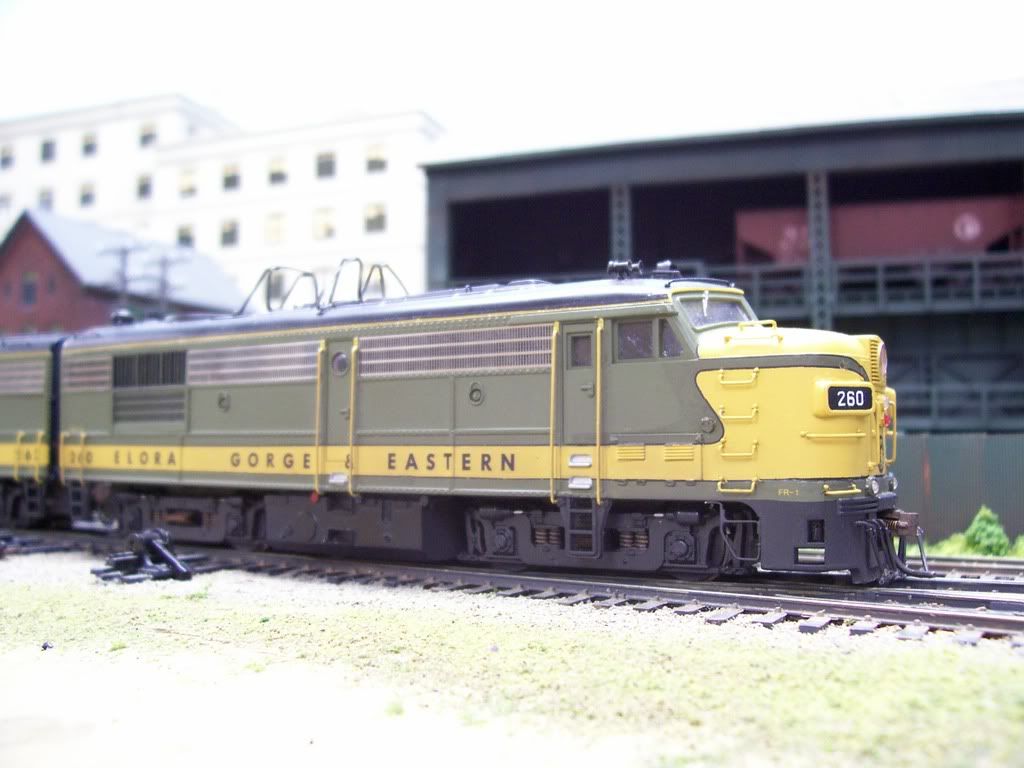
If you need to match a specific paint colour, a good choice would be to use dry transfers as a masking device. To do so, you need to paint your car or loco taking this into consideration. The locomotive below is an example of one for which, at the time it was built, there was no correct lettering available, either in the size or especially the colours.
I first painted the entire sides and ends of the loco with the cream colour (the correct paint colours weren’t available, either, so they were custom-mixed using Polly S military colours), using a good quality brush - several coats were required. After the paint had fully cured, I used dry transfer alphabet sets (the colour doesn’t matter) to add the road name and numbers, and dry transfer stripes to add the upper striping on the cab and hoods. It’s important to skip the normal burnishing of the lettering after it’s in place.
Next, the areas that were to remain cream-coloured were masked, leaving the area for the stripe beneath the cab exposed. I then brushed on the maroon mixture, painting right over the dry transfer stripes and roadname, along with the top of the cab and hoods and the stripe below the cab. Again, several coats were required. (This paint dried very quickly, so by the time I had completed one coat, it was dry enough to start the next.) After I was satisfied with the coverage, and the paint was dry to the touch (almost immediately), all of the masking tape was removed. Next, I used bits of fresh masking tape to dab at the dry transfer lettering, lifting it off and exposing the cream-coloured lett
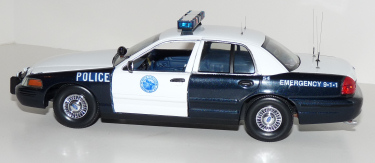
I feel your pain… Back when I was actively building model cars, I also needed a way to make custom “white” decals. I tried something similar to what you tried. To make a model of a local police car, I needed white letters on a dark blue stripe. I used a graphics program to make the art, then printed it on white decal paper. I oversprayed it with clear, then applied it to the model. At a glance, it looked good. But in some light, you can to this day see the edges of the decals. Especially if using a camera flash.
An Alps printer is beyond my budget, and no one else seems to still make such a printer (I’m done my best to find something). The ability to print in metallics is also a very nice idea.
Soooooooo, I say to the world, MAKE A REPLACEMENT FOR THE ALPS PRINTER!
First off, try the Evans Design decal paper for making white lettering on a colored background. This inkjet compatible decal paper does not require a sealer coat. Just let the decal ink dry for at least 30 minutes before wetting for application. Also, use only a water based clear coat over these decals as solvent based clears will turn the white background clear permanently! Don’t panic when you first wet these decals as the background turns clear. It will become opaque white again as it dries. I have made several white, or light, colored text on dark colored backgrounds this way (sorry, no pics). The only time the un-sealed ink ever smeared on me was when I kept applying repeated coats of Solvaset trying to realign a decal I got on crooked!
As previously suggested, you might want to print out a few trial runs on plain paper before you make the final printing. However, keep in mind that whatever decal paper you use will probably take the ink differently than the plain paper. The Evans Design decal paper tends to take the ink in a way similar to an expensive matte photo paper. Thus, when I’m trying to match the background color to a particular paint job, I’ll print out a row of small blocks of slightly varying shades of the background color across one edge of the actual decal paper. When I find the correct match, I set all of my backgrounds to match that color block prior to the final printing. So far, I have made black, dark blue and oxide colored background decals with white, light orange and yellow lettering. All have come out quite nicely. The Evans Design decal paper only comes in white background. However, a shot of Testors DulCote is all it takes to make the decal background clear when a clear background is needed.