1st Time Scratch Building - Need Basic Info

I am going to build a large residential structure, consisting of wood clapboard siding, asphalt shingle roof, brick chimneys, and windows and doors.

I started out with a foam board mockup to get dimensions and angles, and I was pretty pleased with that. Then, I started to look at the materials required for the walls and roof and found that most of the materials are 0.020 styrene sheet, way to flimsy to construct walls and roofs.

So, my first question is, do you construct a substructure and then glue the styrene walls and shingle roofs to the substructure? What material is recommended for the substructure? Can I just use the foam board?

What is the recommended adhesive to bond the styrene sheet to the substructure?

How thin or thick should the substructure be? I am planning to use Grandt Line windows and doors.

Let me start with that. Look forward to your advice.

Rich

Some brief thoughts and a few pics to illustrate.

Wall thickness depends a lot on whether you intend to do an interior. Also whether it’s supposed to be a typical thickness wall (stud, wallboard and cladding) or some sort of thicker, more typical masonry construction. You’re doing clapboard, so a house like that with an interior would probably not want to be constructed of foamboard – too thick.

I like to use basswood, but balsa also works. Alternatively, you could use thicker plastic sheeting and clad it in your finish sheathing.

Here’s a couple of pics from a station I built last week that show how I built up the form then covered it with plastic stone sheathing.

Pics are having an issue right now, so will try that again later. Since it was a masonry building, the window and door frames are different, thinner, than for wood buildings like yours, that usually have a wider frame.

I painted both the sheathing and the doors/windows (they’re Tichy, but basically the same as Grandt, which I favor, just had these on hand) before assembly. That’s a good thing if it works for the item you’re modeling, but not always possible.

In this case, I built the wooden form from basswood first, then cut the plastic sheathing to fit. This works well for simple building, less so for complex ones.

The roof or floor must be removeable if detailing inside, but you may want to either keep that option open or want to get in just to do lighting, so most of my buildings feature a removeable roof or, less commonly, a removable floor.

I didn’t do any scratch building until four years ago, I was a Craftsman Kit builder for 40 plus years. I just decided to give it a try and was I amazed. It turned out easier to build my own houses than build Craftsman Kits and twice as much fun.

The link below is my first attempt at scratch building anything. I went on to build over a dozen “catalog homes”.

http://melvineperry.blogspot.com/2012/12/my-first-scratch-built-building.html

There are several post on my blog of my catalog houses.

Have a blast, I really missed out not scratch building earlier on.

Mel

I would not use foam. I would not build a substructure for doing an “overlay”.

With .020 thick “walls”, that’s 1 3/4 HO inch thick. Walls in wood structures are typically 6" thick if they’re stud framed. If that’s what you’re up to, I recommend laminating the .020 to a sheet of .040. Generally, I’d cut the .020 piece to size, lay it on a larger piece of .040 on a FLAT surface, add appropriate weights, and use a small paint brush to apply MEK to the edges. And wait. Now it’s .060" thick. And it’s the thickness of a real wall. Then trim off the excess .040".

Please try the concept as an experiment BEFORE doing the real thing. Get comfortable with it.

You’ll likely need more reinforcement. You might get enough with the floor(s) and ceiling and roof. Probably not. But maybe. If you need more, 1/4" square would do nicely for the vertical corners. IF it doesn’t show. You can add a lot of reinforcing if it won’t show.

It sounds like you haven’t built a structure out of styrene yet. I recommend building a couple of little sheds or shacks first. You won’t be sorry.

Ed

Hi Rich:

First off, congratulations on taking the plunge!

I’m assuming this is HO.

You don’t need to build a substructure for an HO house. Evergreen Scale Models sells clapboard siding as well as other sheets that are .040" thick which is sturdy enough for smaller structures (as opposed to the monster buildings that doctorwayne builds):

http://www.evergreenscalemodels.com/

You can also laminate a .040" piece of flat sheet to the .040" sheet of clapboard if you want walls that are closer to prototypical frame wall thickness. You could get really fancy if the interior is going to be seen by using V-groove sheet on the lower 40% of the walls and smooth sheet on the rest to model wainscotting. The problem with a wall that is .080" thick is that it becomes more difficult to cut out the window and door openings, but see my suggestion below about getting a nibbler. You could use the foam board as a substructure but it will likely show a bit around the windows. That isn’t neccessarily a bad thing if you want to model thicker walls but in this case I don’t think it would look right.

For the roof, .040" will work for the size of the structure you are planning. You may want to add a little lateral bracing with .040" x 1/2" strips. If you want things a little sturdier go for .060". I haven’t done any roofs with asphalt shingles so I can’t recommend a shingle product. I’m sure others can. Personally I don’t like the appearance of shingles that are really rough. It just isn’t realistic IMHO[2c].

The best adhesive for assembling the walls is a water thin styrene solvent. You can buy it from Tamiya which is what I use, or I believe Testors has a version too. Or, you can go to your local hardware store and buy a can of MEK (Methyl Ethyl Keytone) which does exactly the same thing. The way I use the solvent is to apply a little to the mating surface

Rich has graciously offered to build the Coors family mansion for me. Because I have no interest or skills in building it. And there are no kits available that look similar.

This is the house in question.

Michael and Rich:

OK, when Rich said “large” he meant LARGE! I’m estimating that the building is about 200’ long. That’s about 27" in HO. Are you sure you don’t want to do some selective compression?

To add to my previous post, the roof and the walls will definetly require internal bracing to keep them straight.

The skylights will be a bit tricky. Here is one option but the skylights have gable ends. If you were to buy a couple of extras you could cut them up to make the hip style skylights. You need to use canopy glue to assemble them or they will fog up:

http://www.campbellscalemodels.com/product_p/0909.htm

Grandt Line sells round gable windows that are pretty close to the prototype. You will need to install some more muntins if you want to be more faithful to the original:

http://www.grandtline.com/products/images/5000’s/ho%20windows/5011.jpg

The rest is actually pretty straight forward, except maybe for the overall size.

Dave

If you do go with the substructure idea, take note: a couple weeks ago, I bought a 4x8 sheet of .040" sheet styrene for $20.00 from a local plastics supplier. That’s 4x8 FEET! (6.25 HO ACRES!) .040 can be rolled up and carried in a car.

A sheet of .060 would have been about 36 dollars, but he’d need to order it. I’ve used an awful lot of .060 for structures, larger scale models, and even made a silverware divider for my wife. .60 is considerably more rigid than 40, but 40 is good too. I’ll probably order a sheet of 60 as well. Compare the prices of these sheets to the price of the same stuff at the LHS… Oh, I buy my share of Evergreen too at my LHS, but for bulk sheet quantities, these can’t be beat.

They also had some neat liquid cement applicator bottles with metal needle tips, and a number of cements to consider as well. In fact they have some machinable plastics too. This store has a scrap bin of various plastics, and I came out of there with a handy assortment of goodies. Check your local area for a plastics supplier.

For what it’s worth, I plan to build a model of a structure that was here in Bend OR for many decades, 435 feet long. That’s 5 actual feet in HO! I don’t want to “compress” it, as I actually want it to take up a large space on the layout. And another building about that long as well, it being compressed from it’s original length. Big is great! Dan

Rich,

Well I personally like scratch building with Mat Board and stripwood of all flavors, but I do build with styrene. I won’t get into all My techniques in doing so…I don’t feel like typing that long…but I have built quite a few wood ships in My time…some scratched and the technique is the same. Here is a link to quite a few You Tube video’s on How to scratch build with styrene…some are pretty good and You can glean some info from them, I’m sure:

https://www.youtube.com/watch?v=p3gabIJ3Ono

Have Fun! [:D]

Frank

Just sat down with a morning cup of coffee., and I am bowled over with the replies so far. I really appreciate all of rhe advice which is great and highly informative.

As Motley’s photo shows, the residential structure is a mansion. As Dave points out, it is huge and would measure over 27’ wide in HO scale. We have agreed to compromise with a 16" x 10" structure. Dave, we do intend to use the Campbell #909 skylight to represent the clesestory, if that is the right term for that roof structure. And, yes, that oval window from Grandt Line is our choice for the ornamental door treatment.

What I am finding is that the cost is significant, far more than I initially thought it might cost. We are nearing $100 for the list of mat

Rich,

If You are going to use 3-tab roof shingles, the roof caps are actually cut from the 3-tabs where they are separated, then they are folded over the ridge and nailed in place on the tar strip…simple. Did My house, garage and a couple barns, in My time.

Take Care, [:D]

Frank

Yep, that is the way they do it in the real world. But I was hoping that a manufacturer would make it easy for me by providing strips so that I don’t have to cut the shingles one by one. GCLaser is one such manufacturer, but their ridge caps are pricey.

Rich

I suggest you build something small like a handcar shed to start with.

Good luck

Paul

Appreciate the suggestion, but why start with something small. Wouldn’t I learn a lot more with something big?

Rich

As this is your first try, how about something smaller like a shed, or maybe something like this scrapyard office:

The techniques are the same regardless of size, but sometimes it’s easier to dip one toe in rather than go off the high board the first time.

I use Evergreen siding, because the shop where I buy it has a large selection of Evergreen materials. It doesn’t need any extra bracing, although it can’t hurt.

This is a kit, not a scratchbuild, but I use this technique for most of my structures.

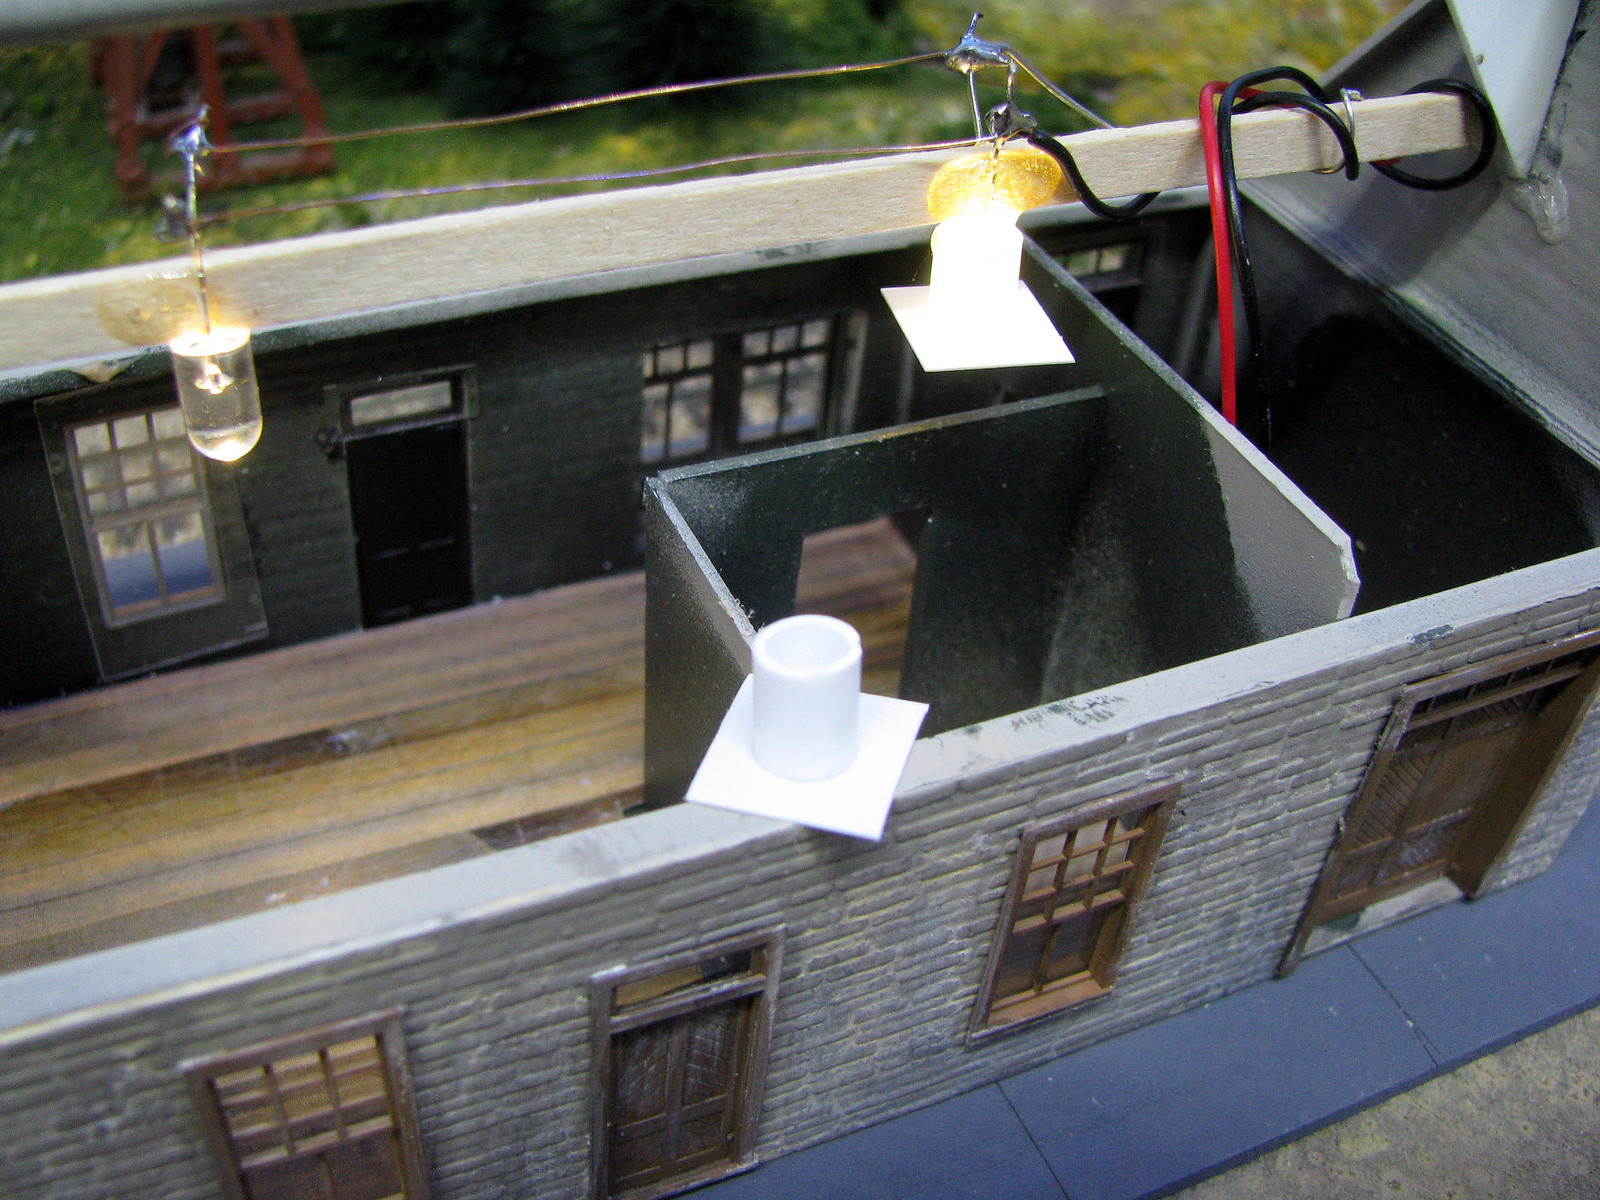
I illuminate most of my buildings, and it makes a big difference when the interior is not hollow, but has at least some rudimentary floors and walls so that the light does not permeate the inside, but rather gives the impression of occupied and unoccupied rooms. I built this with foam board, which is cheap and easy to work with, and also provides a strong interior lattice that makes the building much more solid.

Even thicker siding like Evergreen will glow if you put lights inside, so I make interior liners with cardstock. OK, this is overkill, but as long as I’m playing paper dolls with cardstock, I’ll take a few minutes to print wall and floor patterns.

If you look at the windows, you can see why it’s overkill. With small windows, you just can’t see through into the interior very well, so the effort to detail buildings inside is lost. On the other hand, adding curtains, shades or Venetian blinds to the windows covers them nicely, but also lets the light through. These are from City Classics.

Again, I ask, why start small?

The bigger the project, the more opportunities to learn from mistakes.

Rich

I just like the mistakes I learn from to be smaller. [:-^]

Seriously, I’m a better model builder now than I was ten years ago. Each model comes out nicer, and it’s easier at the same time. This is all from accumulated knowledge. If you’re going to make a “showpiece” model, you’ll go into it with more skill and confidence if you do a smaller “get your feet wet” building first.

Can this structure be my first scratch build?

Rich

Another alternative to starting small is to build one part of the larger structure. Evaluate, then proceed on to the rest. You can always redo the first part if it’s not up to your later efforts.

Another thing to consider is what viewing distance? Michael’s layout space isn’t huge, but if it snuggled away at say 3’ distance, you can make the same impression with a lot less detail. In that case, things like wall thickness and interiors become less important – you really can’t see in the window – but light still works well.

BTW, forgot to mention what I use for bonding plastic sheathing and the wood underneath, etc, which are dissimilar materials, but it’s 3M 77 spray adhesive.

A pic inside Purgatory station. Not generally the right windows for use with stone exteriors, but it’s what was paid for and on hand when it was built.

You can also mix technniques, building a more substantial form underneath (this thing will be big enough that having something more substantial than scale thickness walls and framing might be good) while using scale thickness for the walls where there’s lots of openings.

Here’s a pic of a barn I built showing basic stuff to build those “boxes” underneath.

Will this model’s backside be hidden on the layout? There’s an opportunity to cut costs and labor by simplifying that area.

Go for it Rich. Being a risk taker offers greater rewards. Speaking from experience going big and/or expensive made me be much more patient and methodical in the construction of all the R/C aircraft I use to scratch build. No lives are at risk.[(-D]

This is a great thread. Maybe people could also mention the makers of some of the materials they used as they show us their pic’s.[tup]