Once again, I am in need of some advice. I have my track all laid and now it is time to paint the track and the ties. I have bought an entry-level airbrush and have read and watched enough to feel I am ready to give it a shot. I need some help acquiring paint. I know I want to use acrylic paint as I don’t have a paintbooth and a respirator. I remember there being some discussion awhile back about the discontinuance of a major label of paint. My question is this–given the acrylic paint that is available on the market today, what would you recommend for painting my ties? If it makes a difference, I am using Peco code 55 track. (I guess I would have a second question–where is a good place to get said paint?)
You could give these a try. http://www.micromark.com/SearchResult.aspx?deptIdFilter=0&searchPhrase=microlux+acrylic+hobby+paint . They are produced by a quality manufacturer and are said to match the discontinued Polyscale colors.
Joe
I used PollyScale to paint my rails, but since it’s been discontinued, you may not be able to find it. The latest (last) batch is not the same as the previous version, and wouldn’t have been suitable for my application method.
The paints which Joe has suggested may work, but I’ve recently read elsewhere on this forum that flat latex housepaint can be used in much the same manner - thinned somewhat for brushing or moreso for spraying. I hunted for the thread but can’t recall its title.
I’d suggest using a brush instead. It paints only what you wish to paint, whereas an airbrush is less discrete. When you aim at the rail, all of the paint which doesn’t hit the rail lands elsewhere, and the nature of airbrushed paint is such that much of that will be dry before it lands. That becomes something commonly known as dust, and you will enjoy it for years to come every time you have to clean your track.
Of course you could always mask everything alongside the track, but it seems a lot of effort to do a simple job, and there’s always that airbrush to clean whenever you use it. I don’t know your layout, whether it’s a table-top type or an around-the-room one, but have you considered how to paint the backside of the rails using an airbrush?
Painting rail with a brush is about as simple as it gets: Got 20 minutes after work before supper’s ready? You could paint at least 20’ of track in that time - both rails, both sides. Supper’s ready? Cap the bottle, rinse out the brush, and go eat. Everyone I know who has brush-painted their rails was surprised, not only by the ease of the work, but by what a relaxing task it was.
Use a good-size br
Wayne: Good advice. I was planning on using the airbrush based on the project layout videos in Video Plus. My plan was to use the airbrush to paint the ties before ballasting, masking off the turnout points. I was going to use a microbrush to paint the sides of the rails with a rust-colored paint.
I used a spray can and/or an airbrush to paint my ties. I then used a paint pen to color the rails. The pen worked great and was very easy to use for my code 83 rails. May be a little big for code 55 but worth a try.
Hope this helps.
Mark
LION uses acryllic paint from WalMart, the kind that is sold in those 2 ounce plastic bottles over in the crafts section.
Him squirts out two or three colors onto a dispoable lastic surface, (lids from coffe cups if you must know) and then with his brush at random globbles it onto the tracks and ties. It does not go in between the ties very well, but that will be covered with ballast, so is a moot point. A little black, a little brown, a little grey and jsut put it on.
When dry, use a putty knife to remove it from the rail heads. This is fast and easy : No work involved.
If you model subway trains, you will want to paint the sub bed black before you lay the tracks, as you will not need ballast in your subway tunnels.
LION has used acrylic spray paint, but that is harder to remove from the rail head, and produce a too uniform appearance.
ROAR
Sir. I too was at this juncture a couple months ago. In the end I used Badger paint in my entry level airbrush. At a MRR show I had purchased a pack of six paints from Badger. From that I mixed RR Tie Brown, Grimy Black with a dash of Rust.
Although it takes time to setup and cleanup the airbrush I was quite pleased with the results. The airbrush left a light coat that took the plastic sheen off my ME track and smooth colour application on the rail sides. The resulting track looks old and weathered.
I suggest you not forfeit your aibrush entirely. Give all methods a try.
Dwayne A
I used Foquil/Polly Scale ‘railroad tie brown’ It is being discontinued, but Micro-Mark has a matching replacement acrylic paint.
I would take exception with Dr Wayne - Painting even with a small brush near the ‘hinge’ area of a turnout is asking for problems. The paint will kill the electrical contact and is new to impossilbe to fix. An air brush set to low will paint your entire layout quite fast. If you have the ‘MR Video Plus’ series, watch Cody air brush track on the Virginian or Thin Branch project layouts.
Our club used ‘camo brown’ paint in rattle cans - Looks very good, but the ‘smell’ was bad. It too three painting sessions to complete the layout. After about 2 hours in a 27’ by 27’ room, it drove us out!
Jim
I’ve tried the brush method - anything BUT relaxing for me. Obviously what ‘relaxes’ you may be different from what ‘relaxes’ me. I reverted to using the Floquil paint markers, but unfortuinately they are now discontinued. They went FAR quicker than brush painting.
Not sure what I will do with the new layout when I get started. I have 2 extra packs of paint markers I found in a LHS, but that will never be enough to do the size layout I have planned. Guess I will have to bite the bullet and brush paint things.
With the markers, I painted over all surfaces on the turnouts, and had no issues after cleaning off any paint that got on top of the rails or point blades. I don;t have extra jumpers from the point to the nearest stock rail, but I do have power feeds at all 3 legs (Atlas, non power-routing, insulated frogs, so you can do that).
–Randy
Put me down in the Rattlecan column. I can see using the airbrush for detail if you’re comfortable with that. In my case, cleared things off, threw a strip of tape across the bridle and points, then shot away. Yeah, it can get a bit fumy, but that’s what ventlation is for.
Track will get buried in ballast, so you’ll not see any detail that’s not on the rail itself. Here’s before and after paint and ballast pics.


I was at this point earlier this year and tried various methods on some test track that I glued down in the shop. I first tried my airbrush with various colors but was not entirely satisfied. Then tried painting the rails with a paintbrush. Only difference was that I painted with the ballast already down and used a smaller brush than Wayne suggests. I didn’t worry about paint getting on the ballast against the rails or on the tie straps since those areas generally get stained “rail color” in the real world. That gave the best results and I painted a bunch of my track that way.
It was tedious, but no more so than many of the other tasks required to lay down track- ballasting etc.
I used Model Master acrylic, just tested some colors until I found some that I like. Two coats with slightly different shades can help keep it from looking too uniform, and I purposely used a different “rusty” shade for a siding. If brush painting then a cheap latex or craft acrylic would probably work fine, but cost is not a real issue since it takes very little paint just for the rails.
Here is a section done that way. Shinohara flex joined to ME bridge track (ties not painted.) One point that I’ve been thinking about is that the ties and the rails are usually not the same color, except where the ties get stained up near the rails. So as I continue on I am thinking of first painting the ties with my airbrush to “age” them a bit before laying the track, then following up by painting the rails after the track is in place. I think it looks pretty good as is, but doing that might take it to the next level.
Paint brush is relaxing. Set some time to do it and then just do it.
You do not even need a paint prush, as you can use the tip of your tail, and that works just as well, and you do not have to worry about dropping it. These are acrlyic paints after all, and will wash right out of your tail.
Exactly where I got my inspiration for airbrushing the ties and track.
I brush painted all my rail with Floquil (solvent based lacquer) Rust. The EPA’s war on paint thinner killed off Floquil a year ago, so I think acrylic is all there is. If you don’t have a local hobby shop, try a craft store like Michael’s, or the craft section at Walmart. They sell 2-3 ounce bottles of acrylic paint for a dollar or two. It comes in lotsa colors, kinda thick, you have to thin it quite a bit to brush it and more to air brush it. I’d bother to wipe the track down will a rag moistened with solvent to improve the chances of the paint sticking. If you don’t see exactly the right color, just get some brown, and gray, and black and mix 'em til you get it right.
RideOnRoad,
I know it’s too late for some of the following suggestions, but here goes anyway.
I tried airbrush coating the first piece of track I installed, but was difficult for me to get a good even coat shooting from all the awkward angles, and of course all the masking work involved. I ended up shooting the track with the airbrush before installation away from the layout, much easier and good even coat. I’m using M.E. track with no sliding rail, so I didn’t have to worry much about leaving lots of holidays. Of course a color of choice spray bomb would work too.
After installation of the track I randomly brush applied thinnned acrylic craft paint washes to the ties, burnt umber, raw umber and grey. I go easy with the grey, mostly on spur tracks where there are more rotting ties. Then a random brush application of a thin wash of raw sienna craft paint along the outside and inside of the rails for an uneven rusty look, going heavier on the spur and yard tracks. Using the washes allows for sneaking up on the colors until you get the look you’re after. All this broke up the color sameness of ties and rails and didn’t take long.
After ballasting I hit the grimey treatment with washes of dilluted india ink and black craft paint washes. Thinned mars black artist acrylic tube paint does a good job simulating oil drips and oily stains. Unthinned the mars black works good for tar patches on roofs too.
I also randomly brush apply the raw umber wash, with the addition of tan onto the surrounding ballast for some added depth and contrast, with a bit of the raw sienna wash here and there to simulate rust washing leaching onto ballast from the fish and tie plates. Wait for the washes to dry to see where you’re at before applyig more.
Well, time to pump up the “skinnies” and hit the road.
good luck, Allez! Allez! Venga! Venga!
regards, Peter
I tend to agree with Lion here. I use the craft acrylics and artist acrylics from Walmart for both a base color for scenery and for weathering. Because of it’s low cost you can ‘sacrifice’ some for the sake of experimenting. Thin it with water or alcohol to the consistency of buttermilk and mix different colors till you find what works. Your airbrush will atomize the paint and create a paint dust in the air but it will not be toxic in the same way as solvent based paint. A good quality dusk mask would be recommended.
Mark H
An addendum, one thing I most definitely do NOT recommend is one of those roller devices like the Rusty Rails painter. Looked promising, so I tried it on my previous layout. Messy. Very messy. Used it once, and then recruited my father in law to brush paint the rest, since like Wayne, he found it relaxing.
–Randy
RideOnRoad,
Forgot to mention that wearing a properly sized quality half mask respirator with appropriate filter cartridges is a must when airbrushing or spray painting, no matter what kind paint. If paint odor or taste is detected during use check mask fit and or change filter cartridges.
regards, Peter
I use an airbrush, spray can or brush depending on what mood I’m and where I’m working. Most of my track ends up with multiple methods being used. Choose a color that you like and go for it. Final weathering changes the color of the end product anyway.
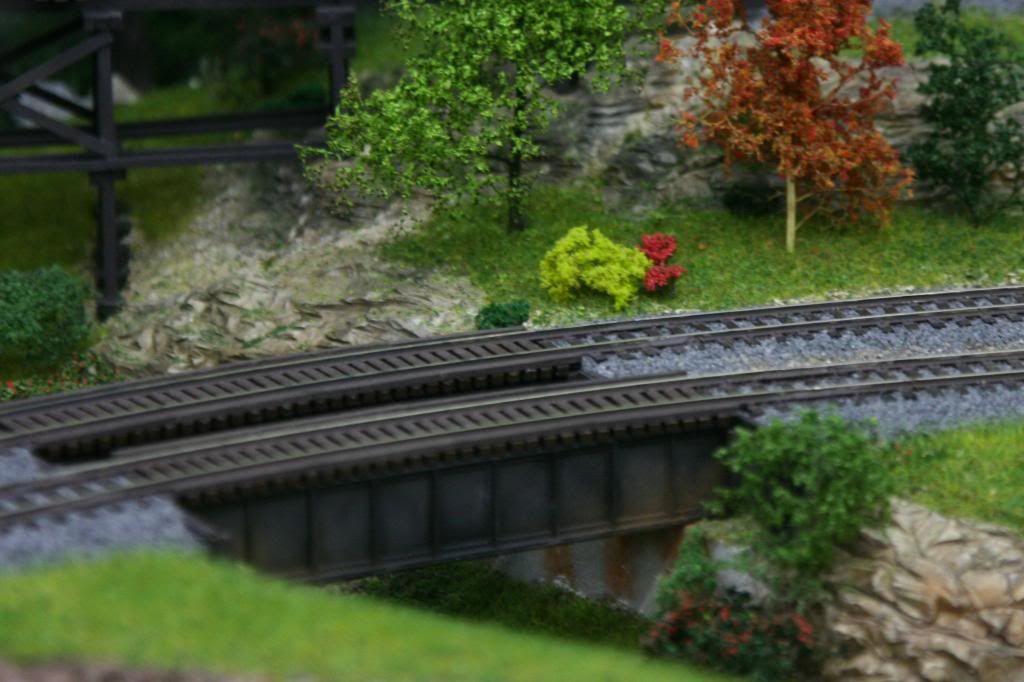
I painted this track with an airbrush, then dry-brushed acrylic weathering on ties of the secondary tracks. Note that there isn’t much overspray. Any small amounts of dust caused by dried paint that doesn’t adhere can readily be vacuumed. I always vacuum the track after cleaning the rails to ensure all stray material is removed.

Weathering here was done both before and after ballasting. This track initially looked like the photo above, and received more chalk dust and acrylic dry brushing after the ballast was secured.
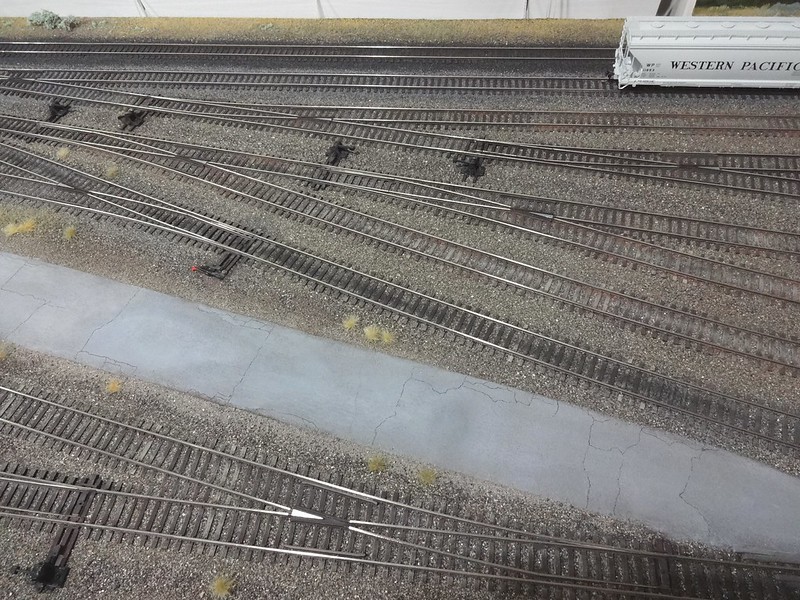
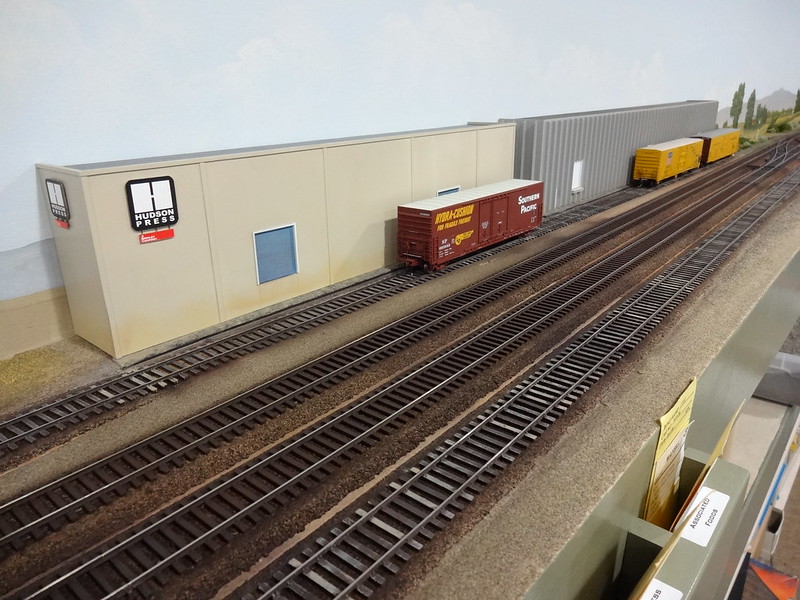
Due to the large amount of track in this yard, I painted it with a spray can. Again, overspray wasn’t a major issue, but any areas of concern were masked. More acrylic and chalk weathering is also evident. A base coat of acrylic or latex brushed in place would probably serve as well as the solvent base paint I use.
Never thought about spay painting the track. I used the same acrylic paint as Lion and wiped the tops of the rail after working maybe 3 feet. Took an evening as I recall.