I see a lot of layouts that show staging yards under the bench work but I don’t see any articles on how go from the staging yard up to the main layout. I don’t have a lot of room to use a helix. It would help me out if someone could lead me in the right direction
If you can’t practically use a helix/ramp/grade/no-lix*, then you’ll have to design a cassette system that lifts and drops between levels.
*Instead of a helical, multi-level track, it’s just a constant grade supplied by a ramp that runs outside the rest of the trackage, or generally near the walls.
Those layouts are larger multi-deck layouts. See Koesters book
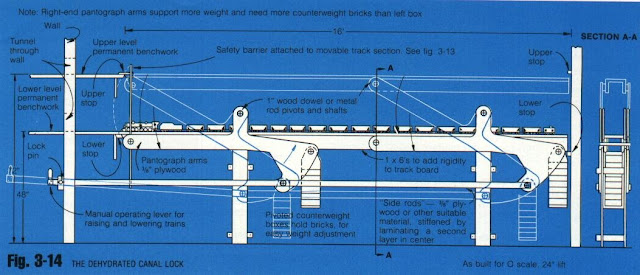
For smaller layouts, Armstrong’s “Dehydrated Canal”
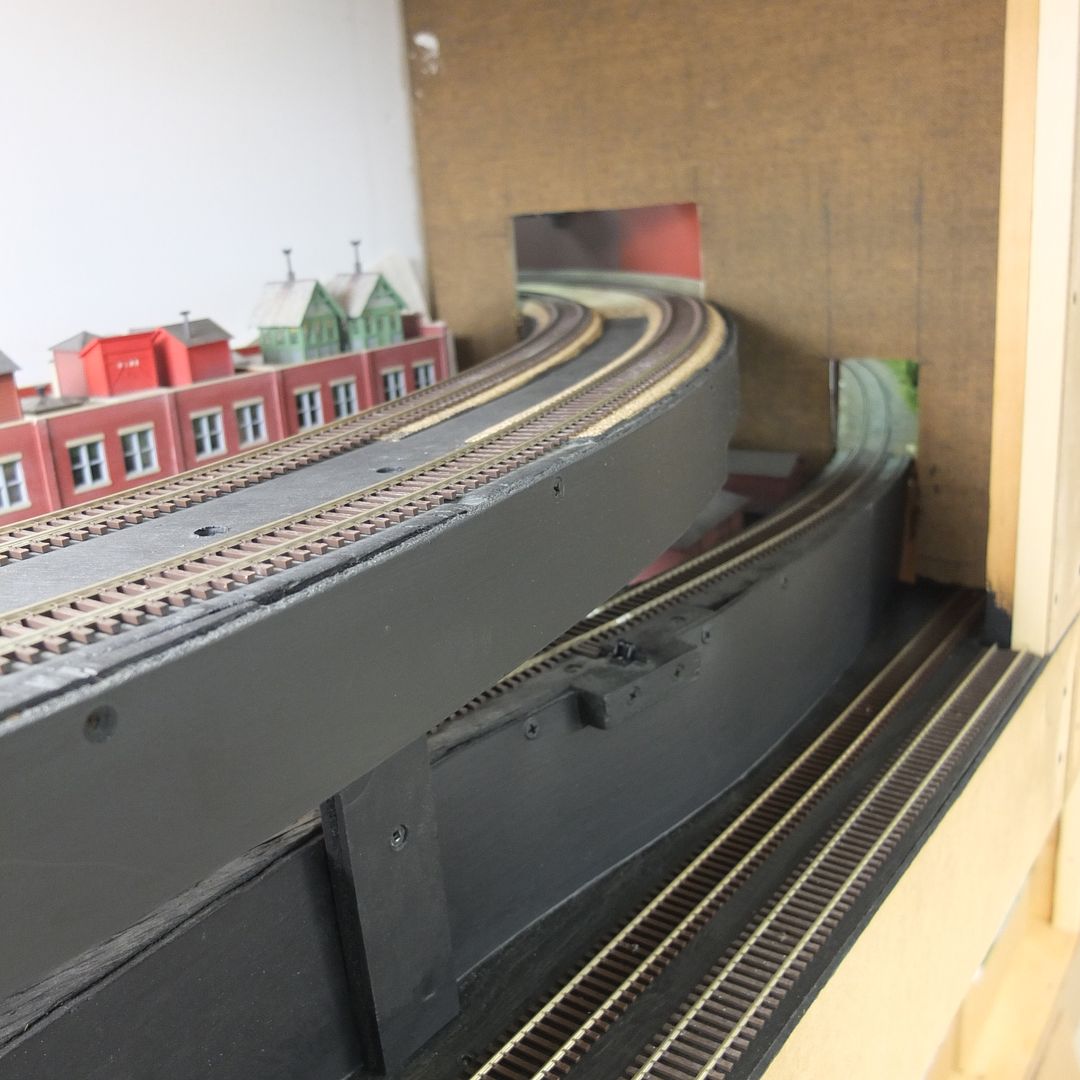
i’m using a multi-deck elevator for vertical staging

I am building this hidden staging, but keeping it on the same level so I don’t need any inclines. I’m hiding the 4 tracks on the left under a removeable scenic cover.
This is a narrow shelf tucked under a 45-degree roofline. Not much potential, so I will build scenery on the cover. The fifth (right-most) track will be a branch line out past the end of the staging. The track all stays at the same level. It’s just the scenery that goes up and down.
This angle is from the other end, and the yard throat is at the far left side of the picture.
Sounds like you’re looking for the no-lix approach. It’s a way of connecting two levels without a helix, whether one level is a staging yard or a scenicked part of the layout. Rather than gaining the elevation all at once as in a helix, elevation is gained gradually as the mainline goes around the room. By the time it comes around to the starting point it has gained enough elevation to go above the tracks there with enough room to spare. You just need to figure out how much clearance you want/need above the lower level and how much length you have to achieve it to figure out the grade you need. Most likely you will want level areas along the mainline so you need to factor that in.
Staging yards don’t need as much separation as scenic’d decks. In a pinch 4" will do (for HO) - although getting at the trains might be difficult if far from edge. A 17’ run will give you 4" at 2% grade. Also staging yards are generally for trains so the staging yard itself can be on a grade if necessary. A lot of plans start the grade down as single track at the back of the benchwork and run along the wall(s) until down far enough to put in the staging yard.
Part of the planning process with staging yards is figuring how to get the trains in and out along with whatever access you need.
Good luck
Paul
This is not staging, but can be used that way if desired. I have a car float on my layout.
This holds about 15 Transition Era freight cars. It adds operational interest because a train must be built up on arrival and another broken down prior to departure. Some model the float as part of the scenery, but I built mine as a cassette and made it removeable. I have a second car float, as yet unbuilt, so that I can swap them to get a second train in on later boat.
In many cases, it’s just a ramp.
And as others noted, staging tracks need not always be below the visible tracks. They can be placed behind a low or removable backdrop.
Posting your space or track plan might help others help you help with ideas.
Good luck with your layout.
Byron
No-Lix is my preference, I hate a train running and running in a circle with no meaning and scenick interest. A specific area of the layout is designed to gain level but may weave in and out of tunnels get a little loopy, might dissappear short in a tunnel and come out. Designed right it could fit right, add some modeling interest, have some industries even. I don’t have much room either but I figured it out.
If you have the room (and not necessarily in the same room as the rest of the layout) you could arrange staging yards at the same level as the portion of the layout on which you wish the trains to first appear.
My layout is partially double-decked, and in order to keep grades semi-reasonable, much of the visible layout is on grades, while four of the five staging “yards” are stacked, one above another in the same area:
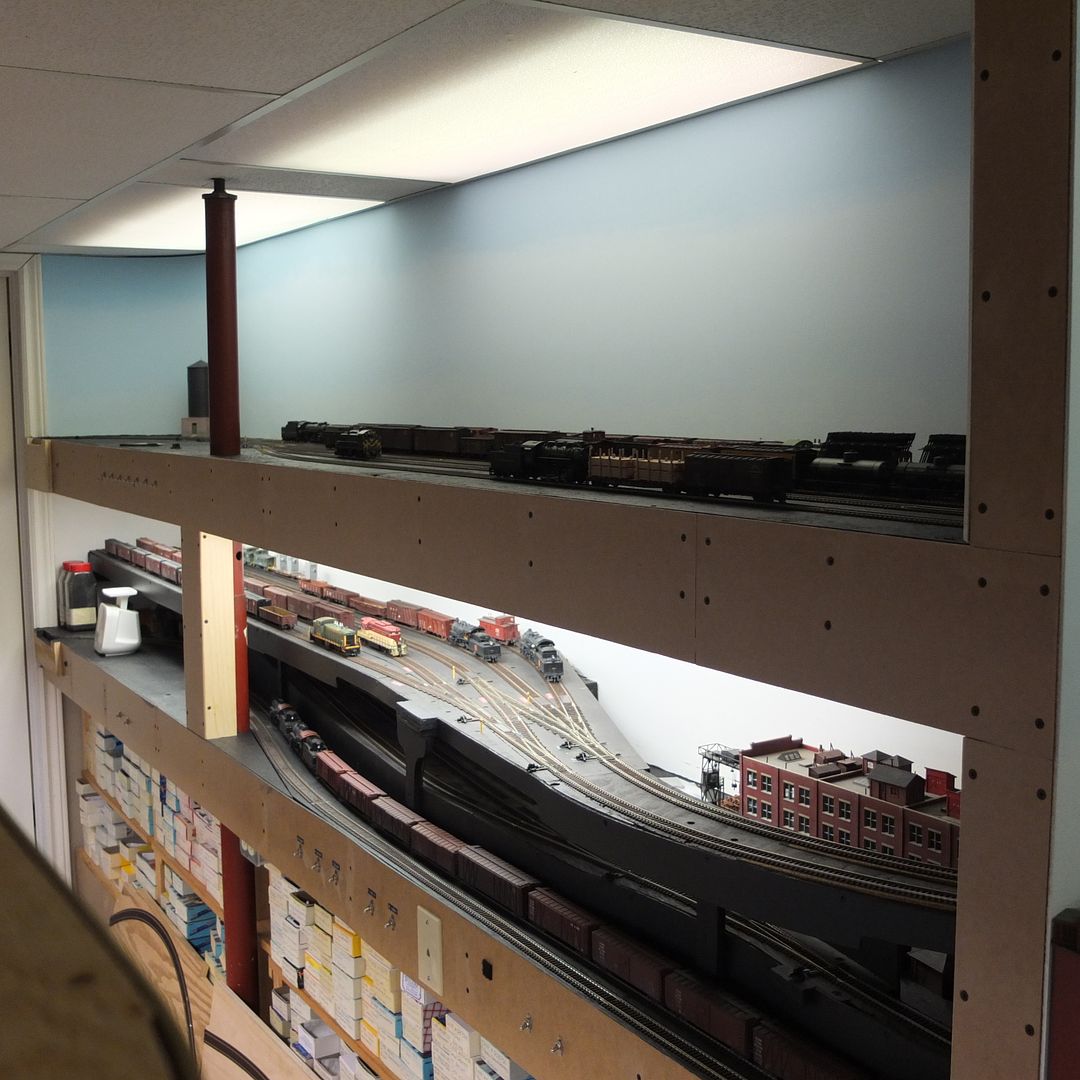
The two tracks on the lowest level (shown above) represent an interchange which connects (via a lift-out at the entrance to the layout room)with the lowest level of the layout (Port Maitland on the drawing of the layout room a few images down).
The next level up is also two tracks, and it represents an industrial district. Because no structures are modelled, I can create as many industrial destinations or originators as I wish. It’s a great traffic generator that takes up almost no space. This track enters the layout (towards the viewer in the photo above) on a lower portion of the single level part of the layout;
…and, as seen above, there’s also a more conventional staging yard above that. It also enters the single-level portion of the layout, but at a somewhat higher elevation than the industrial tracks.
Here’s a view which shows the industrial staging and main staging going through the layout’s backdrop…
Both tracks fir
As others have mentioned, if your staging tracks wont be a massive yard, you can keep it open and on the same level as the rest of the layout.
A scenic break such as a high ridge of maybe 6 inches tall covered with large trees can make an effective scenic screen depending upon the height of your layout. The higher the layout the better in this case.
You can access the trains by reaching over the barrier (just trees) or perhaps using pull-out step stools, some being made from left over benchwork.
Keeping the staging on the same level present some scenic challenges and requires some compromises, just as challenges in bench work construction does if on a lower level. You can remove a backdrop to access trains, or live with a ridge and row of trees where you might only see the tops of rolling stock through the barrier.
Another option is a hinged lift-up section. This is particularly useful where the layout shares the room with other functionality and is limited in space because of that. During operating sessions, the lift-up can be put in place and populated with trains, but afterwards it can be lowered to reduce the footprint of the layout.
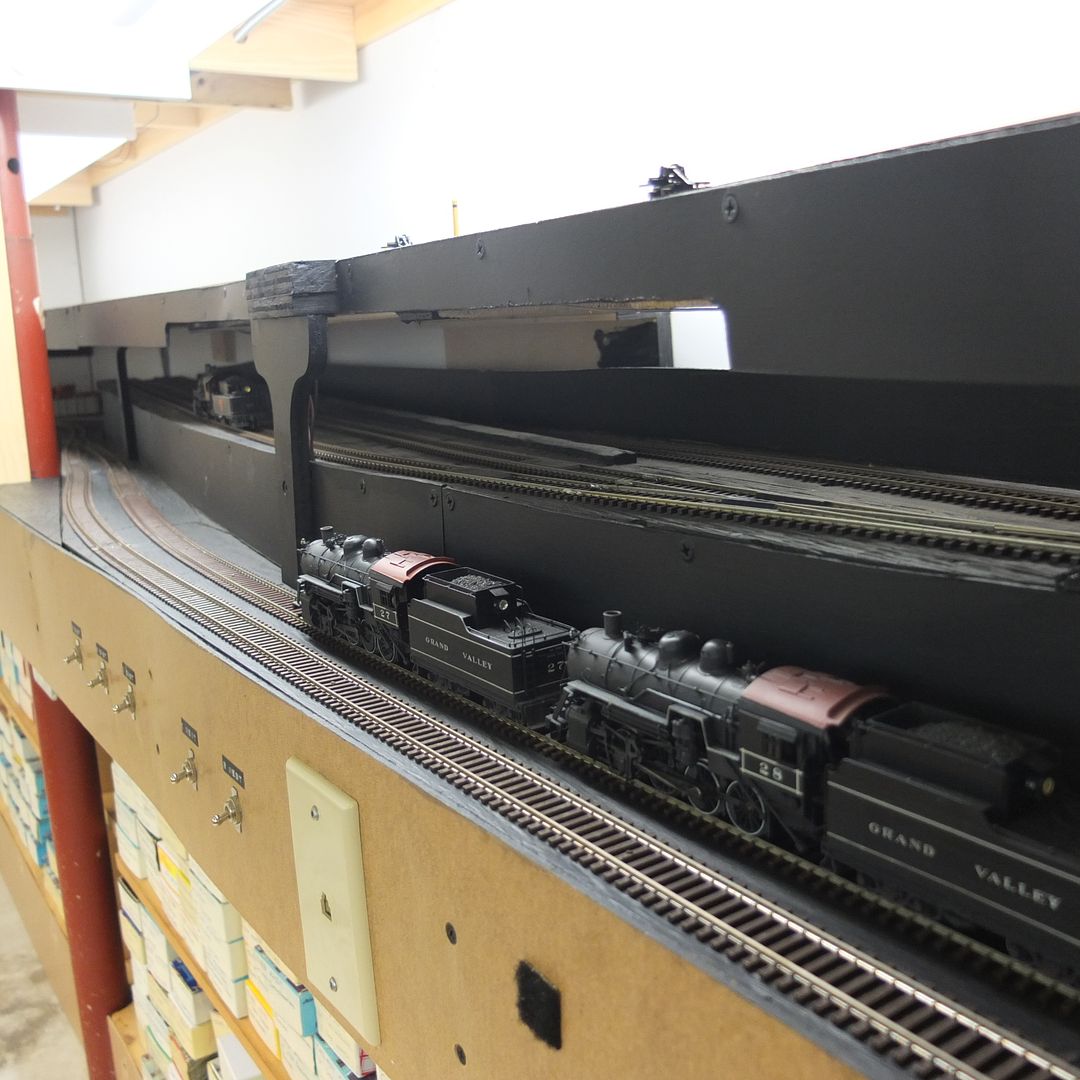
Here’s some pics of my no-lix solution. The room is about 24x16, narrower toward the entrance, from whihc this pic is taken:

Lower, on the left, is the penisula where Durango is located. The track loops back there and follows the other side of the curved viewblock and the narrowgauge starts climibing to Silverton (distant, on the right) and past it to Chattanooga (on the right, in foreground.)
The next pic is on the other side of the coved backdrop, before much scenery/builings went in, as this is the site of the Durango smelter. The narrowgauige track to Silverton climbs on the left, while the diesel on the standard gauge shows how it stays lower, as it is cl beyond the smelterimbing will eventually duck under the the second level and remain as the first level.

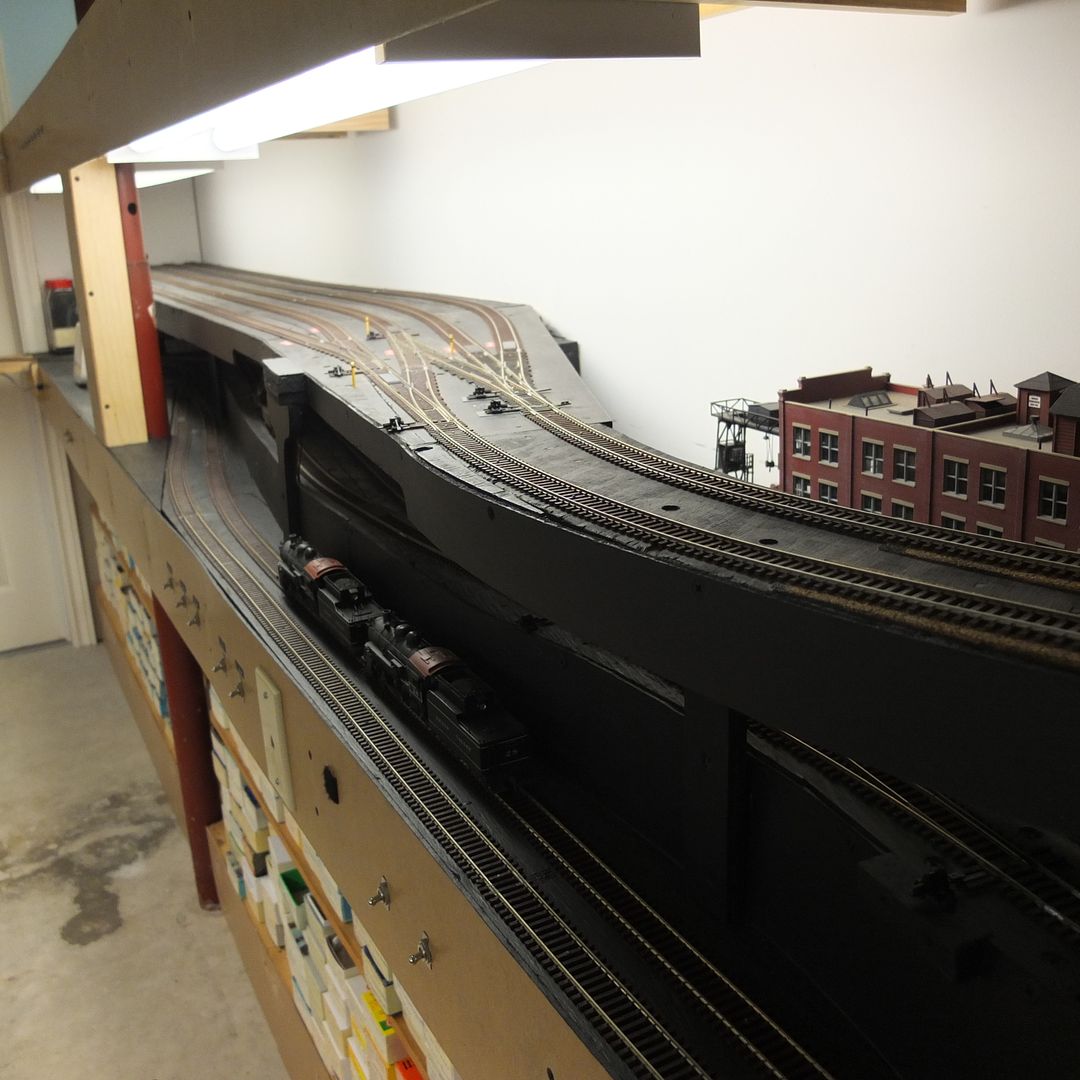
In the next long shot, you can see the NG from Durango climbing towards Rockwood. About where the elevator sticks up is where the rubber rocks starts. This provides a liftout for access to staging underneath the climbing nolix line to Silverton.

The next pix shows the transition to 2 full decks. From the left, the Rubber Rocks continue to where the waterfall is and just to its right; next you’ll see the top deck start as a sepaqrate structure.

So in the space of less than halfway around the room, my nolix design gains enough separation to allow for two decks, while also connecting them with no hidden track.
I am currently in the planning stage for a new train room and have been considering this same problem. I will only have about 21’ x 8’, so a helix will take up way too much space, and the nolix approach would not have enough run to gain enough height without taking the whole layout to do so.
That, combined with the fact that I’ll need a door gate, has led me to design an elevator that will do both jobs for me. It will have two sections which will provide both a cross-door link for my upper level, and also an elevator to move trains between upper and lower levels. When the layout is not in use, or access to/from the room is required, both sections will raise to a level at the top of the door.
I intend to use lead screw mechanisms based on the C-Beam actuator from Openbuilds, with all sorts of sensors and interlocks to prevent catastrophes.
Although it will be a lot of work, it is a challenge I will enjoy, and it will give me a layout that will fit my requirements.
But first I need to get the over-garage extension approved and built. But I have gone a long way down the layout design route first so I know what the major design requirements are for the architect - critical dimensions, service provision, etc. All good fun!
Bob
I plan to use an existing dock and carfloat to connect my RR to a rail museum. It formerly connected to my son’s first road, which was on an island (actually underneath my road.). Marine operations have been idle or used for storage. But I’ve decided to move inactive equipment to an offline museum, located on a separate table. Most of that equipment will be for static display, but I may wish to run a few pieces on occasion.
Lots of “leading” available here, but no sign of Soo Line Kid.
I hadn’t noticed originally that it was his first post, and it appears that everybody else missed it, too. Still, I think that lots of responses equate to a pretty warm welcome, anyway.
Wayne