What does everyone think of laser cut wood kits? I have never tried to put one together myself. Are there any special tools or procedures needed? Any pitfalls I need to be aware of ?
Thanks,
George
What does everyone think of laser cut wood kits? I have never tried to put one together myself. Are there any special tools or procedures needed? Any pitfalls I need to be aware of ?
Thanks,
George
I love them, so far the couple that I have put together were well designed and resulted in nice structures.
I would recommend (and not in this order)
patience. Cut the material slowly from the sprue, and I glued one section at a time and left it to dry before moving on. Usually the next day
a very sharp knife blade (or a bunch, actually).
glue (i used white) and a small brush and or toothpick to spread it.
spare materials for internal bracing
paint major parts before assembly; you can touch up and weather afterwards. This is where the bracing can come in handy, in case the wood warps.
Have fun, and enjoy!
Here is a shot of the two I recently completed. The small building to the left is from BTS, the larger Crosby’s Coal is a Branchline Trains kit.

George,
I think wood laser kits are just terrific! I find them very straightforward to put together. The only ones I have experience with are American Model Builders (AMB). Here’s a couple of views of their Dill’s Market:


If possible, go with a enamel-based paint when you paint them. Acrylic (water-base) primers and paints can warp the walls if you paint them before gluing them up. I paint them after assembling them.
The other nice thing I like about the laser kits is that the windows can be cut/adjusted to appear as if they are open. (See Pic 2 above). The windows pieces generally come with peelable backing on them. Peel the backing to stick the window parts to the frame or to one another.
Hope that helps…
Tom
Another vote in favor of going out and trying one.
This is Branchline’s “Weimer’s Mill.”
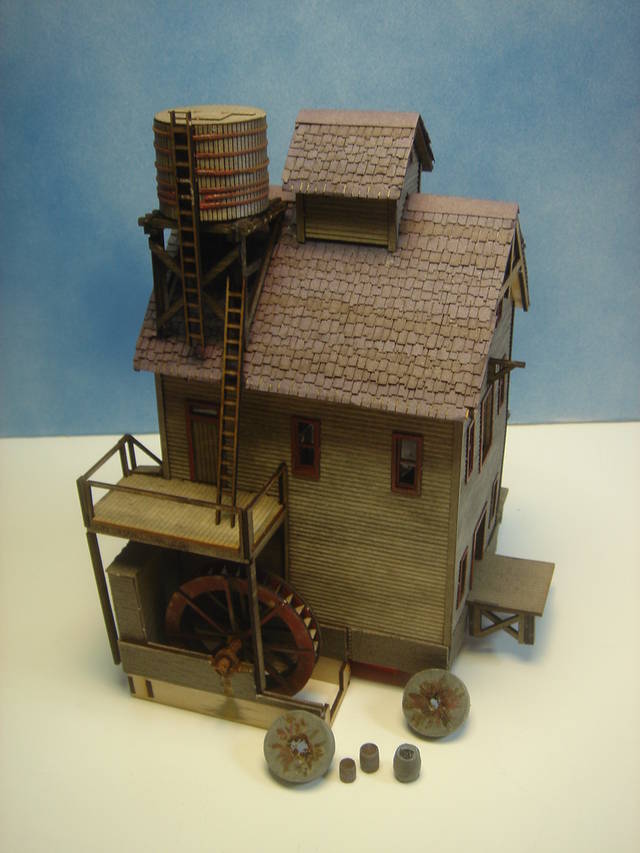
Patience is the key. Since I wanted this to be an old, abandoned-looking structure, I used India Ink in alcohol to weather it, and very little paint, just on the trim. I painted it mostly prior to assembly. Warping, by the way, is usually caused by the paint getting into the grain on one side of the wood only, so you can reduce it a lot by painting both sides at the same time.
Even if you’re used to big plastic-parts kits, opening up one of these can be intimidating. Perhaps the most important thing I learned is that these kits are not all that hard to put together. Yes, I used tweezers for some of the small parts, and I did apply glue with the tip of a toothpick, but these are techniques that I’ve used on plastic kits, too.
Another big vote in favor of these kits. Wooden kits have come a long way from the early days, with most of the newer laser cut kits being well engineered to good tolerances. If you follow my signature link you can find several photo series from different kits that I have built. You might pick up a few hints and tips to personalize the kit and make it yours.
Let me give a big thumbs up.
You might try these guys http://www.blairline.com/bldgkits/
They’ve got some great kits.
Mainetrains [banghead]
Thanks to all for the replies. I am definitely going to try one of these.
George
George,
Laser Cut buildings are quick and easy. The second volume of Dream, Plan, Build series has easy help instructions. They recommend spraying with a clear sealer prior to assembly to prevent warping.
American Model Builders will be an easy first kit.
Have fun.
Sue
I only have experience with the American Model Builders kits, but LOVE 'EM. The peel and stick design is really nice, along with the slot and tab construction. They are pretty much fool-proof as long as you have some patience and the right tools (all noted above).
I paint mine before construction. With the window sashes, frames, doors, and so on being different colors for the kits I have built, it made life a lot easier. I found the best results for painting was using an airbrush. The rattle cans just didn’t cut it, and the brush painting was a pain.
I guess I’m a lone dissenter in this discussion, but I hate wood kits. It must be my own fault, however, because my experience is utterly unlike any that I’ve ever seen anyone else describe, so there’s clearly some step I’m missing.
The problem I have with them is the wood warping-- although warping is a very inadequate word for what happens to me: they curl up into objects resembling hand-rolled cigarettes. I’ve tried multiple times and multiple methods to avoid the problem (because I really like many of the photos I’ve seen of completed kits) but nothing seems to work. Paint one side, both sides, use enamels or water-based paints, spray, airbrush or brush-- it doesn’t matter, they curl up into cylinders. Paint after assembling the model and it’ll tear itself apart in the walls’ eagerness to roll up. Spray on a sealer first and the sealer will make them curl up. Paint and then press between flat surfaces until dry and they can’t roll but they do end up with ripples.
I don’t know what it is that I’m missing; perhaps it’s just a curse like Charlie Brown and kite-flying; but it’s possible that you might miss it, too. So I’d recommend experimenting before investing too much in wood kits.
THE GOODNIGHT
GN, Sorry to hear that spraying the sealer on both sides first didn’t work. I followed the instructions in the second volume of Dream, Plan, Build, and had no problem. I have had serious problems with scale plywood though. [:(]
Sue
I am sorry to hear about your warping issue as well. Here is my take on the situation.
Water based paints and stains certainly contribute to warping. I like to use an alcohol and ink stain as my base coat when I am prepping a wall for weathering and find that I get worse warping issues when using 70% compared to the 90% Isopropyl. However, I have never had a warp that was not cured by pressing the warped walls under a pile of phone books. My prefered method is to add good bracing to the walls after I have got them flat. Some kits really don’t have enough bracing, so it is not uncommon to add a little extra. I have now made dozens of kits from several manufacturers and have not had a kit that failed due to warping.
Here is a list of a few manufacturers that I have made kits from. All have been good and I would reccomend any of them.
JL Innovative Supply http://www.jlinnovative.com/
Bollinger Edgerly Scale Trains http://www.besttrains.com/index.html[](http://www.besttrains.com/products_1048.html)
Fos Ltd. http://www.foslimited.com/
Minuteman Scale Models http://www.minutemanscalemodels.com/
Railroad Kits http://www.railroadkits.com/
[2c] If my experience is unique, then the original poster is probably safe enough going with wood kits; but my experience does exist, so I thought I’d put it out there. I don’t try them anymore.
THE GOODNIGHT
Tom, great looking building. What do you use for weathering?[
Tom and others,
I am in the middle of building my AMD (Nenana Depot) and I am read to assemble the walls. What did you all use to glue the walls together keeping a 90 degree angle? Also, triming the corner edges to a 45 is a real pain. Any hints there?
Thanks,
Peter
Peter,
I used our magnetic gluing jig with a rubber band on the outside, but I started on a couple of small buildings. The wood glue doesn’t stick it to the jig.
Sue
A simple and highly effective method is to cut squarely a small piece of 2 X 4 and use it as a block inside the corner of the two pieces being glued together…such as two walls. If you confirm that the faces of the block of 2 X 4 are both vertical, or 90 deg to their top and bottom surfaces, and that any two sides are perpendicular to each other, then that piece of wood, resting on one surface, should provide an excellent inner form against which to glue the kit sections that should be at right angles. On their outsides, you can use anything, an old book, more wood, anything that will keep them against the inner block while it all dries.
Commercially, you can get plastic and metal brackets designed for modellers that hold pieces at certain angles.
Wood’s way cheaper.
I have built a dozen or so and think they are great. Identify all parts and read the instructions,they are generally right. The suggestions posted earlier are right on.Think about it before you proceed. I use yellow carpenters glue because it sets up Quickly and I can work faster. After you do a few you get the idea and it goes better.
Dave
I’ve tried Quite a few Blairline, GLC Laser, American Model, and probably others I’m leaving out.
The rules are about the same.
Take your time both removing the pieces from the sprue, and gluing them together. As stated prior allow one section to dry before starting on another . Helps keep down frustration. I find painting the peices first easiest. Dry fit parts first then glue; so any adjustments can be made easier. Only special tools I’ve needed were Exacto blade (sharp) Tweezers for N Scale structures. Good wood glue. Lots of Patience.
Here a
I hope this helps with your decision and the enjoyment