Well some have tried. Others have planned to do it and yet others have made test pieces. Consider me in this group somewhere. Here are mine. Since I work in AutoCAD and Inventor all day, it was very easy for me to draw up a stud rail setup. Having an office window that overlooks a machine shop helps too. I have another aspect of this project that pertains to those who don’t want stud rail but I thought I’d show this off first. These can be had in 3 different tie spacings. The middle spacing is compatible with Atlas 2R track. Most (but not all) 3R wheelsets will run on Atlas 2R track. They will not run through Atlas 2R switches though. I am solving that too. I am building switches (#4’s at first) that have accurate tie spacing, code 148 rail and can be used with stud rail but with different frog and guard rail spacings to allow for 3R wheels. The plan being to make these adjustable for either 2R or 3R wheels.
These first pictures are just a test piece. The track is simple handlaid Code 148 rail with accurate tie size and spacing, spiked but with no tie plates. It is also only painted 1 color which is a dark brown. The goal for this piece was to get some pictures to show what the studs look like. Once I get all the bugs worked out, then I’ll do some nicer display tracks. I also have outside 3rd rail coming for the subway modellers. Here are the very first pics. Again don’t be too harsh. It was a quick mockup. I am still revising some things in the design but I’m not showing those right now. There is so much more potential here and it works with 3R wheels. It isn’t expensive at all and the way I have done it make installation very quick and easy. Comments are welcome.
IM new so I’ll try not to ask to much but what do you mean by “stud rail” and is the track made from single rail, code 148, placed apart for the correct gage? I have not seen single rail that I remember only track already set with ties. Im trying to build a smallish track for my old Marx 999 and Lionel 1110.
It is still 3 rail track but instead of a center rail I have a series of small studs sticking up between the ties. They are barely visible. Instead of center pickup rollers, I use a set of sliders. Marklin uses this type of system on their HO scale line.
As far as the rail goes, Code 148 means that the rail is .148" tall. It has a realistic shape to it as well since it is not a hollow tubular style rail. The gauge is correct at 1-1/4". As a comparison, O27 rail is roughly .250" tall, O31 rail is even taller. Atlas 3 rail track uses Code 215 rail and even MTH Scaletrax is Code 190. My rail is far more realistic.
This isn’t a system for everybody though. While not difficult to assemble, it doesn’t just snap together. You definitely can’t just set this up anywhere and run on it. It is intended for permanent installation and is aimed at the person wanting more of a model of a prototype feel rather than a toy train like layout.
For your old Marx and Lionel trains, this probably isn’t the track for you. Then again I don’t know what type of layout you want or if you just want a table layout. If you want a more realistic feel to it but still want tubular rail, I can show you how to make O27 style track into something that looks alot like the Atlas 3 rail track but for much cheaper.Then again maybe Lionel Fastrack would work better for you.
Well, at 1/48 scale, 1 1/4 inches is correct for modeling 5-foot gauge, the Western and Atlantic, perhaps, or Russian prototypes. But for standard-gauge prototypes, the scale should be about 1/45, which is what Europeans use, or the gauge should be narrowed to 1.177 inches, which is what the Proto-48 O-scalers use. In short, our 1 1/4-inch gauge is “incorrect” for 1/48 scale.
Don’t confuse the guy! 1-1/4" is what American O gauge is and what Lionel and Marx are/were so that makes this gauge “correct”. Those crazy Europeans and their technically correct ways!
Your saying then the slid picking up power on middle rail (studs) is simular to the slide on my old Marx and Lionel? Also what is the scale I’m using, I thought it was 1/48? Is your rail one long piece, like 10’, you cut and place two 1/14" apart? I’m using some old track that came with the two trains, 027 I think, and also bought some new 027 42" radius. Is there any Poto-type rail that is really 3 rail. As you can tell I’m very new, but reading all I can.
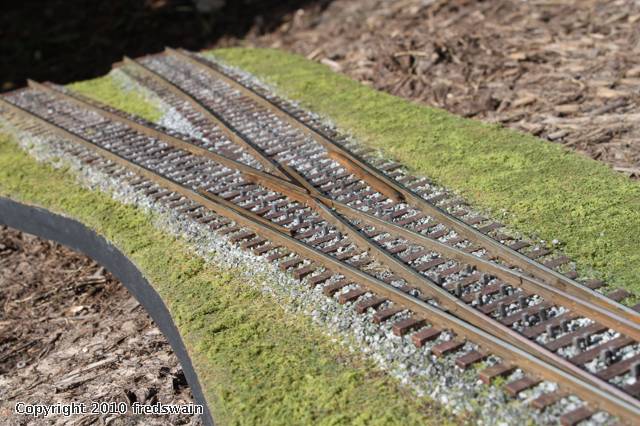
It’s been a while but I’ve been hard at work on this and have even formed a company around it. Here are a few updated pictures. The first is of the stud sticks and an assembly for an Atlas #5 switch.
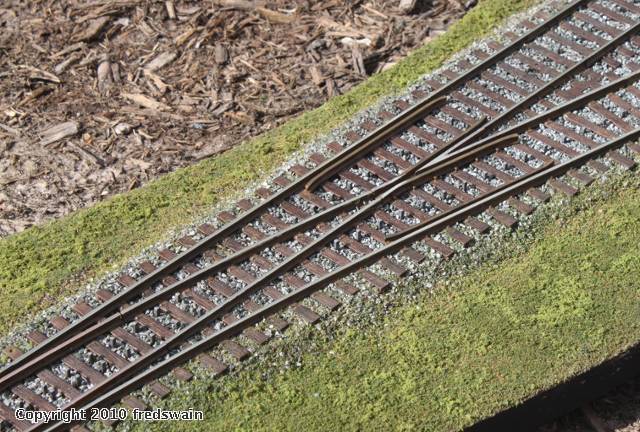
This is a photo of just the switch assembly. It it bolted together with #1 bolts and nuts. Although I have brass pieces shown here, the finished versions have stainless. This is setup as a right hand switch but to make a left hand just requires bolting the diverging strip on the other side. The bolt also provides a convenient place to attach a feeder wire.
This is a shot of the stud sticks installed between the roadbed.
A different view. Although a bit hard to notice, the studs get taller as the approach the center of the switch and are lower profile when on straight track.
Here are a couple of views of the stud sticks installed under the Atlas #5 switch.
Pretty cool. I have followed several folks messing with stud rail over the years. It is interesting to me.
How are you planning to build the shoe for the bottom of the loco? One attempt I followed several years ago made a shoe that clipped onto the existing rollers on the loco, but then the person quite posting.
There are a number of ways to do the pickup sliders. Some pickups work fine with just a clip on shoe such as lighted cabooses or passenger cars and some engines. Others however don’t work so well due to space constraints such as my MTH SD70ACe or a couple of postwar Lionel engines. They require a different technique. The pickup rollers aren’t all the same size between pieces either so one size does not fit all. So far I have built 3 different styles (not sizes) but they hardly cover every type. In some instances the best way to tackle things is to remove the factory rollers and completely replace them. In rare cases such as on some steam engines, the best method may be to fabricate and attach one under the tender. The pickup issue is definitely the biggest hurdle in this but fortunately they aren’t hard to build out of brass.
This display piece that I am showing pictures of will have a relay shed next to the tracks with a 9V battery hidden in it wired to the track. I will set a lighted caboose on it for display that can be rolled back and forth. That caboose uses a simple clip on shoe. It also shows that there is no ticking sound across the studs. I had to figure out a stud profile that minimized this as well as a minimum length and thickness slider to eliminate it.
The whole point of this is to stay with 3 rails and not 2. I don’t own enough equipment to keep me in 3 rail as opposed to 2 but I just like the electrical simplicity of 3 rail and the little wiring tricks that you can do without the need to any extra electronics. My home layout is a small work in progress outside 3rd rail layout using all hand laid track just because I’ve always had a nostalgia for it. I just like 3 rail but I also like realism. Then again just to be a bit more different, I also like to run DCC on converted engines so I don’t exactly do anything the easy way.
Here are a couple of in progress shots during painting. I use a combination of techniques from the two great modellers of Lance Mindheim and Pelle Soeborg. I start out by painting all of the track a light gray that doesn’t contain any blue. Model Master Light gray in this case. I even paint over the rails. I am not coating the tops of the rails with any oil as the next step involves oil based paint. The ground is painted an earth like tone. In this case it is latex based Mocha but any dark tan to light brown tone will work fine. I will apply various ground cover in layers on top of this. I’ll post more details as I get to those steps. It will all make sense when I’m done.
I have continued with the painting process. I have done 2 layers of a wash of mostly paint thinner with burnt umber artist oil color. I wait at least a full day between washes as oil colors are a bit slow to dry. Fortunately paint thinner dries fairly quickly. The washes combined with the light gray base coat really allow the molded in detail of the track to show up really well. The slight inconsistency is also more realistic looking than just a solid color. Next up is to mask off the ties and paint the tie plates and rails with Floquil Rail Brown and thendust it with Floquil Rust. Then it’s off to ground cover and ballast. More to come…
Thanks. Hopefully it holds together quite well! This technique is actually not mine but rather mostly that of Lance Mindheim who is an incredible HO scale modeller. Some of my other scenic techniques are borrowed from another incredible HO modeller named Pelle Soeborg. I have basically combined their techniques and then do a few little things of my own. If I wanted it to look real then I figured I should use the techniques of those who do it the best.
Here is the work I did today. I masked off everything but the tie plates and rails. The tie plates don’t go to the edge of the ties but that is OK as in the real world rust runs down and stains this part of the ties anyways. The part of the process is quite tedious and at one point I started to question my role in the universe. This little 3 foot long display piece took me well over an hour to mask off. Most of the time is spent in the switch as the rest of the track is quite quick and easy to mask.
Once the masking was done, I sprayed it all with Floquil Rail Brown straight from the spray can. I will allow this to dry for a full day before applying the rust colored paint. I feel that too many people are impatient and try to rush everything to quickly. You need to let each layer dry thoroughly before applying the next. What is another couple of days when you want a layout that last for years or decades? Unfortunately that next step with Floquil Rust won’t involve a spray can as they don’t sell that paint in spray form. I may
I am currently finishing up the scenery and detail and will probably have it done this weekend. Here’s are some new shots taken in the kitchen tonight. What do you think so far? Yes it’s 3 rail.
Fred, What you are doing looks so good it almost makes me want to duplicate it. However, at the present time, I don’t have a place for a permanent layout, so I am still using good old O-31 tubular track and 022 switches. I assume you have to keep the pickup slider pretty well lubricated. I remember my first loco was a scout with sliding pickups, and I wore them out. I made new ones out of some copper sheet. This was early '50s, and parts just weren’t available. Keep up the good work. Bruce Baker
There is nothing wrong with good old tubular track! I actually have a love of O-27 for some reason. Stud rail adds complication and when used with a smaller code 148 rail makes nearly all 3R wheels unusable although mostly due to the clearances through the switches. My goal was to make the ultimate 3 rail track and not just to find a way to make stud rail compatible with everything. It isn’t for everyone and I don’t have any intention right now of building it with tubular rail although never say never. I know most people here probably don’t care about this type of track but I just wanted to show off what is possible in 3 rail with a bit of effort. There is nothing wrong with even just setting up a loop of track and playing on the carpet though so I don’t want anyone to think that I am pushing this as the only thing to use. That definitely isn’t the case. I like all trains. This is just my personal project and what I wanted.
As far as the sliders go, most pickup rollers can use a simple clip on shoe made from brass. There are some pieces that these don’t work with though. This way if someone wants to run on standard 3 rail track, all they have to so is remove the slider. Clip it on for stud rail use. Over time it will probably wear out but just install another one. At less than $5 a pop they’re pretty cheap.