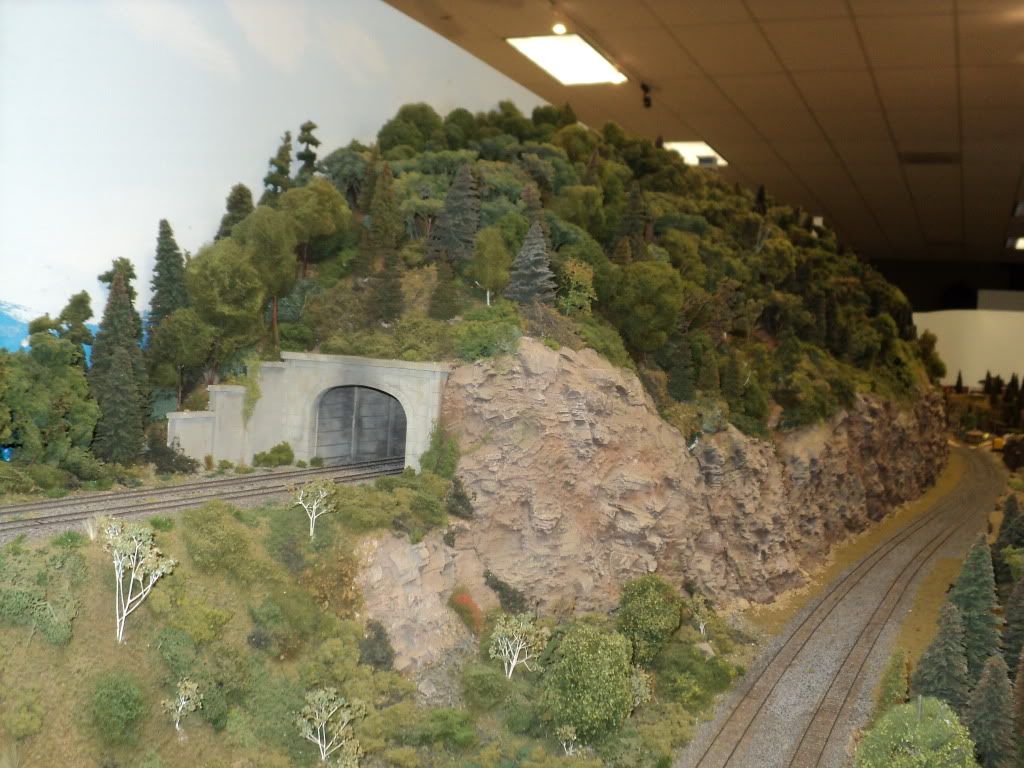
Now that I have the rocks stained and the mountain painted I was wondering if I should secure the portals and the retaining walls or wait?


Now that I have the rocks stained and the mountain painted I was wondering if I should secure the portals and the retaining walls or wait?
Wait for what? Unless you’re making changes to the track, I see no reason not to secure the portals.
Nice looking mountain, and rock work. Well done.
Thanks, that’s what I needed to know as this is my first layout. I’m working from videos and books.
So now I glue them in and then scenery and trees.
Merry Christmas!
Ah nice, I remember when I first built my very first mountain. I was just wingin it.
You know what would really look good on your mountain.
Is some real dirt, its FREE. And also some yellow and green ground cover.
Just go outside, and get some dirt that matches the color you painted the mountain.
Then use a flower sifter, to get all the big rocks and junk out of their.
Then using some elmers white glue, just paint it on, and then sprinkle in the dirt and ground cover.
Here’s my mountain. I used some real dirt on it.

Thanks. I would try real dirt but here in Georgia all I’d get is red clay. I wish I had some of that nice black loam I used to play in as a kid when I lived in Boston.
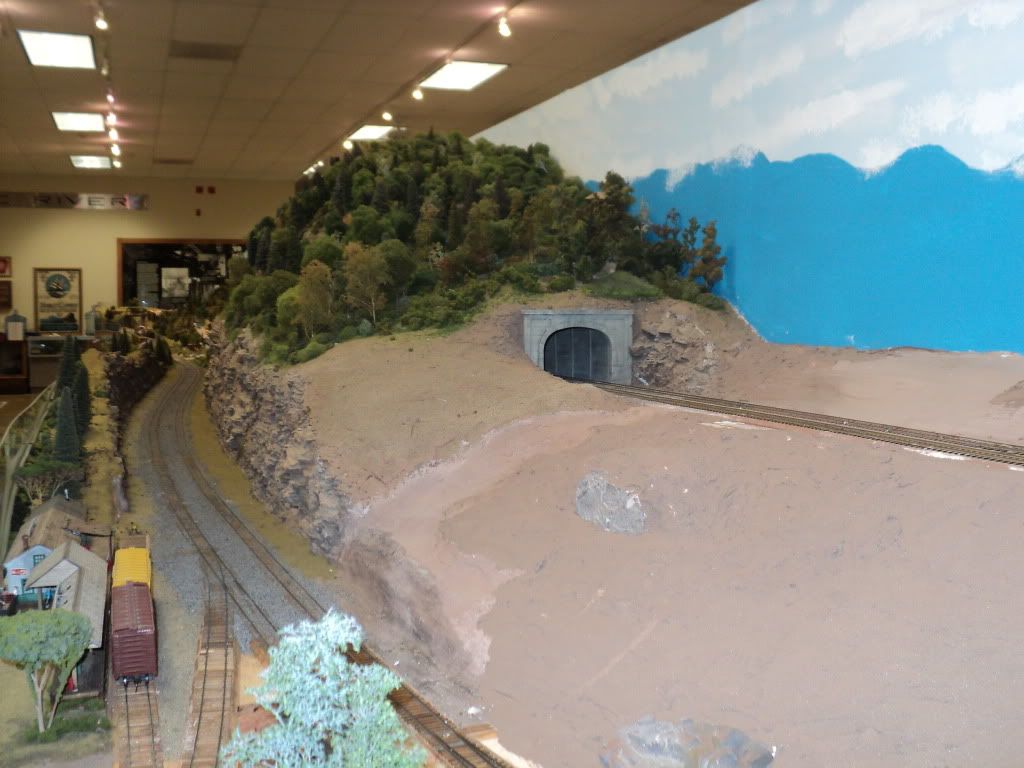
Hi Paul, nice work! The only thing I can think of is you might want to create and install a lining for your tunnel before affixing the tunnel portals. When I originally built one of my mountains and included a tunnel I did not line it with a rock face and later decided it needed to be lined. Fortunately, I had provided an access hole underneath the mountain in the event of a derailment. After building the liner I was able to lift it up through the access hole and place it behind the portal. I did this for both tunnel entrances. It was a job, but I got it done. As you can see in the below photos the rock face lining made a big improvement in the tunnels overall appearance.
BEFORE

AFTER

You’ve done a very nice job, but if you are interested in creating and installting a tunner liner behind your tunnel portals you can go to my website Bo’s Trains at http://www.bostrains.com and look at the process I used. There are other ways to make a tunnel liner, but I chose to use polyurethane foam, plastic casting resin and a rock mold that I purchased from Bragdon Enterprises out of California. I chose those materials because of the size of my tunnel liners and I wanted to try something new.
I hope you will keep us posted on your progress. Bo [:)]
[quote user=“railhead53”]
Hi Paul, nice work! The only thing I can think of is you might want to create and install a lining for your tunnel before affixing the tunnel portals. When I originally built one of my mountains and included a tunnel I did not line it with a rock face and later decided it needed to be lined. Fortunately, I had provided an access hole underneath the mountain in the event of a derailment. After building the liner I was able to lift it up through the access hole and place it behind the portal. I did this for both tunnel entrances. It was a job, but I got it done. As you can see in the below photos the rock face lining made a big improvement in the tunnels overall appearance.
BEFORE
AFTER
You’ve done a very nice job, but if you are interested in creating and installting a tunner liner behind your tunnel portals you can go to my website Bo’s Trains at http://www.bostrains.com and look at the process I used. There are other ways to make a tunnel liner, but I chose to use polyurethane foam, plastic casting resin and a rock mold that I purchased from Bragdon Enterprises out of California. I chose those materials because of the size of my tunnel liners and I wanted to try something new.
I hope you will keep us posted on your progress. Bo
God deal Paul. I guess I didn’t discern the tunnel linner in the photos. I understand about the many things to be done. Take your time and enjoy. Merry Christmas! Bo [:)]
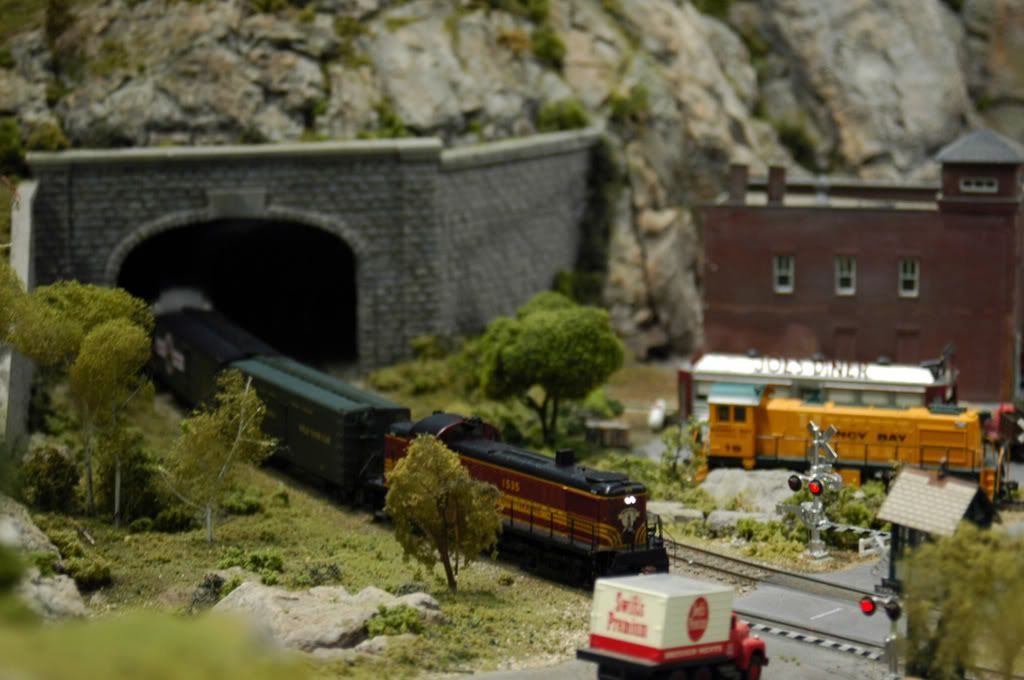
Paul, one note before you do go too much further, In Bo.s pics you will see the rock @ the near vertical which runs right up to the edges of the portals/ wing- retaining walls. There are quite a few places where additional rock molds should be placed, this is @ those steep almost vertical spots. If you plan on burying those areas w/ trees and bushes much will be hidden so the entire edge need not be all rock.
This pic shows exposed rock up to the portal, the rear is grade beyond the retaining wing wall, you can also see the partial tunnel liner (piece of 1x run in about 14")
Opposite end has lesser grade and only some minor rock is needed @ the steeper sloped spots.
This is a much heavier rocky done area, had very little room to work with so all the cut rock. My first attempt at this.
Looking good, come a long way, since scratching your head about a month ago, fun stuff- isn’t it!!
Thanks Bob. I was wondering…do you mean I should add rocks where the “wings” are right next to the retaing walls or add rocks to the vertical part of the mountain itself?
I was gonna cover it in a lot of trees, dead fall, and even have a little hiking trail made from natural stuff.
(BOGP40) Bob, good point about the verticle faces. I really like your rock work and the tree covered hill shown in the first two photos. I know those trees took some work. I’ve had a lot of trees to plant as well. Bo

Visit my website Bo’s Trains at http://www.bostrains.com
I would add at both places. Study real rock cuts, don’t have to actually be a prototype portal. Just get a feel as to where you need to place rock where grasses, trees and bushes wouldn’t be able to grow due to too steep. Blasted rock along highways is a good example. If you find that the face of the hill (actually almost between the portals is too steep and you don’t want that much rock, let the hill grade down further out on the the layout, placing only a few rock outcroppings as it decends to the base.
When first attempting scenery and doing the rockwork, I would study and take numerous pics of all sorts of rock cuts, natural outcroppings and faces, washouts between outcropping and how the “tallus” would land. You can also study how the vegetation will grow also under these conditions. The type of rock you’re modeling will make a difference as you try to capture the prototype in miniature. There is granite, shale, sedimentary all which are modeled/ treated (done) differently. Study the coloring, you’d be amazed at what colors are running through the stone or have weathered/ leached out from all the minerals. Since we are modeling New England and that’s where the club is located, actual local glacial rock is everywhere as well as numerous deposits of shale.
Another nice hint for casting w/ hyrocal or plaster is to add coloring to the plaster. I have found that powdered masonry dyes can be added to get a decent base color that later only needs minor washes and added color and lighter highlights. This coloring works great where castings may see some abuse such in a club layout. Nothing worse than seeing those bright white chips that need to be doctored up to hide.
Thanks fellas. Good thing I have a lot of rock castings left over.
I’m simply not good at carving foam to look like rocks. I don’t know how to do that so I’ll have to figure out what rocks to use and put them in place.
If you don’t have any plans for that flat area between the hill and tracks, add to the hill and lessen the overall slope You still would most likely need rock @ the portal sides, but some of the landscape can flow down outward and change the entire corner. Woun’t look like there’s a rock hill planted on the corner of a plain.
Hi Bob, thanks. I’m kind of fuzzy about this. I have massive indecision and still really don’t know what you’re talking about.
I was just gonna glue on some small, flat castings above and near the retaining walls and cover them with vines perhaps.
As for adding to the mountain, I can’t. I need clearance for the coal mine. I can add a lot more rocks to it to make it look more rocky however.
This is the tough part for me as I don’t think I have the “talent” to decide what looks good or not. I can do the physical work but I just am not “creative” enough to see it.
Paul
Okay, do you think this looks ridiculous? I already glued them in place. I can add a lot of vegetation and talus around them.


Hi Paul, as time goes on you’ll learn that when it comes to scenery, nothing has to be set in stone, sorta speak. Just learn to kinda play with different possibilites until you hit on the way you like it. You might just start by crumpling up some wads of newspaper and use them to form different landscape features coming off your moutain until you get what looks good to you. If the features are not to high (are low lying) you may be able then to tape the paper wads in place and lay plastercloth over them to give you a hard form. Even then if your not satisfied to can continue to work it or even rip it all out and start again if you want.
Another approach based on Paul’s earlier suggestions would be to add the rock faces where you know you want them while thinking about the overall vision you have for that particular area of your railroad. I struggled with this as well, but have gotten better over time. Now I try to envision what is is that I want to create and then work to achieve that vision. Sometimes I get it right out of the gate. Other times not so much so and I have to keep working it until I’m satisfied or feel that I have done the best I can do. It’s then time to move on. I might go back to that particular area later after having thought a little more about it or if I think my skills have improved such that I can capture the vision and make it work.
From the photos above, Paul’s work is exceptional and his suggestions would I think enhance your mountain scene. I am not particularly adept at any of this, but I have learned and gotten better at it over time. I would encourage you not to get to stressed out about any of it. My tunnel liner experience is a good example of how you can always go back if you feel the need to improve upon earlier work. Take care, Bo [:)]
[quote user=“railhead53”]
Hi Paul, as time goes on you’ll learn that when it comes to scenery, nothing has to be set in stone, sorta speak. Just learn to kinda play with different possibilites until you hit on the way you like it. You might just start by crumpling up some wads of newspaper and use them to form different landscape features coming off your moutain until you get what looks good to you. If the features are not to high (are low lying) you may be able then to tape the paper wads in place and lay plastercloth over them to give you a hard form. Even then if your not satisfied to can continue to work it or even rip it all out and start again if you want.
Another approach based on Paul’s earlier suggestions would be to add the rock faces where you know you want them while thinking about the overall vision you have for that particular area of your railroad. I struggled with this as well, but have gotten better over time. Now I try to envision what is is that I want to create and then work to achieve that vision. Sometimes I get it right out of the gate. Other times not so much so and I have to keep working it until I’m satisfied or feel that I have done the best I can do. It’s then time to move on. I might go back to that particular area later after having thought a little more about it or if I think my skills have improved such that I can capture the vision and make it work.
From the photos above, Paul’s work is exceptional and his suggestions would I think enhance your mountain scene. I am not particularly adept at any of this, but I have learned and gotten better at it over time. I would encourage you not to get to stressed out about any of it. My tunnel liner experience is a good example of how you can always go back if you feel the need to improve upon earlier work. Take care, Bo
Hi Paul, I just saw your latest work. Bob might have a better idea, but what I would do now is cover up your tunnel porttals and the track near them. Mix some plaster and work it in around your casting. While the plaster is wet use an instrument to work the plaster up to your castings. I’d have a small paint bush and some clean water handy also. As the plaster begins to set you will be able to shape and carve it thus blending the new plaster into the casting. When I am carving rock work it always helps me to have a couple pictures similar to what it is that I am trying to achieve. The internet is a good place to find them. You can also use the castings you have in place to model your handy work. You might give it a try and see what you think. If you decide to try it, work just a small area at a time and mix your plaster batch accordingly. Bo [:)]
Visit my website Bo’s Trains at http://www.bostrains.com
GREAT IDEA!!!
I was wondering what to do now I have a good answer! I’m not good at carving rocks but I can try but building up the area is brilliant!!
Thanks a lot Bo!
Paul