I am about to begin a few trials of DIY street paving in my downtown smalltown USA. Typically, what width for two lanes (mine will have sidewalks on the margins and space for parallel parking) looks good?
I am thinking something like 30 scale feet to 40 scale feet at the most (4 to 5,5 in.) But sometimes what exists in the real world needs adjusting to look good in modeling… what have you used?
I don’t know the correct answer, but you might try using google maps and go into satellite view then find various streets that are the kind you want to model, then figure out how wide they are. You could compare them with objects that have a known size. For example, if you are looking at a street and there is a Ford Mustang in the image, you could find out how long that car is, then extrapolate the width of the street from that.
I actually took a tape measure out to my local street one day. The pavement is just under 19 feet wide. It is considered a very narrow street for two way traffic. Speed limit is 35 and most cars slow down from that to meet another car. There are no sidewalks. Gotta go out and measure the highway one day.
The long out of print Bill McClanahan book on scenery has some useful data on street widths – but he also makes the point that a full scale width street tends to look too large and too dominating on our otherwise compressed layouts, for the same reason that our model trees, neighborhoods, factories, depots, rail yards, etc would look small in real life but seem large on a layout. In real life we would hardly notice a city street 50 or 60 feet wide. On a model railroad it would look enormous.
If you do elect to go on the narrow side for a street, you have to avoid the oversize vehicles that IHC and some other people have sold (IHC says their cars “look great on HO layouts” which is marketing code for “not really HO scale”).
I have found it works well to use the google street view to get an idea of lane widths. If you use initially use the map to get down close and use the person icon that is near top left and drag, you get a photo that is right at street level. The neat thing is that you can look 360 degrees in all directions as if you were actually standing on the street. This is also good for modeling when you want to get the proper building colors, landscaping or attempting to copy a exterior building surface.
In some ways, the timeframe makes a lot of difference to the answer. Living in Chicago from 1944 to 1967, I saw most all main drags get expanded from 2 to 4 lanes or 2 to 2 lanes plus turning lane, and 4 lane roads expanded in the same manner. Much of this expansion took place in the late '50s and '60s. “Side streets”, where most folks lived, were two non-marked narrow lanes with two parking lanes, and most pretty much stayed the same.
At my Grandmom’s, in Anna (small town in southern Illinois on the IC “racetrack”), I saw many local streets transition from dirt/gravel to asphalt. Main streets were fairly wide, anticipating growth and heavier traffic - which never came.
I agree that sometimes accurate measurements just don’t look right in our modeling world. And I would experiment with the width, placing vehicles in the lanes to see how they look.
Lastly, revisiting former homes over the years was an almost shocking experience as they and the streets looked so much smaller. Well, the reason was the trees! The main streets I lived on in Chicago had newly planted trees (replacing Dutch Elm victims), which made streets houses look smaller. Going back, many of these trees were huge, and shadowed the streets and over powered a lot of the houses.
Conversely, a re-visit to a homes in Louisville and Anna had the opposite effect. The huge maples and oaks were all gone, and everything looked bigger and so very different.
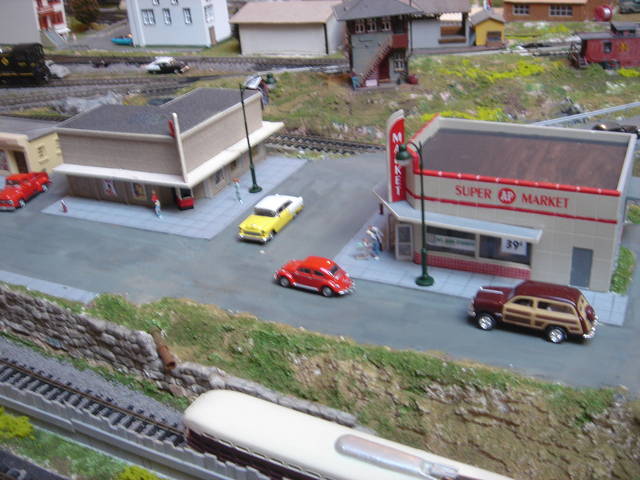
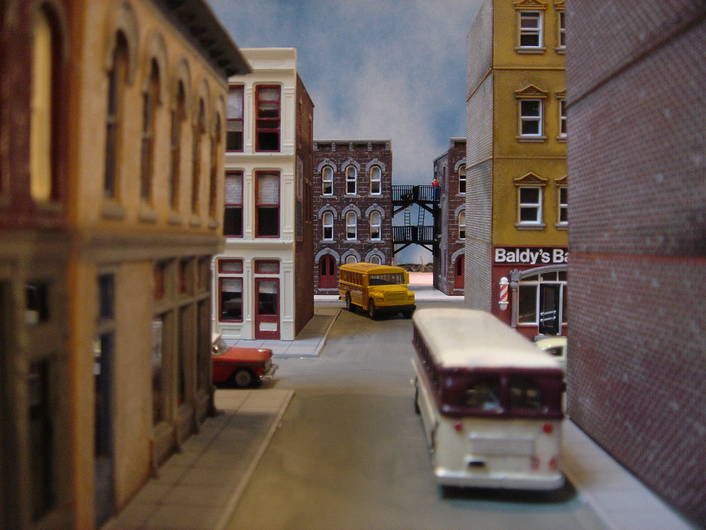
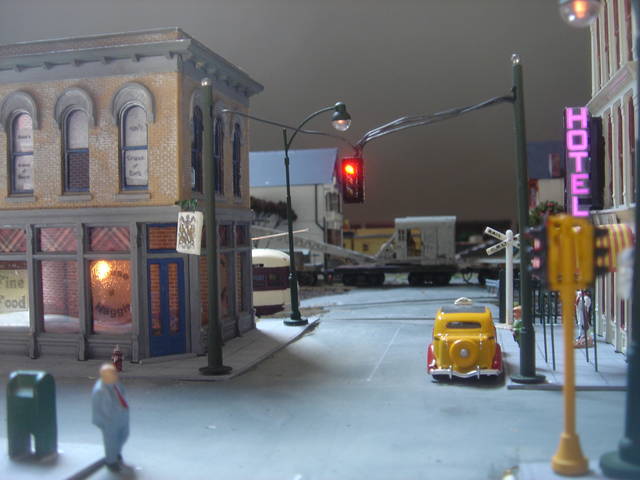
This is a 2 1/2 inch road in HO, and I made the sidewalks narrower, too. I think it increased the “urban canyon” effect I was looking for, even with only 2-4 story buildings.
This is another 3-inch road. It’s a busy scene, with traffic lights and overhanging signs. It’s important to have enough sidewalk space here to add details.
For me, these 3-inch roads are fine. They are probably narrower than the prototypes, but I don’t have the luxury of space. As long as I don’t have to drive on the roads and try to park downtown, I’m OK with them.
Thanks, Dave and everyone else kind enough to give me some tips on this.
Yeah, I kinda thought there was some perception issues with full scale streets.
I think Mr. Beasley’s 3" widths look good. Thanks for the pictures there. I also learned about the sidewalk widths from those shots. I was looking at the “sidewalk styrene” sheets I have and wondering how may squares to use in width.
You’re welcome. Since I just happen to have an HO scale rule handy-- Mr Beasley’s 3 inch roadway scales out to 22 feet. 2 1/2 inches scales out to about 18 1/4 feet.
A parkway on my own layout scales out to 26 scale feet, or about 3 1/2 inches. It “looks” right but I would not be shocked if actual measurements of my prototype turned out wider than that.
For contrast, the Walthers plastic street system (concrete version) which is two halves meeting at a raised or cambered center, scales out to about 40 scale feet (around 5 1/2 inches). It looks like a wide city street but in reality would not be all that large. If I made that my very widest city street the less busy roads, side streets, alley ways, and tight old streets would all be proportionally narrower.
The Walthers plastic sidewalk that comes with the street system scales out to 5 3/4 feet (3/4 inches). Plastruct makes a sheet of styrene that they call “Sidewalk” – each square is 1/2 inch – which scales out to about 3 3/4 feet in HO (pretty tight – sort of like the walk next to the house to get to the back door). In N however that measures out as about 6 3/4 feet which is pretty reasonable for a town sidewalk.
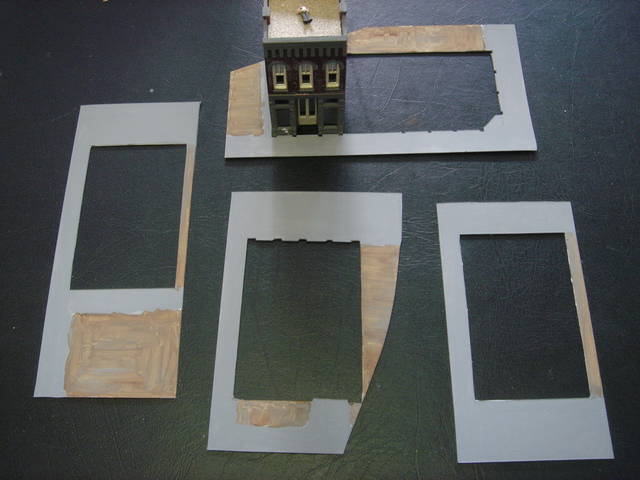
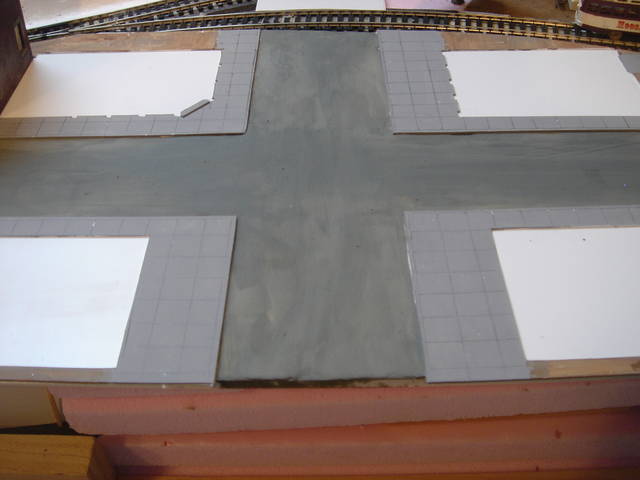
My sidewalks are flat styrene sheet. I use a slightly lighter shade of gray for the sidewalks than I do for the roadway. The lines are a 1/2 inch grid applied with a number 2 pencil. I cut a sheet of styrene for the “city block,” and then removed the center so that the buildings actually sit down inside the sidewalk piece. This hides the base of the building, and prevents light from leaking out under the building:
My job entails measuring street widths for scale diagrams (involving vehicle crashes). Normally, hiways have 12 foot lane widths, main streets have 9-10 foot lane widths, and side streets are about 30 feet curb-to-curb.
That being said, I totally agree with above posts on “selective compression” when it comes to roadways. The best layout roads I’ve seen start in the foreground, and get narrower as they get to the background. I model in 1:48, yet my roads are no wider than 3 1/2 inches.
What thickness of sheet plastic are you using for you street surfaces and sidewalks? I need to model the four lane road that is attached to the link in my response above. I have already completed the large warehouse in the photo.
I think it’s .030. It might be .040, though. I ordered a couple of big sheets from www.usplastic.com when I started my layout. I’ve been using it ever since. Great stuff to have in abundance.
I did my streets with Durhams Water Putty, not styrene, though.
I put it on without color. When I mix a batch up, I add some vinegar to slow down the setting process. (Once, we ran out of white vinegar, and I used wine vinegar instead. It worked OK, but my layout smelled like a salad for 3 days.)
I use a wash of cheap gray acrylic paint in water to color my roads. I use the plain “Gray” color and don’t try to mix or alter the shade, so that I will always have the same color available if I need to patch the road later, and the roads are the same color across the layout. It usually takes 2-3 coats. Using a wash gives a slightly uneven cover, which looks better to me than a “perfect” uniform paint job.
I’m not sure I can get this Durhams up here in British Columbia, but in case I can find something similar with the shrink resistance, how do you smooth it in that stage of your work. Reading the Durham’s info I see it sets rock hard…is it just a matter of rolling it with something when you lay it down…like a rolling pin or cylinder? and then can it be sanded easily?
I use a technique suggested by Bob Grech, who is a forum member I haven’t seen here for a while. His modelling is so jaw-dropping-good that I thought it was a good idea to follow his suggestion.
I mix the stuff up about the consistency of drywall compound, so I can pour it out of the container and spread it on to the “road” with a small putty knife. At this point, it will settle into low spots, but will not flatten out and try to be level. But, it hardens up pretty quickly, which is why I add the vinegar to slow it down.
I keep a small yogurt container of water and a 1-inch or 2-inch foam brush handy, depending on the width of the pavement. Once the roadway starts to set up, begin brushing it with water. Keep doing this every few minutes as the putty sets. It’s going to be pretty solid in 15-20 minutes, so don’t do too much roadway at once, and work quickly as it’s setting. You’ll probably want to throw the water outside (don’t pour it down the sink) and get fresh water so you can keep the brush relatively clean. If you do this water-brush step right, you’ll hardly need to do any sanding at all.