Scratch building a MILW terminal caboose

Time to get this project going. I’ve talked about it for a while, and it’s finally on the work bench, after completing my overhead crane build, which, if your interested is here:

http://cs.trains.com/mrr/f/88/t/275511.aspx

To get this project going, a picture of the prototype, just a couple of blocks from my house.

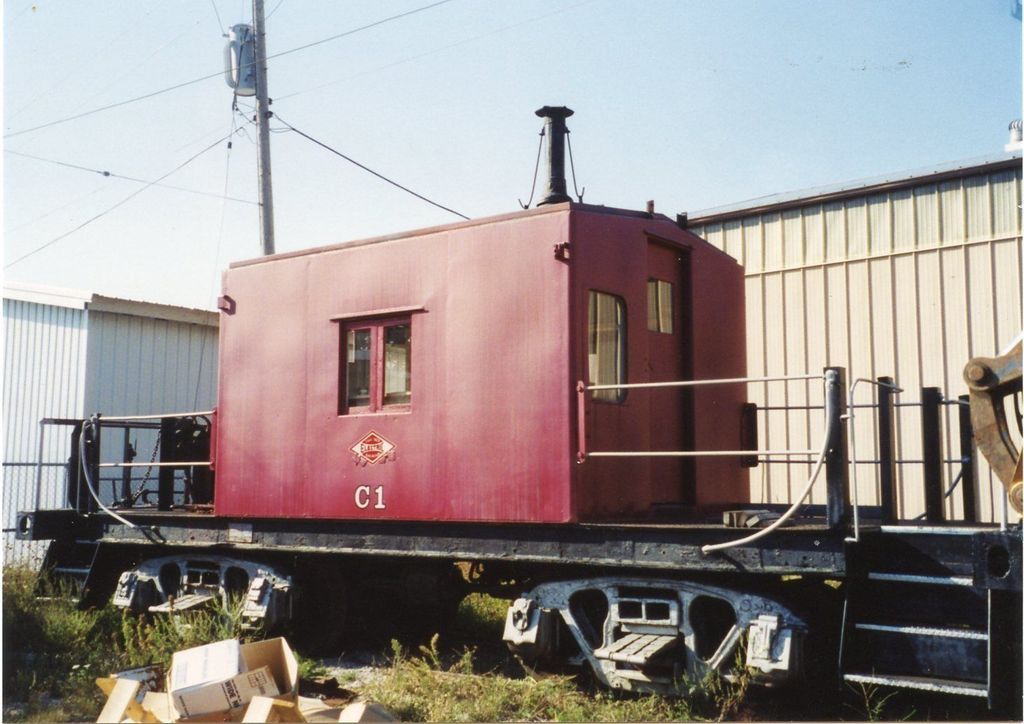
It now belongs to the East Troy Electric Railroad, AKA the East Troy Railroad Museum. https://www.easttroyrr.org/

This car started out life as a coal tender on the MILW.

They have made some changes, most obvious is the ladders and roof walk have been removed from the cab.

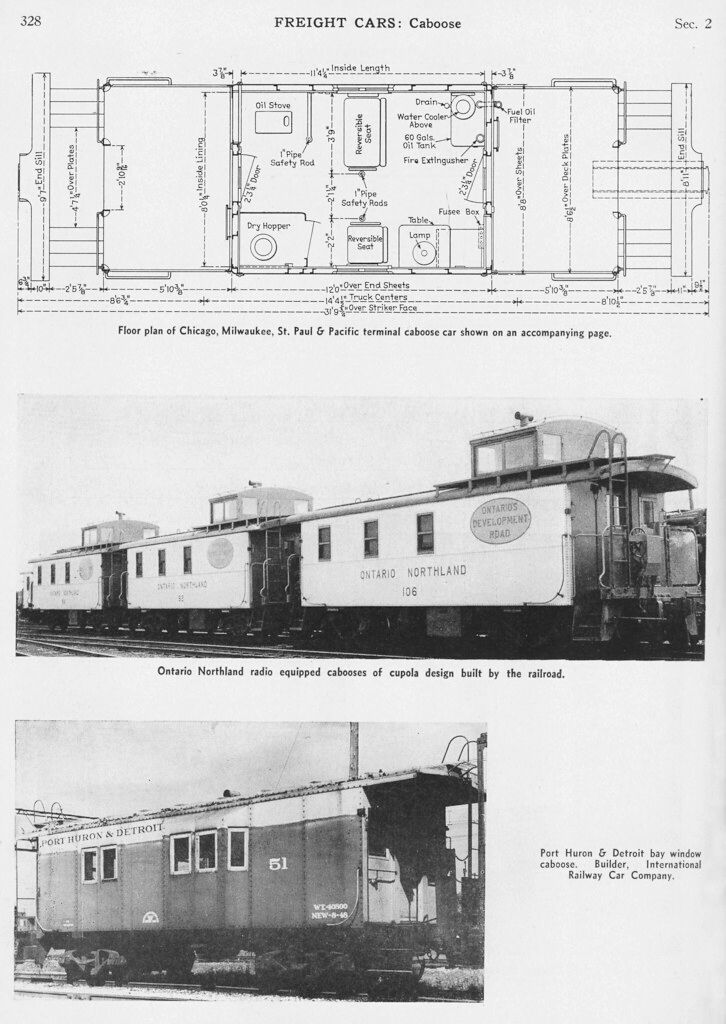
I was also able to find a drawing of this caboose, for the 01731 - 01740 series, which mine is numbered 01738.

My intent is to build this car as it was when delivered to the ETERR, not sure of the date when that happened. I’ll be adding the ladders and roof walk, and starting out with it in MILW paint.

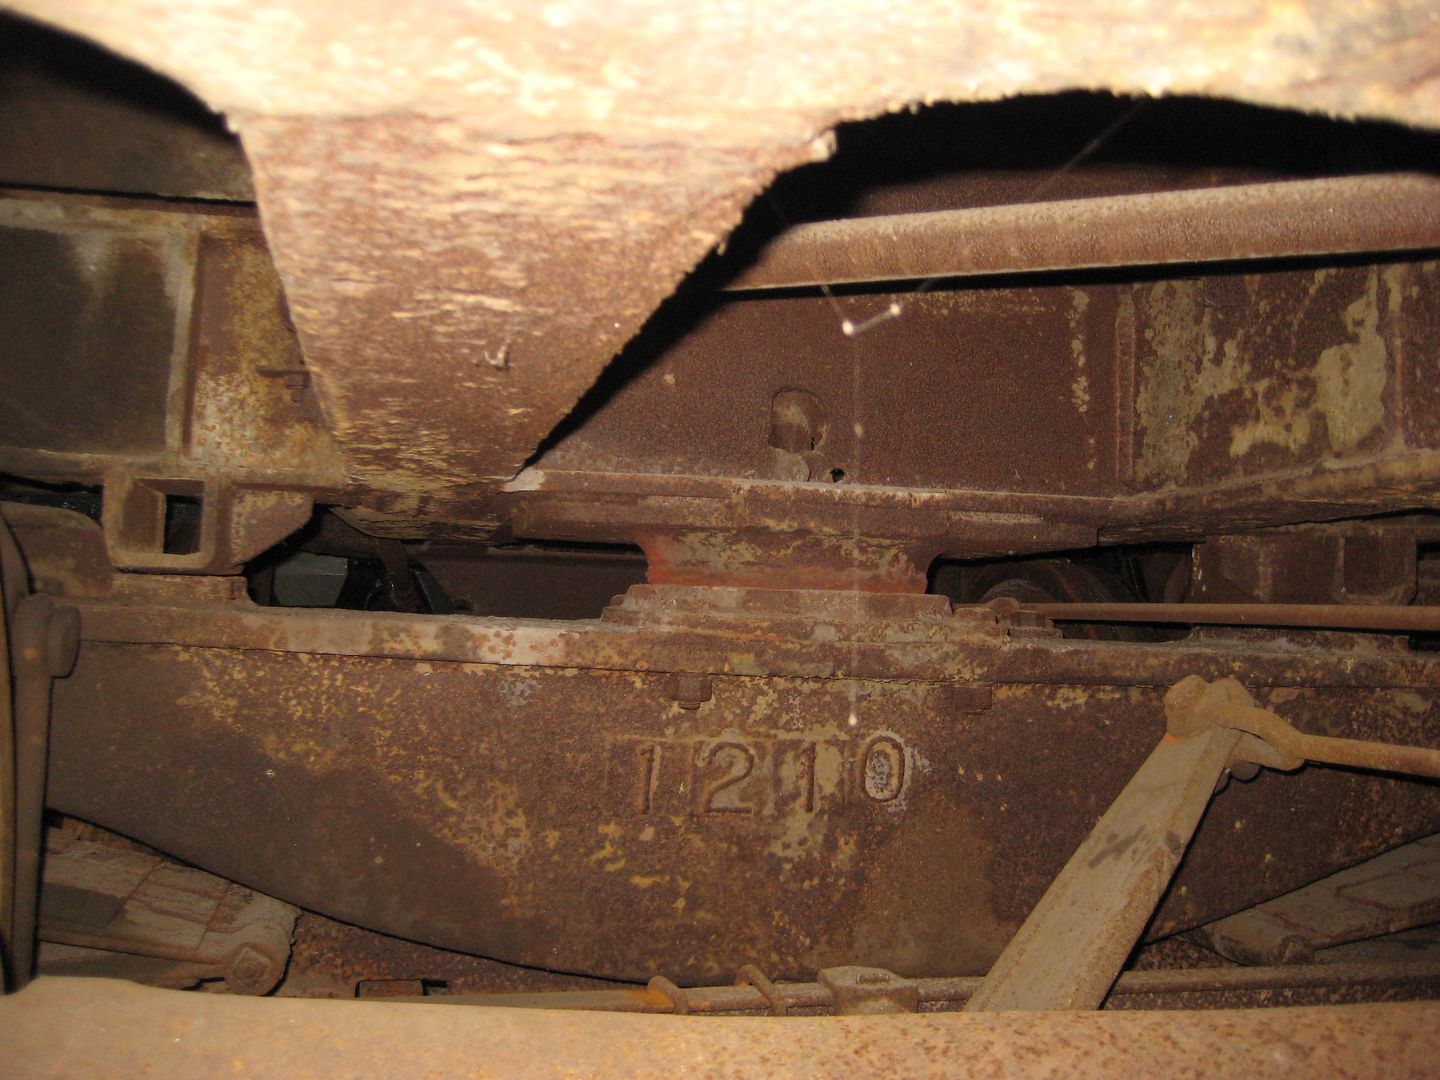
I was able to get access to the car, and take pictures, but, I should have taken a lot more! [:|], but with some on line help, and help from forum members, and what pictures I did take, I can work it all out, and fill the info I don’t have.

First up, was the trucks. I dug through my 3 small boxes of misc. trucks, and come up with a pair that needed only some minor work. Removing the coil springs, and adding the leaf springs.

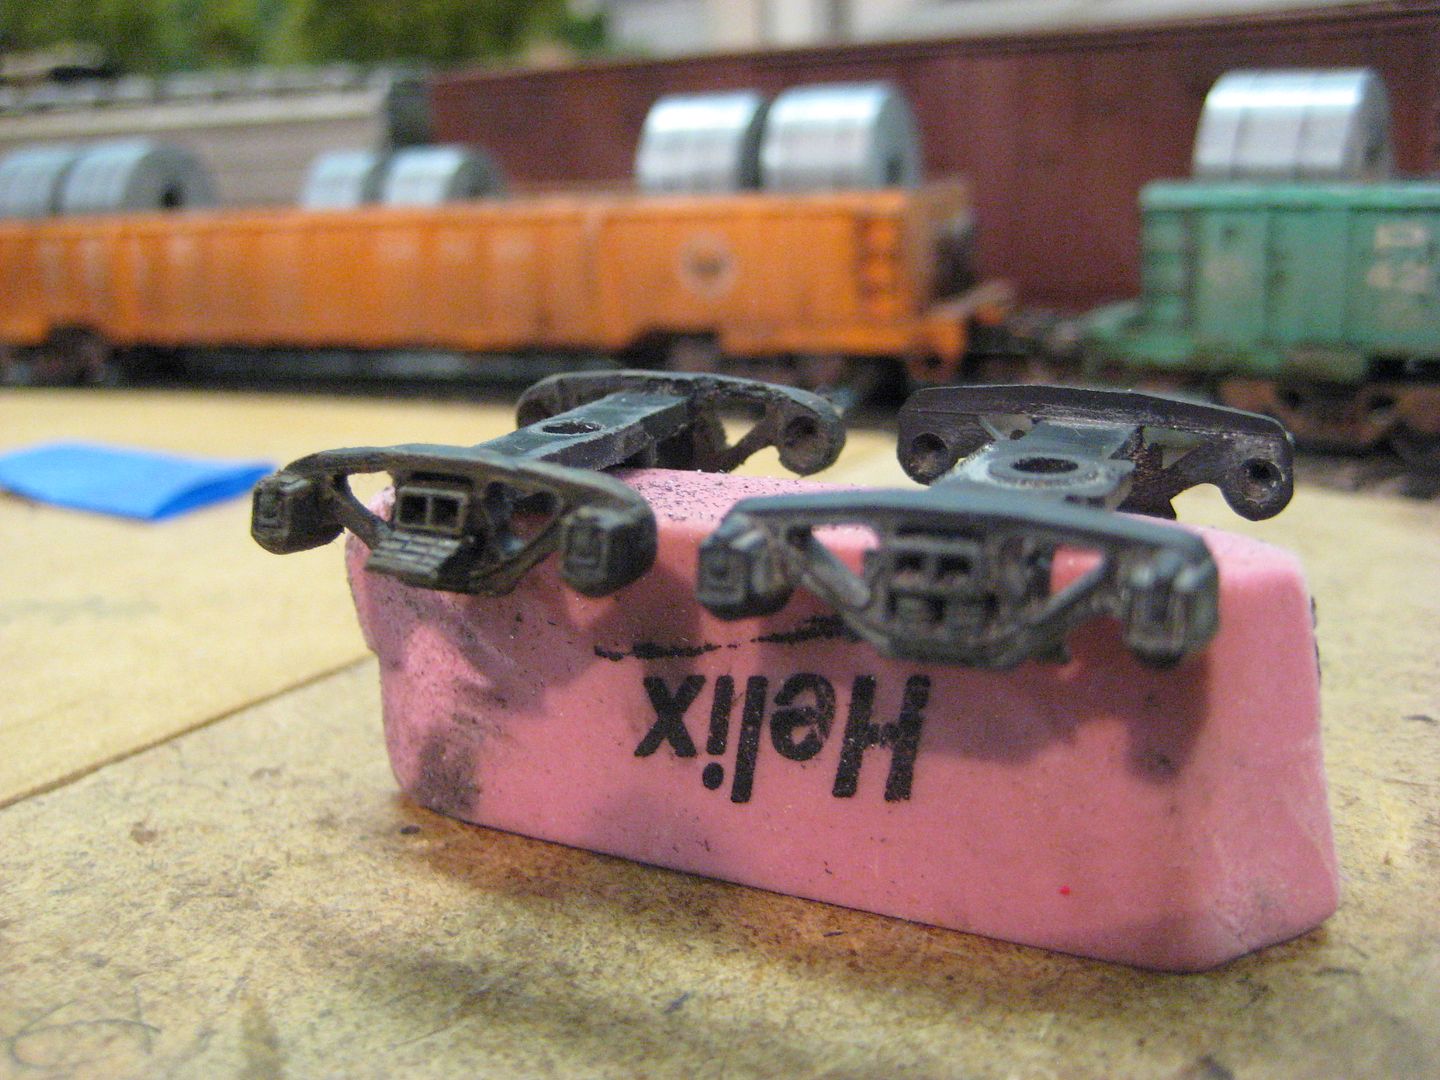
The original truck is on the right, the reworked truck on the left.

Then, after a long delay, I finally started on the frame. I couldn’t find an excisting caboose frame and chassis that looked rig

Yours is looking soooo much better than mine[bow]:

img_0742

img_9830

I should really start over. I can’t wait to see yours finished!

Harrison,

Don’t beat yourself up. Everybody who scratchbuilds had to start somewhere. You should be proud of making a start into a very rewarding part of the hobby!

In hindsight, everything I have ever scratchbuilt or kitbashed could have been done better!

Dave

Looks good Mike!

Dave

Yes, Harrison you’re one step ahead of me, you’ve tried to scratch build something!

If you want to rebuild it, go ahead, all you’ll be doing is improving your skills!

Thanks for the compliment, Harrison. Yours looks great! and everytime you build something, it’ll get better, but there will always be little things that you might not like, and wish you did different.

I’m just starting this, and there’s a couple of things I’m not totally satisfied with.

I like your steps! Which caboose model/manufacturer did you get the frame/steps from?

Thanks Dave!

Mike.

Hey, Mike, you’re building a model of the transfer caboose from the story my late brother told me when I was a kid! A conductor, using his ever ready chalk, labeled an EMD SW1200 cab and cabless combo, “Cow, Calf,” then labeled the transfer caboose, “Sheep!” My brother was a switchman in the Muskego Yard of the MILW and worked transfer and switching jobs locally with one of the combos plus caboose. He said they were fairly comfortable in cold weather, but sort of like riding in a dark box. Good start! Stay with it and have fun!

Deano

Harrison; Start over if you wish. Slow down, work clean, learn to file and get good square fit of parts. Spray, or learn to airbrush paint… Improve. (We all are) But, KEEP that original model just like it is. It’s a milestone for you. Dan.

Oh. And nice work, Mike!

Very true, Dave!

Nice work Mike, I must admit I omit the brake details as (1) I’m lazy, (2) if I can’t see it, I don’t do it.(most of the time[:$]).

Cheers, the Bear.[:)]

I agree with Dan on this one, don’t destroy serial No. 00001. It is a piece of your history.

You both have one-up on me. Years and years of kit bashing, modifying, detailing but I never scratch built any rolling stock (other than some ride-on large scale stuff).

Keep up the good work and thanks for sharing [Y] [Y]

Sorry to hear both your cabooses have a tender bottom. There’s medicine for that [:-^]

Regards, Ed

Thanks Deano, nice to know about a local connection with the MILW. and their terminal caboose.

Did your brother move on to work for the Soo?

Here’s a floor plan of the interior of these cars, and they did have all the comforts, so to say. An oil stove, reversible table and chairs, a desk for the conductor, and of course, the “dry hopper” [:|] You might have to enlarge it to read everything.

Thanks Dan, yea, there are a few places I could’ve spent more time in the filing and sanding dept., for sure. All critical for using the macro setting on a camera! [:O]

Thanks Bear, this is the first time I have ever done the brake gear, linkage and piping. It was a challange, and while doing it, I started to “get it” as far as the guys that do this all the time with their freight car builds.

I could’ve spent more time getting everything perfect. As I mentioned before, that macro setting on a camera doesn’t lie! [:O]

Thanks Ed, speaking of tender bottoms, [%-)] Here’s a shot I took while under the prototype, showing the truck and bolster connection.

I didn’t think I could model it the way it actually is, and be able to operate the car, as we need a little side to side action on our models for good operation.

This picture looks straight on at the bolster, and truck, you can see the leaf springs on each side, towards the bottom of the picture.

Here’s another view of the end of the prototype, showing the brake wheel stand, and the end railing details.

Thanks to RRpicturearchives and the Rev, Jeremy He

It already looks great Mike and when finished I think this is going to be a wonderful replica. You’ve been mentioning this project for a long long time. (But I agree - those oversized parts for the running boards will bug you forever if you don’t do something about them at this stage. It is interesting how unlivable things you “can live with” become.)

Those interested in “rolling your own” should, in addition to paying close attention to what Mike is doing, read Alex Sansone’s good article about scratchbuilding a Milwakee Road transfer caboose in the June 2010 Model Railroader and should also try to acquire the Milwaukee Road Historical Society’s book on steel cabooses, which has a section on the transfer cabooses. Not all of us are so lucky as to be within walking distance of a preserved prototype!

Dave Nelson

Thanks Dave ! I already filed down the angles before I installed them, and to hold on to the model, it looks OK, but when I took a picture in macro! [:O] [(-D] They looked like 6" angle instead of the approx. 2" that I thought I had!

I’m trimming them down now, while leaving them in place. It’s not looking bad, even with the macro setting! [(-D]

Plus I’ve “test” fitted the grating, and that helps the overall looks.

I’ve got to look up that article in the June, 2010 issue, Thanks!

Mike.

I’m not Deano, but I wonder if his brother worked for the MILW just before the MILW-SOO merger, then continued to work for the SOO after the merger.

That gets me thinking, when did the MILW stop using these transfer cabeese? Would they still be around at the time of the merger with SOO and did they continue to work on the SOO after the merger, and did they receive SOO paint? It would be interesting to see this model in SOO as well as MILW.

According to the book on Milw Rd steel cabooses I mention earlier, some of them did last right to the end of the Milwaukee in 1985 although most had been scrapped and some sold or leased to other railroads such as 990003 which was leased to the Des Moines Union Railway and eventually found its way to the East Troy museum (Mike’s prototype). Says the book: “The spartan little cars became a memory once the Milwakee was bought out by the Soo in 1985.” Between the Milwaukee itself and the Soo there were more than enough “regular” cabooses available for transfer and yard work by then. I remember seeing them in Milwaukee orange but never in Soo Line paint or colors or even merely re-lettered as Soo. But they were widespread on the system so my observations are not definitive.

Dave Nelson

My prototype still carries the number 01738, you can see it over the doors. Not sure if that’s the one your talking about Dave. Could be? And the plan I found is for the series 01731 - 01740.

I don’t have the book Dave talks about.

I did just check out the article in the June, 2010 MRR. It looks like he might have modeled a different series, but it’s a nice model, non the less.

And it sounds like Deano’s older, late brother worked for the MILW well before the Soo, just by the way he (Deano) talked about him. Just making a guess here.

I do have a friend who’s brother also worked for the MILW., just before, during and after the Soo take-over, and he rode the line between Milwaukee and Portage, and Milwaukee and Fond du Lac, WI., but he always talked about being in a regular caboose, until they weren’t used any more.

I don’t ever remember seeing them in Soo markings, either, but never followed the Soo in all of it’s locations, just it’s presence here in WI.

Mike.

Did they actually remove the polling pockets or is this the other (locomotive) end of the tender frame?

Of course, a tender would only have polling pockets on one end. The end that carried the apron and drawbar would have to be modified to accept a standard draft gear and there wouldn’t have been an end sill. Kind of hard to tell from the photos which end we’re actually looking at.

Thanks for all the great background info [Y]

Cheers, Ed

Both ends have been torched open, the way my picture shows, not sure why.

Your could be right about the draw bar end, but the way the ends are cut open, they looked like they were the same, at one time, as whats left, after torching, is the same on both ends.

Mike.

I uh, just built the caboose part on an old tyco caboose chassis. [:$] The article in the June 2010 model railroader says to use the stairs off of a walthers trainline caboose, and I was looking to jump start the project, sooo…

I’ve wanted to build one of these ever since the Alex Sansone article in the June 2010 Model Railroade, but I’ve had a heck of a time finding out info about steam engine tender frames!

I would be very, very, VERY interested in seeing more about how you built the frame. My inclination is to try using brass structural shapes for the sake of weight.