I recently worked on a variety of things on the layout in order to provide dramatic and still useful night lighting. These were relatively easy and practical for anyone, so I thought worth sharing, as well as providing a place for others to discuss their own experience.
Like paint, night lighting covers a multitude of sins. All that stuff that just doesn’t look finished in the light of day blends into a beautiful nightscape that will cause you to see you layout in a new light – something like moonlight.
First, it’s important to distinguish between lighting for your camera and lighting for human sight. The human eye is a remarkable and flexible instrument and in many ways is still unrivaled by even the most advanced imaging systems. However, night vision is one place where humans apparently lost out to their zombie cousins. It’s just not all that good. However, this does make the human eye easy to fool at night.
One can use a variety of means to achieve lighting that suggests the night while still leaving enough to see by in a darkened layout room. A relatively new product, the blue LED rope light (or other blue LED strip lighting “fixture”), makes it easy to simulate a bright, moonlit night. Prices range all over the place, but these are generally affordable at a little over a $1 a foot. Don’t waste energy – and your money – cheaping out on blue bulb rope lighting. Bulbs are energy inefficient for starts.
The blue LED has a specifically beneficial property. In addition to throwing a dim blue light that suggests moonlight (it’s really too blue for that), the elements used to “dope” the LED to get the blue glow cause it to also emit near ultraviolet light. Those who can remember the 60s & 70s know how dreamy colors jump out unexpectedly under “blacklights.” Near ultraviolet behaves ver
It occurred to me to ask if anyone has advice on toning down the blue using Photoshop or other imaging software? I fiddled a little with it, but ended up with a bad B&W scene. What I think you’d be trying to accomplish would look like a good black & white pic. This would make night photography easier.
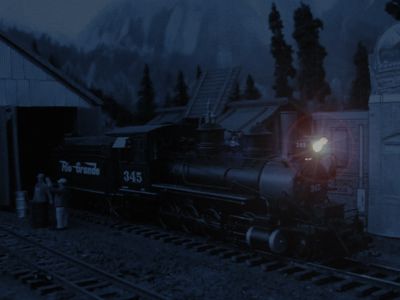
One way I found to work with the blue light is to keep it directional when taking pics. The last photo above in my original post is an example. In this pic, I turned off the blue LEDs on one side of the room, but left them on on the side that’s to the left in the pic. This provided better, more dramatic lighting in that it comes from a single source overhead, providing a shadow effect that accentuates the building.
The photo editing software I use (PhotoImpact) is no longer available(and doesn’t work well in Windows 7 or 8),but I’m sure others work much the same. It gives me the option, when adjusting color,hue,and saturation,of selecting what part(s) of the color spectrum are affected. Maybe tinkering with just the blue/purple areas would give you the results you desire.
Also,can you tell me what you are using for a power supply?
I used the HSL adjustment to desaturate it a bit. I also moved the Hue slider a bit away from the violet and toward the green. I then when into Levels and darkened the midtone slider a little.
BTW, our ability to see colors deteriorates in dim light. The cone cells in your retina that respond to color work best in bright light. The rod cells are more sensitive in dim light but can’t see color. So having the image being nearly B&W isn’t really a bad thing.
I tried making the basic adjustments in Photoshop and that’s how I ended up with the rather unsatisfying “B&W” image. I’m definitely not a Photoshop guru, so there may be some little trick that I’m missing. Not a big deal, as the ambient light pics work fine, just gotta be careful the camera doesn’t get jarred in the dark.
I am making my power supplies based on this circuit provided by another member here (can’t find the post where I saw this on right now, darn CRS [*-)].)
I used 7.5 volt power supplies on both of mine, building them to go into some old RS project boxes. The output is variable from something like 1.75 volts up to 9(?)volts (don’t recall exactly). I set mine to 2.95 volts. Try a few LEDs and see how it works before picking a set point. You can turn it up brighter, but I think you need to keep it below 3.2 volts once you’ve got a lot of resistors in it to avoid the potential to start blowing LEDs installed at a lower voltage.
I know very little about photo editing,Mike.but I like playing around with it. Here’s a screen shot showing the sliders I was talking about… By selecting just the blue part of the spectrum,I can change the tone without affecting the headlight color.
Then I used the “select” tool to select and darken some of the background:
Thanks for the basic tips. I gave a couple of pics a little workover, still not quite what I was trying to achieve (both your images of 345 are better than mine), but here’s a couple of other shots that I think look better than the originals right now.
Great tip and nice modeling there. I vaguely remembered my Canon SX100IS had such a mode, but had to dig out the manual to confirm the meaning of the little icons to be sure I had mine set right.
I gave it a try, but found it didn’t work well with the scenes I’ve lit so far. I’ve tended to light things as if they’re out in the boonies, because most of them are. I’m just starting to work through my main town, Durango, and there will be more outside lighting there given its an urban area. My mines and mills just don’t have enough outside ambient lighting to get good exposures.
I have been using the manual mode and that has worked well for the shots taken without the blue LED lighting. Exposures that work range from about 5 to 15 seconds with the camera set for ISO 400. I’m going to bump the ISO up to 800 and 1600 for my next group of manual shots to see how that does.
One thing I should say about the blue LED lighting that I don’t want the photography discussion of it to suggest that it’s an annoyance. It really isn’t for viewing by the eye, in fact it’s rather unobtrusive after one gets used to it, acting a lot like the moonlight it’s intended to replicate. It’s just that it tends to show up more in pics than it does in by eye, so requires some adjustments when dealing with pics to avoid it dominating them.
I had some unexpected time on my hands today, so had an idea and took another crack at river_eagle’s suggestion to use Night Scene on my Canon. This time I left the blue LED rope lights on. This seemed to do the trick and achieve a happy medium. Here are some shots.
Here’s Durango station. I used the Auto Brightness/Contrast, which picked things out of the mud, then added about +10 on brightness and +15 on contrast. I applied this in general on these shots and the results do look better.
Here are the Durango engine facilities. That roundhouse is crying out for some lights…
This is Webber Wholesale, which supplies groceries and sundries to grocers and industrial feeding facilities in the mining camps.
The rail-side dock of Webber Wholesale. Now that it has lights, it’s going to need a better interior.
Here is the lumber mill town of Rockwood at night. Dang, those distant mountains on the backdrop really look dramatic under the “moonlight.” [:D]
My reference pic of Tefft station. I made the adjustments I noted above like for the rest of these pics, then tried to color shift things some. Interesting.
The Sunnyside Mill at Eureka on the Silverton Norther
Nice work Mike! Unfortunately, our color vision at night is not very useful. The scenes you show appear to be moonlit and reflected moonlight tends towards the blue in our perception of color in such darkness.
On my old Disputanta and Danville Western HO layout, I did a lot of night shots, but all in black and white only. Mostly taken in the 80’s.
Thanks for your comments! Glad it’s working for you. My first shots were pretty spotty, but I’m getting better.
I wish my Canon had a B&W setting on it, but I haven’t found one. Perhaps some sort of macro for Photoshop that would process it into B&W all in one swoop?
A very handy tool to have when installing so many LEDs is a LED tester. There are fancier ones available commercially, but all mine is is a 2 AA cell battery holder with a resistor (470 or 680 ohm) soldered into the positive lead. I use it to test individual LEDs, LED assemblies, and the structure feed once a building is complete.
The other tip is regarding placement of the LED rope light in relation to the layout. I had a ready-made ballast along one side of the room. For the rest, I installed it mostly so that it follows along above the edge of the fascia. Since the blue LEDs don’t glare like some lighting, so long as it’s above your line of sight it’s not a bother, so doesn’t need a valance.
I finally got me last LED section. I had about 50% success rate with the off-brand ones I’ve been buying. They’re cheap but fortunately have a good return policy. Once hung and lit, I’ve had no failures. Anyway, here’s one of the Durango station now that things are fully lit.
This shows how the LED limitations require multiple strands be hung if the area is wide. In my case, it’s 16 feet wide, so I have four strands spaced across the room (one is behind the valance on the right and another on the far left of the pic), which lights things pretty well.
So you’ve got a dark layout room with the aid of a few dim pools of light. How the heck would you operate? That’s easy, just get one of these:
It’s one of your fairly standard headlights now available for camping, fishing, late night mechanicking, etc. You’ll want one like this one, where the lamp assembly swivels. It’d blind people to walk around with something like this set to straight ahead. But once you tilt it down, it’s like having your own personal street light always at hand. A button push turns it on or off.
I’ve heard of people taping uncoupling tools to small flashlights. IMO, using the headlight with a coupler pick would work better, as the light angle might work better for depth perception in the dark.
I’ve also found that operating trains at “night” opens up new vistas unseen when it’s “daytime.” Some of my locos need work on there lights, either too weak or too strong. This one came out pretty good.
Welcome back to The Night Scene. In this installment, we’re going to take a bit of a diversion, by turning night into day. Lots of pics in this one and I’m cooking breakfast. Don’t want to burn the bacon, so these will trickle in as I get time.
Here’s what I’m using, probably best bang for the buck in layout lighting out there right now. I assume these type lights are widely available from various suppliers, but Menards is close to me. They do have an online presence if that works for you. The SKU is 3462510. Cost is $39.95 for 12 Feet. They do have a 6 foot version.
The clips used to mount. Unlike track lights, there is virtually no reduced clearance, so they are great for those like me who have restricted overhead clearance.
This stuff likes to go in a straight line, because it’s essentially a flat cable. But there are ways to make it turn and project other than vertically. For the turn over Animas Forks, I used this method, with the factory clips, but making the cable stand up. This way, the light goes almost horizontally and illuminates a scene seen primarily lit from the side, since it’s at eye level near the ceiling.
For turns that are less than 45 degrees, the twist method works well.
Since I already have the blue LED rope lights up, I was able to thread the light strip through it like this in a couple of places. It’s lighter stuff than the rope lights, so easy to use various creative methods of attachment.
In this one, I embedded a plastic J hook used for hanging Xmas tree lights into the ceiling panel with epoxy to hold it.
Here, I drilled the J hook and used a screw into the ceiling panel frame.
The results? Outstanding. Consider, too, that this is all done, an entire 36 foot string, with just 30 watts.
I had two of these I previously installed separately. The one I took pics of here was installed between the other two, allowing power to feed from just one end.Here I’ve connected everything and loosely strung it through a couple of clips that helps set the turns. The first shot is with the overhead lights on.
This is with the room lighting off.
Because of the where the first two strips were placed, I gained about 4 feet at the far end, which will allow me to nicely illuminate the coved corner at the south end of Silverton.
The trick with this lighting is to place it where it does the most good and aim it well, which was the point of the pics above with the various ways to turn and angle it. And there’s no valance needed, either, another plus for those with restricted overhead clearances. This will be especially helpful for multi-deck layouts, too.
The end result is excellent, almost museum like, where they call this the “black box effect.” Other model railroaders have used this method, often done at great expense in some cases with old technology, elaborate valancing, etc. here, you can do it in an hour with little more than what comes in the box for $40. Combined with my blue LED rope lights, I think I’ll call this the “blue box effect.”[swg]
I found a good photo to show a Before shot of a scene that I could take a comparison photo After to demonstrate the amzing things 30 watts of LEDs can do.
Before (during my last ops session)
After the LED strip light install
I think the way the LEDs spread the light is much more realistic. Natural light tends to form parallel rays. Most indoor lighting is a point source on some way that tends to cause shadows that form multiple iterations and give the scene away. The closely spaced, multiple sources of light that flows along with the benchwork is why the second pic looks more real and the first, well it looks like a model railroad…which is sorta, but not quite what we’re trying for. Photo #2 takes the cake for my eye.


