In a nutshell, I’m very interested in ordering Union Station Products’ corrugated fluting for HO passenger cars. Have any of you purchased their passenger car or detailing kits or seen them up close? If you have, I would appreciate your feedback on them.
I’ve e-mailed USP 2 times over the past month and yet, have received no responses. I’ll give them the benefit of the doubt and assume that their may be a problem with their web site.
I bought some of the Amtrak California cars a few years back and the sides are styrene, so is the fluting. it’s probably one of the Evergreen metal siding sheets from LHS. They are a small company so they take some time to respond usually. I have the kits almost done except for decals and they actually tuned out pretty decent (I blacked out the windows and skipped the interiors-cheapskate!!).
Sorry I had already custom mixed and painted them Testors Model Master Steel and Black already when I saw your work with Alclad!!
PS I used non-flammable contact cement to glue the sides to the clear backing, acc for the rest.
I’ve built a few of their cars and I’ve applied the fluting to smooth-sided cars before. I do recommend them.
The sides and fluting are all milled out of .020" styrene. To glue the fluting onto the sides, you’ll want to use a FAST evaporating glue, such as Tenax 7R, otherwise you’ll end up with bubbles and warped sides/fluting.
They make very nice cars, and in fact there are some cars that I’ve never seen anywhere else except in brass!
On mine, I did some things a bit differently from the instructions, though. The kits come with a clear backing piece for the glass. One of my cars was a baggage-dormitory, and the baggage door windows were milled into the “glass”. That didn’t look right to me, so I cut a new baggage door out of styrene and ditched the milled glass in favor of styrene strips and transparency film glass. If you’re doing a coach or other car that doesn’t have the window milled into the glass, I’d say use what’s there.
Thank you for that great info, especially on the fast glue! Very helpful as I was actually planning on using a slow curing glue. After applying the Tenax, did you put any clamps from the fluting sides to the body shell, or let the Tenax work on its own?
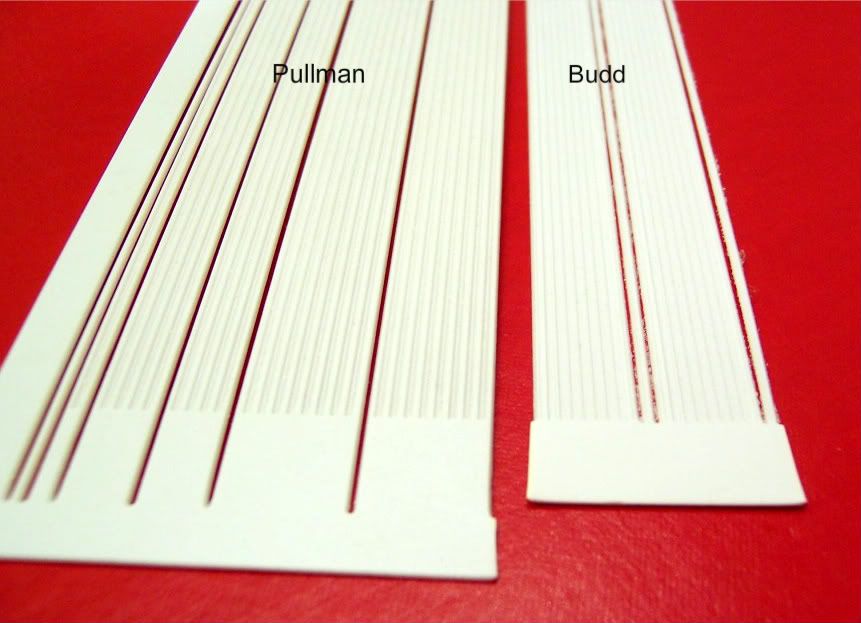
I’ve bought both the PS and Budd fluting from them. It’s not bad, but the profile of the budd fluting is more like the old brass cars, you know, single etched lines side by side, instead of having the half moon contour of true budd fluting. (I hope that makes sense).
Also, their budd fluting only comes with the larger fluting for under the windows. If your looking for the finer fluting that was above the windows on some Budd cars, I suggest buying some of their N scale budd fluting as well. It’s about the closest I’ve found to represent the finer fluting. It, of coarse will only be as long as an N scale passenger car, but you can usually hide the seam with the letterboard.
The way I did it (and this might not work for everyone) was to start at one end of the car with the fluting and tack it down (making sure the fluting is aligned along the length of the car). Then I applied a couple of drops every 1/2" or so and pressed the fluting down onto it, gluing as I went. After I got the fluting in place, I let it sit for about 24 hours or so, then applied a thin bead of Tenax along the edges to seal it and keep it from peeling back up. Tenax works fast and evaporates fast, so you usually don’t need to clamp it…gentle finger pressure for about 10 seconds is usually enough.
Update: I called the phone number on the website. A gentleman, who sounded like he was elderly answered. Pleasant, he explained to me that it may take more than a week before he checks his emails. I explained to him what I wanted, he answered my questions pleasantly. I decided to order the fluting.
OK, here’s what I’m up to:
I am modeling the ACL and SCL versions of “The Champion”. Unfortunately, no Budd streamlined “blunt-end” observations are available in HO. (Come on, Walthers!). Here is what I was looking for:
Then it hit me…why not do a “freelance compromise”? I went on to ebay and typed in “HO Observation Cars”. I found and won an AHM HO blunt-end smooth sided observation car in Amtrak’s scheme. Here’s a prototype photo of the car, which was used by the Pennsy:
I plan on paint stripping it, adding corrugated fluting to the sides and the blunt end, paint metalizing the entire car shell and decal it to either ACL, or SCL. Instead of the Budd fluting, I will be using the Pullman Standard fluting since it seems that it would better fit the car. Though different, I’m going to leave the windows as they are. I thought about splicing in a Budd Roof off of a streamlined Rivorossi car, but I may leave that be…
I realize that the prototype guards will put a bounty on my head, since the Pennsy car is a Pullman Standard and the ACL car is a Budd.
Sound’s like a fun project. IMO, I would suggest to use the Budd fluting instead of the Pullman fluting though. The Pullman fluting has a thick row, thin row, thick row etc. pattern to it that wouldn’t quite match the budd roof if you decide to go that route. (check pic below) You could also use the N scale Budd fluting for the letterboard area above the windows. Either way you go I’m sure it’ll be a nice car when done.
I have included a very crappy pic with both style’s of fluting side by side, if for nothing else to show you what your going to get. I didn’t include the N scale fluting in the pic as I had a hard enough time trying to catch the detail of the HO fluting with my old camera.
I am slightly confused. Are you saying apply small dabs of a slow drying glue on the back of the fluting, then seal with Tenax? WHat brand or type of glue do use for that step?
Yes, I will post pictures. If the car comes apart as easily as most Rivorossi’s, it shouldn’t take me too long once I get it in the mail.
John,
What a big help! Thanks for that photo. Most helpful. The reason why I’ve decided to go with the Pullman Standard fluting instead of the Budd is because there is more fluting material in the Pullman version (in case I make a boo-boo). I realize that the fluting shape is off, however, it will be going on a Pullman Standard model so it should fit in nicely. Additonally, because of my time constraints (yes, even though I have a lot of posts here) I’ll likely leave the roof as is. Again, this is a freelanced “Budd wannabe” version that I’m doing that should look nice bringing up the rear of my HO scale Champion. [;)]. - Thank you, guys!
Start at one end of the fluting and tack that end down using Tenax, then apply a couple of drops of Tenax between the fluting and the side of the car 1/2" down from the end. Move down 1/2" from there and repeat. Do that until you have the entire length of fluting glued in place and let it dry for 24 hours (just to be safe). Then apply the Tenax along the seams to seal it.
You’ll use the Tenax for all of it. you definitely do NOT want to use a slow-drying glue for this, as the fumes/vapors from it will be trapped between the fluting and the side, and will continue to attack (read: warp) the plastic.
I haven’t seen a Rivarossi car yet that didn’t come apart pretty easily, so yeah, you’ll have it done in no time. [:)]
Now understood very clearly. I will try your method when I work on the observation car.
One thing I’m keeping in mind is that I’ll have to be very careful in sealing the fluting’s edges, so I’ll use Tamiya masking tape. One of the downsides to the Alclad metalizers is that they reveal every little nook, crack, and “mistake” on a model’s surface; especially glue.
Last year I metalizied a batch of Rivorossi cars for a gentleman who had glued TSP name boards on them. After I sealed the metalizer with acrylic clear, tiny streams of dried glue along the name boards that were not visible before stood out like a cactus on the beach!
It’s an exchange of information, then…I’m about to the point of painting my Highliners F7 shells using Alclad (stainless steel panels on Santa Fe passenger units), and now I know I have a bit more work to do to clean the surface up first! [:)]
Per David M. Bedard’s suggestion, I’ll be using Krylon Fusion gloss black as a base coat, using a Badger 175 airbrush. I spent a couple of hours last night going over the surface looking for glue spots and going over them with 1600 grit sandpaper. Looks like I’ll need to do a little puttying to get it perfect. [:)]
am modeling the ACL and SCL versions of “The Champion”. Unfortunately, no Budd streamlined “blunt-end” observations are available in HO. (Come on, Walthers!). Here is what I was looking for:
I believe Train Stations Products makes this along with a line of core kits. Their complete line is carried by Walthers.
Look up Walthers Part No 732-504
If this is a match to the Union Station Congo/Senators sides then I am in business.
The Fusion is a very good product. Please make certain to test the Fusion first on a junker car or panel as it does dry quickly and has a tendency to appear hazy if applied heavily. A helpful technique is to spray the coats on thin but wet to obtain the smoothest finish possible. The smoother and wetter, the better the Alclad will appear. I’ve been getting good results with the Scale Coat II Black using a 50/50 paint & thinner mix.
When applying the Alclad II metalizer, a narrow fan, a small or medium size needle in the airbrush, 1" - 2 1/2" inches spraying distance, and 10-15 psi air pressure works very well. If a wide fan, large needle, or higher pressure is used, the finish can look dry and grainy (ask me how I know! [B)][:o)])
Here’s my metalized Metroliner thread with some detailed info from a while back.:
For sealing/clearcoating you can apply Future Floor Finish as it’s sprayable through a quality airbrush without having to thin it. The “catch” is that the airbrush needs to be flushed out a.s.a.p upon finishing. Future dries and cures quickly and will clog up an airbrush’s passageway. I’ve been using Acrylic gloss clears with good success on my passenger cars as each coat slighlty dulls down Alclad’s high sheen to a more realistic appearance. Just my opinions.
For testing, I used an old Bachmann F7 shell that someone at a train show gave me. Alclad is expensive, but testing is worth it. As I got better I noticed that I winded up using less and less Alclad. Originally I was able to do two HO 85ft shells wit
For clearing the Future acrylic out of the airbrush, what’s the best solvent to use? Isopropyl?
For your blunt-end observation, maybe you should email Mark with Union Station Products. If TSP makes the blunt end, he can make the sides if you can get him some good photos or drawings. I was talking to him a while back about doing Santa Fe’s steam generator cars (ex-baggage cars), but couldn’t find drawings.