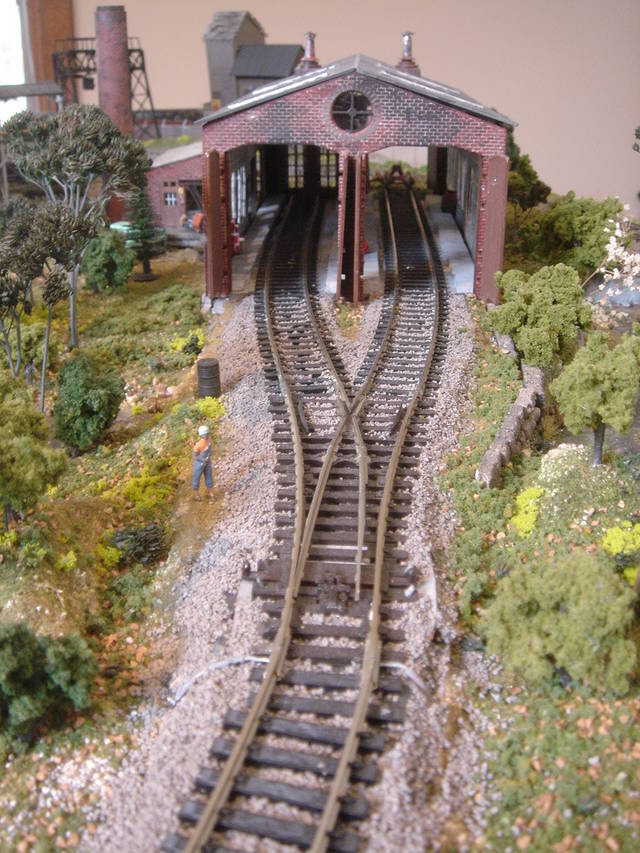
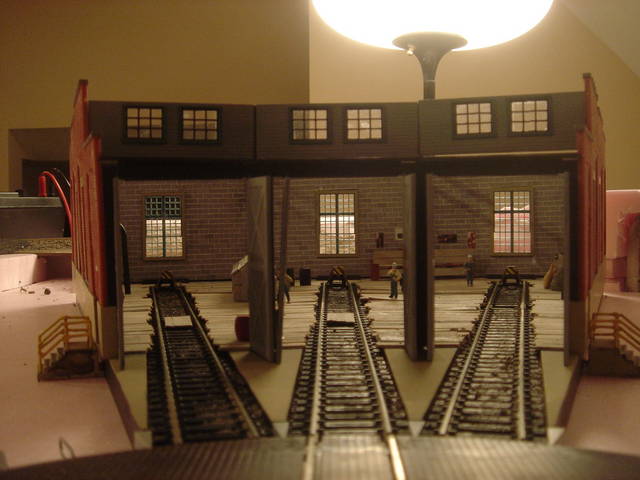
Ok I have an IHC 2 stall brick engine house. I have it painted and basically assembled I have my rustyrails workbenches ready to be painted and have the side shop area done with a floor and windows. My problem pertains to the engine house it self. It has no floor. I would like to add a concrete floor to the engine area but have had a brain fart on how to proceed. Do I put a floor down and then track over top or do I intergrate the concrete around the rails? If the latter how would I go about doing that without looking funny in the door area?
Pics and if you have a description on how you did it would be great.
You can do styrene for the flooring, up to the edge of the rails and almost as high as the rails. Then you can add a center strip of wood or styrene between the rails (leaving enough room for the engine wheels of course) to make it look like the rails are embedded in the floor. You can extend the center strip a little beyond the door, and taper it down slightly.
I’d maybe start by creating a base using wood or styrene square stock (say 1/8" or 1/4") to set the perimeter, so you can set the structure over it and it fits nicely and is held in place. Then fill in the styrene sheet inside of the perimeter.
Unfortunately you’ll have to experiment a little. You’ll need two thicknesses of styrene:
One thickness that is as thick as the rail ties. You need to cut a strip that fits inside the width of the NMRA wheel gauge.
One thickness that fits between the rails that sits on top of the ties, and almost the same height.
Tip: When done, take some 160 sandpaper and give it a roughened surface. The paint will go on more realisitically if it’s not perfectly smooth. Concrete is never smoooth & flat. They intentionally roughen up the surface.
BTW: Depending on year & era, not all engine house walls were just plain brick. Sometimes they painted them white because Edison bulbs weren’t so “bright”. The white walls helped keep the interior better lit.
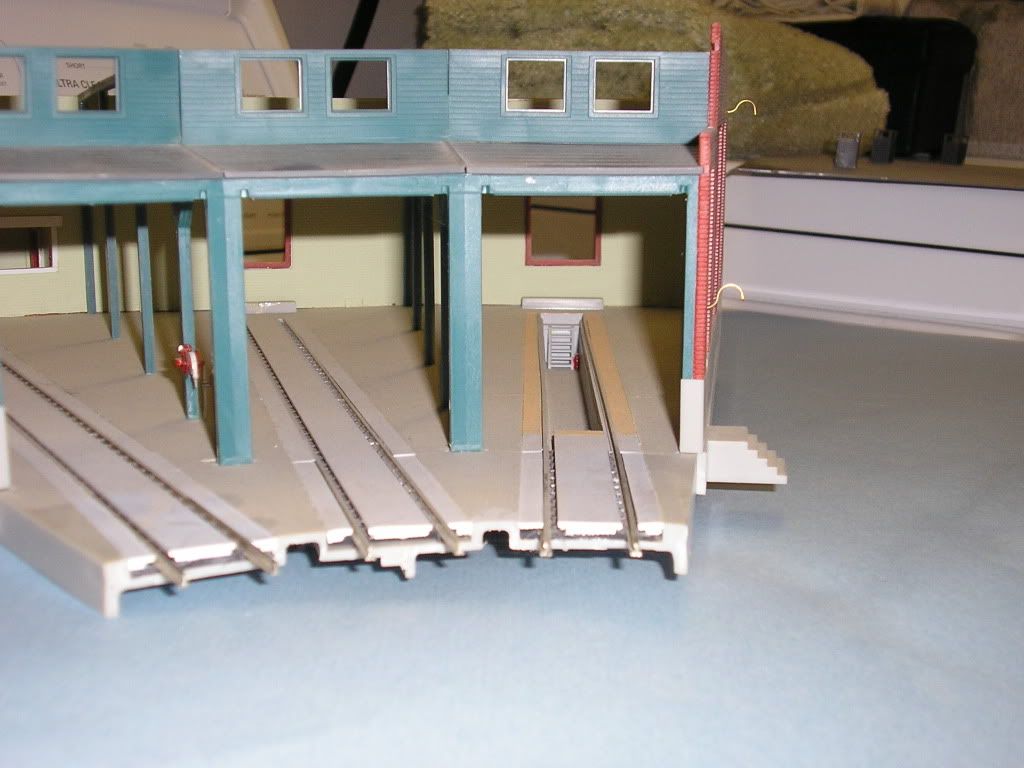
Some years back, I bought a sheet of Evergreen styrene with a 1/2-inch grid pattern. I used the styrene sheet to make a mold, using latex rubber, and I’ve been casting Hydrocal sheets with that ever since. The floors of my engine house are sections cut from those Hydrocal sheets, painted gray and weathered a bit with an India Ink wash. There is no flooring under the tracks.
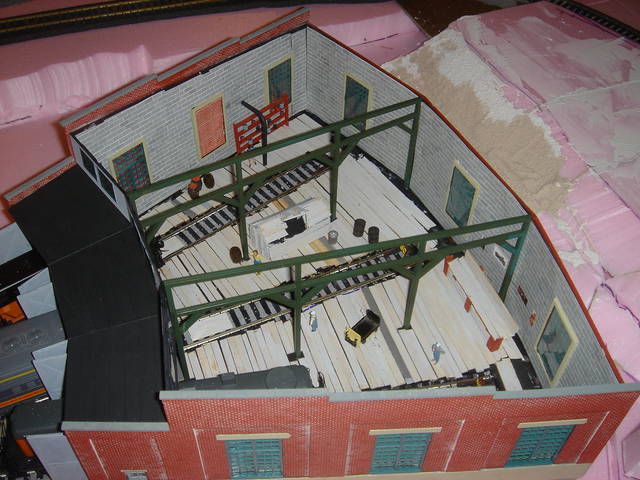
I printed a cinder block pattern on card stock on my computer, cut it to shape and glued it to the interior walls. This both gives a nicer look to the interior than the plastic walls, and also keeps the interior lights from glowing through the walls, which are very thin on this kit.
I added some tool chests and other stuff from a JL Innovative gas station details set.
Yes Concrete is Smooth and Flat when it’s a floor! I am a concrete finisher and if My floors weren’t smooth and flat I would be out of a job. We only rough {Broom Finish} sidewalks and the like. If Floors were rough they would be very difficult to clean, Something You Don’t want when You have Oils and Grease present.
Yes Concrete is Smooth and Flat when it’s a floor! I am a concrete finisher and if My floors weren’t smooth and flat I would be out of a job. We only rough {Broom Finish} sidewalks and the like. If Floors were rough they would be very difficult to clean, Something You Don’t want when You have Oils and Grease present.
At an engine house I recently visited, not only are the floors smooth, they’re sealed with grey paint. and have yellow safety stripes along the tracks.
I have a similar project underway right now. Unfortunately I haven’t got as far as the floor yet but here is what I plan to do.
First, I will start with a subfloor of .040" styrene. The subfloor will have spaces in it so I can install inspection pits and it will provide a surface onto which I can mount the flex track. I will remove the ties in the pit areas and use styrene strips CA’d to the bottom of the rails to support the rails along the sides of the pits. The inspection pits are optional. To answer your second question, the floor will also extend outside past the doors to provide a smooth surface beyond the terminal.
Next I will place shims of scrap styrene on the subfloor thick enough so that the actual floor will be just below the tops of the rails. Prototypically the floor would be level with the rails but I will lower it a bit so I can clean the track without destroying the floor paint, just like you would do when installing track into a road. The actual floor will also be .040" styrene. Where there are ties I will use .040" styrene between the rails and shims if necessary to bring it to just below the rail tops.
The inspection pits will be scratch built similar to the one I put in my Atlas roundhouse
Peco makes inspection pits with three different rail sizes if you want to go RTR. Here is the code 100 one:
To mount the terminal with inspection pits you will have to be able to remove enough of your layout base to lower the terminal sufficiently into the layout. If you are not doing the pits, you could raise the surrounding trackwork enough to line up with the terminal track.
It’s probably not prototypical, but it is my railroad. I put a wood plank floor in my Atlas roundhouse, using coffee stirrers:
Again, I lined the interior walls with computer-printed images of cinder-block walls. I scratch-built a workbench, shelf and even a small coal bin in a back corner. Above the workbench are some centerfolds. (No, you can’t make them out. Even if you download the picture and zoom in, it’s nothing but a handful of pixels. But, like the real thing, it’s all in your imagination, anyway.)
Due to the very low speed at which locomotives move in an engine house or round house, the space for flanges can be made quite narrow – to avoid a tripping hazard – so you can snuggle that styrene a little closer to the inside of the rail than you would at a grade crossing for example. The rail would be embedded in the concrete very much like street running.
At the century plus old Milwaukee Road roundhouse in Janesville WI, now used by the Wisconsin & Southern and open for tours now and then, most of the stalls have an inspection pit which enables a worker to take stairs down into a concrete lined trench to enable work under the traction motors.
Peco actually offers an inspection pit as a plastic casting in Code 100 and code 75 rail.
The other interesting detail in Janesville is the equipment that tends to gather at each structural support, such as welding stations… There are also safety signs, workbenchs, and lockers for the workmen. Don’t forget fire extinguishers or hoses.
At the roundhouses in Janesville and Stevens Point WI certain stalls were closed off (and the doors bricked up) to make storage areas with metal shelving and lots of boxes on the floor.
Greenway Products has an incredible collection of cast metal machine shop tools many of which would look good in an engine house, or in a tool shed or machine shop often attached to an engine house.
Let me clarify by the subjective term “smooth and flat”
What I meant was a broom finish. Perfectly flat cement with fine aggregate (sand) can be very very slippery, especially when wet. That is a hazard. Hence forth why they broom finish it to give it a little bit of a rough texture.
Of the 3 round houses I visited, they used larger aggregate which makes things even rougher. It’s not a rough pour by any means. It is finished. But it’s not as flat as a piece of glass by a far shot.
The problem being plastic is just way too perfectly flat a surface to accurately represent concrete. You can use simple dull coat to help. But I like the effects of a fine fine sandpaper. If 160 gives you the willies, try 300, or even 600 grit.
Tar roofs are very similar and hence why a lot of people use masking tape (which has a little texture) to represent their roofs.
Maybe I should post some shots doing a side by side? What do you think?
Some great ideas guys. Today I am going to start painting the work benches and shelves for the side office like on Mr. B’s little 2 stall house there. I was thinking of an inspection pit on this one but I also have 2 of the bachmann 3 stall car shops that I plan on using for an engine shop and possibly putting a crane and inspection pit on one of those. If I get anything accomplished today I will post some pics. Keep the ideas coming though my creative juices are starting to get flowing.
I’d put something there, but a railroad tie or concrete stop would probably be more appropriate. Prototypically, they might not have. Remember, though, that you will have trouble telling exactly where the engine is as you’re running it in, so having a stop will have practical value.
Made some progress today. Got the benches painted and cabinets painted. Got one bench and one cabinet and a worker in place in the office space. I thought I had some flex track sitting around but could not find it so tomorrow I will continue with the engine space. Coming along nicely. I will post pics when it is all done.
Well got a little side tracked by mother nature and her assault on my house . Had flooding in the basement the last couple days, and it has taken every trick in the book to stay somewhat dry. I did manage between drying towels and sopping up water to get the base built out of styrene and tracks mounted. Today I put my first layer of paint down and will put another down tomorrow, if mother nature lets me, and do some weathering and start adding details. Still debating on installing wood beams and partial rafters in it or not. Anyway pictures should be coming soon.
Well I am putting more details in this than I thought I was going to. I just got done painting 4 guys for the shop area, some tool boxes, cabinets, benches, gas meter, electrical switch, parts washer bin, 55 gallon oil drum on a skid. I am also thinking of putting in wood beams and lights but that will come later. Just waiting for things to dry to take some pics. I been putzing around with making a small diaroma out of it since my layout won’t come for a while yet.