Quite the ordeal! You have every right to be frustrated.
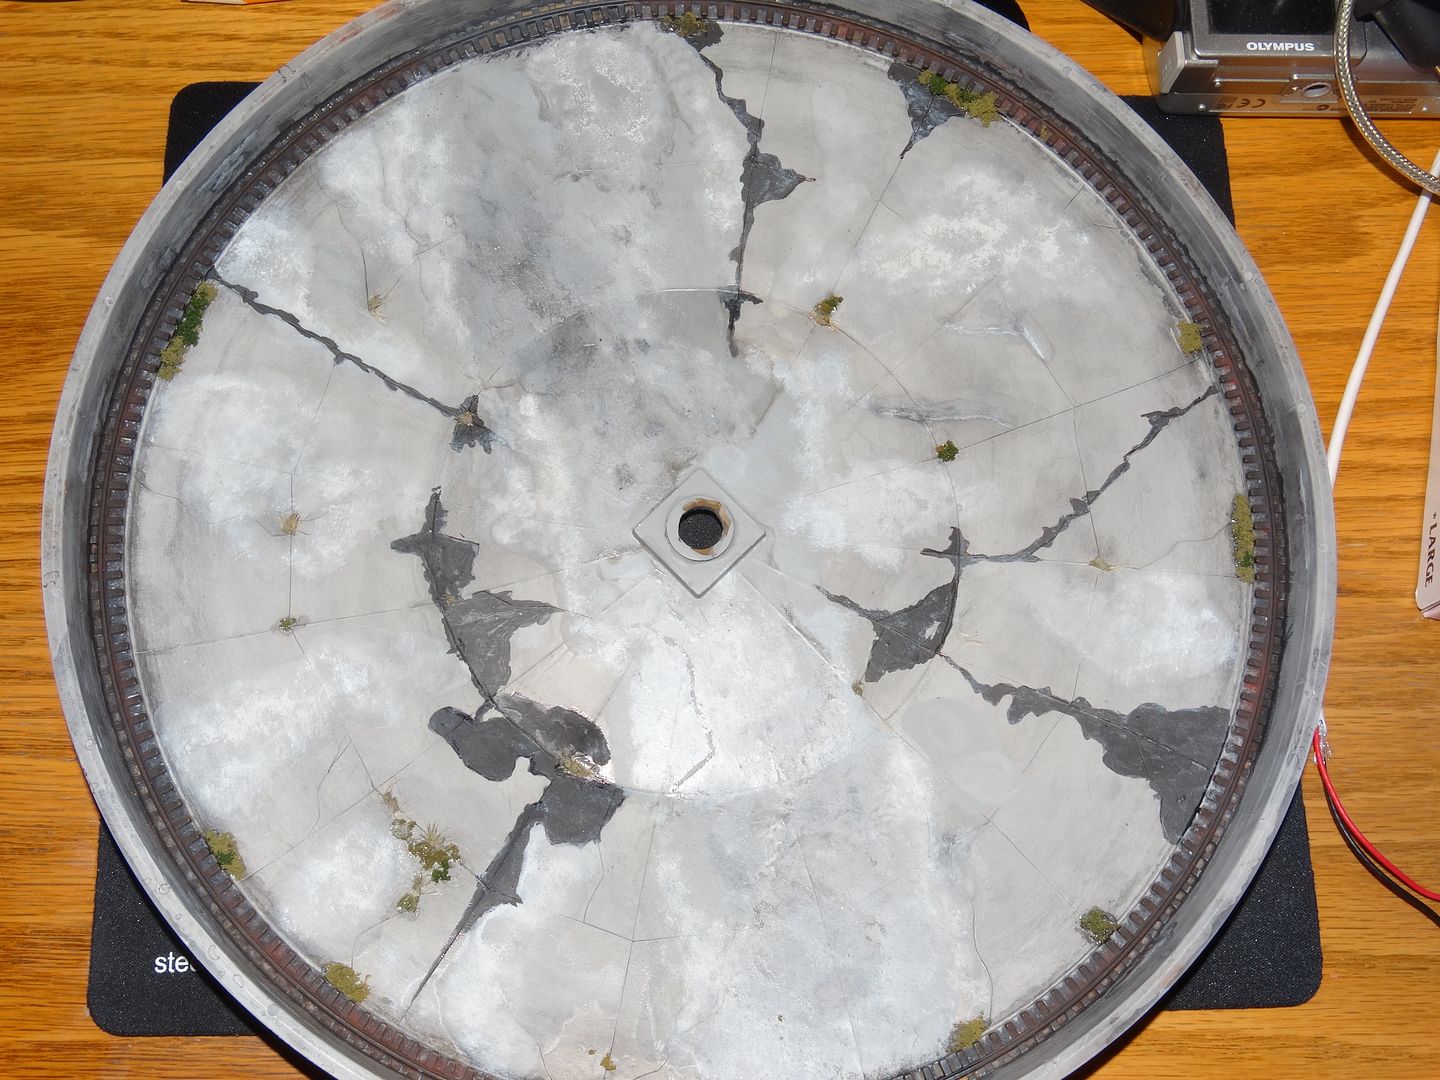
I’m hoping that my bridge will be quite stable with the kit bashed bogie assemblies. As far as I can tell the new wheels sit nicely on the ring rail and everything rotates smoothly. The bridge doesn’t rock. Of course I don’t have any track set up yet to test it.
I’m going to use a train set power pack to turn the bridge so I can control the speed of rotation. Alignment will be visual. I’m hoping that will work. It will be a while before I can test it.
The engine service facility will be one of the focal points for me. Having a turntable and roundhouse were two of the first requirements when I started the track plan.
TY for the thought. I hope you are successful in your install. A lot of work, planning, and money went into this…win some and lose some. Visual alignment of track was impossible due to placement on the layout. Once installed and programmed I would have relied on the controller to properly index the track. Best of luck with your installation…Ed K
You have caused me to stop and think about the turntable location. On second examination, it is too far away to see the track alignment properly. A little while ago I increased the size of the helix over which the turntable will sit. That added about 1’ to the reach in distance. The result is that the turntable can barely be reached. Not a good plan! Back to the drawing board.[banghead][sigh]
Dave… On yur weathering … you can try adding a bit of gray to tone it down to your liking. light or med, just a little at a time. I would also suggest doing avery small section at first to see if it has the effect you are after. If you need to remove weathering, use a q tip or cotton ball with alcohol. I have done this on painted models, and as long as you dont scrub the paint will stay…
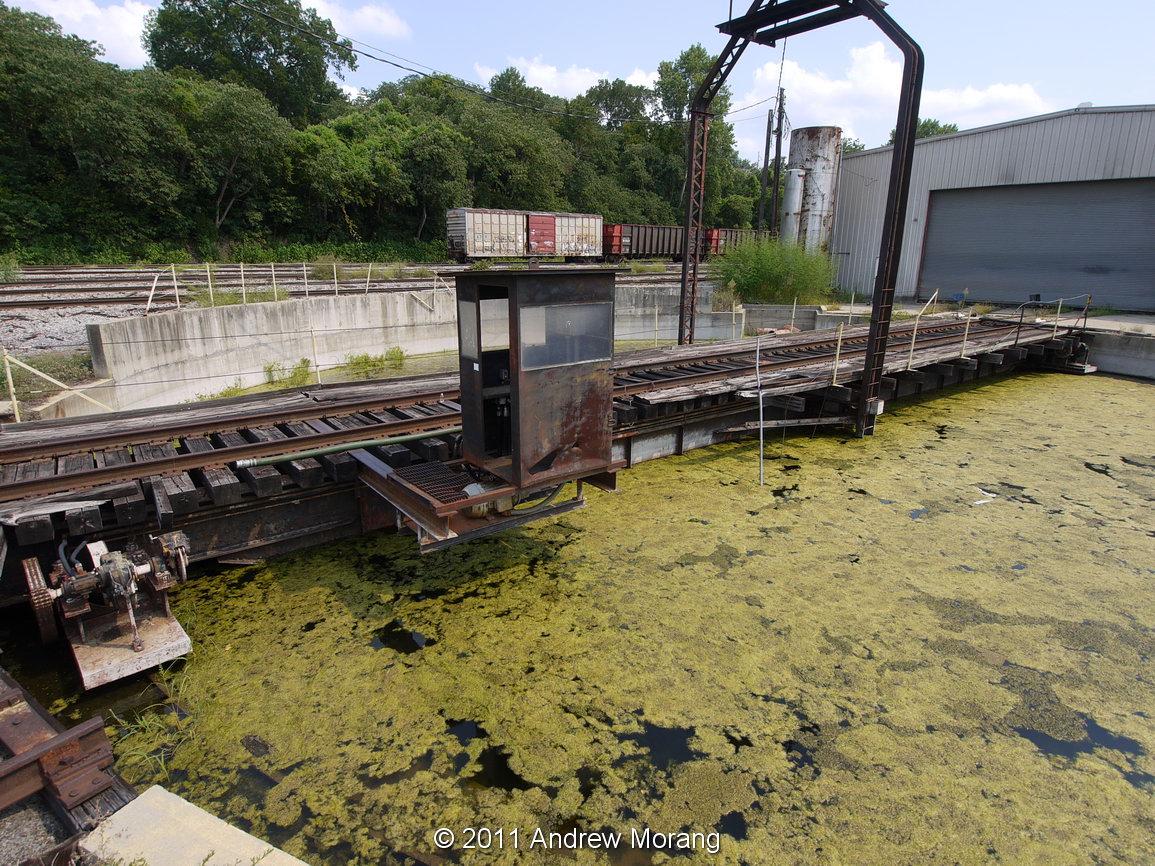
What a great shot!!! That is the best picture of a well used pit that I have seen! Thanks so much![bow][:D]
The pit is obviously well soiled from years of use. I love the rust and grease stains that have accumulated where the locomotives come on the the bridge from outside the roundhouse. The apparent water stains or wet patches look great too. I now have a much better idea of how to get the look I want.
Quite the collection of locomotives too. All nice and shiney.
Sorry that I haven’t posted recently. I was waiting for some shoe dye to arrive so I could stain the bridge planks. It is 10 days overdue so I have asked for a refund.
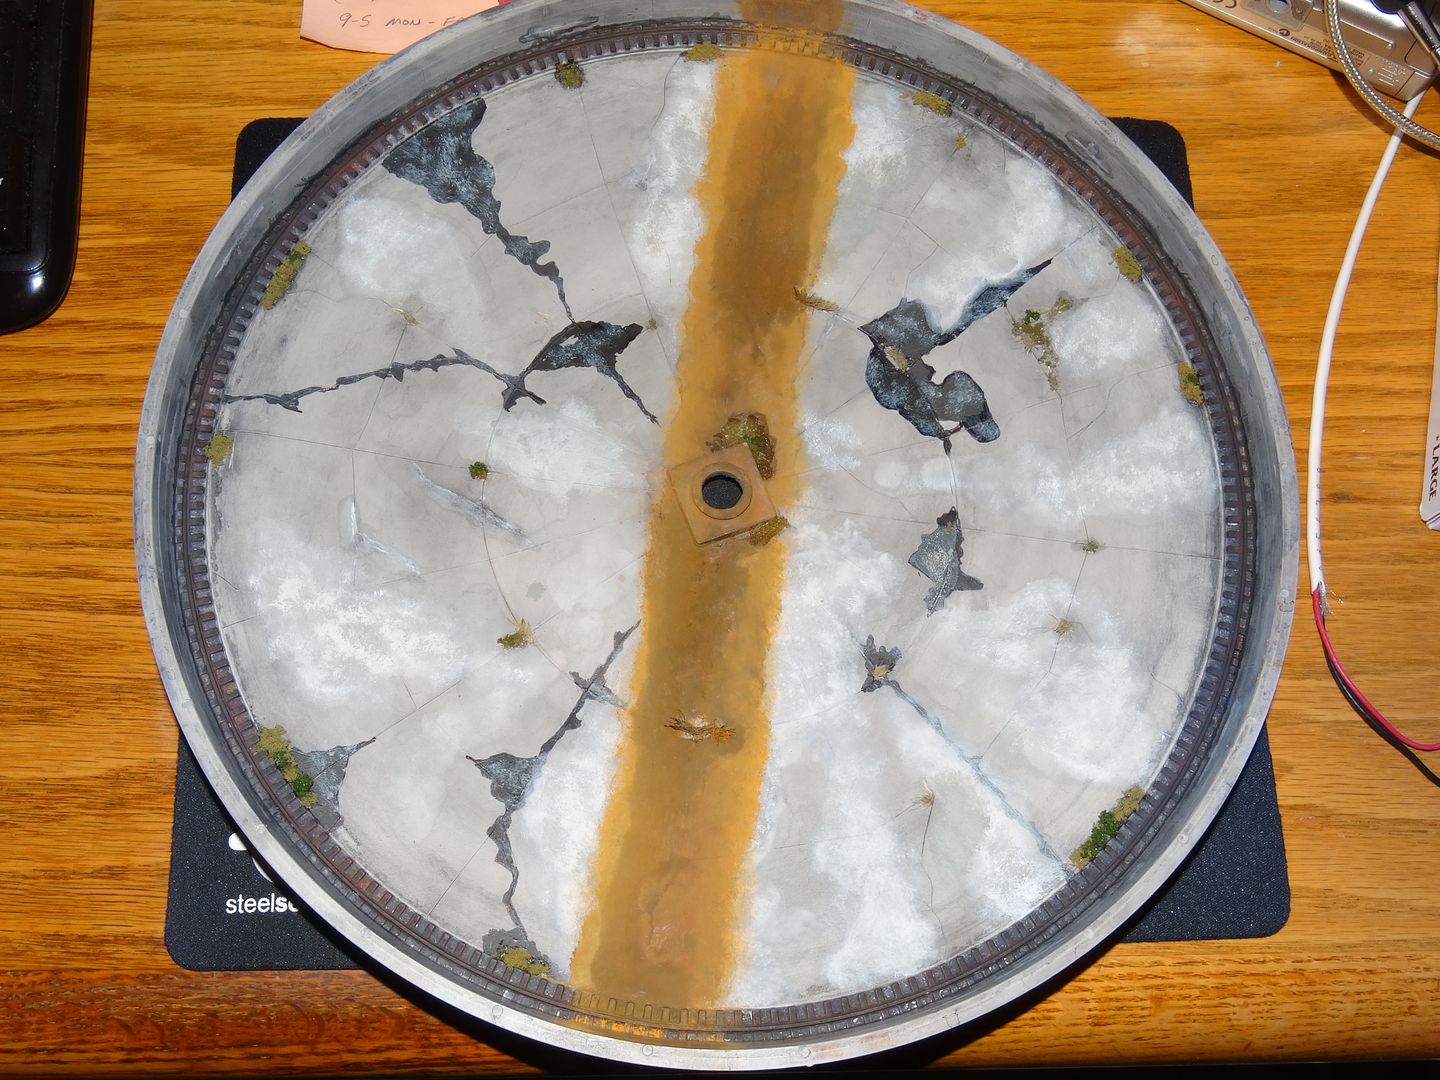
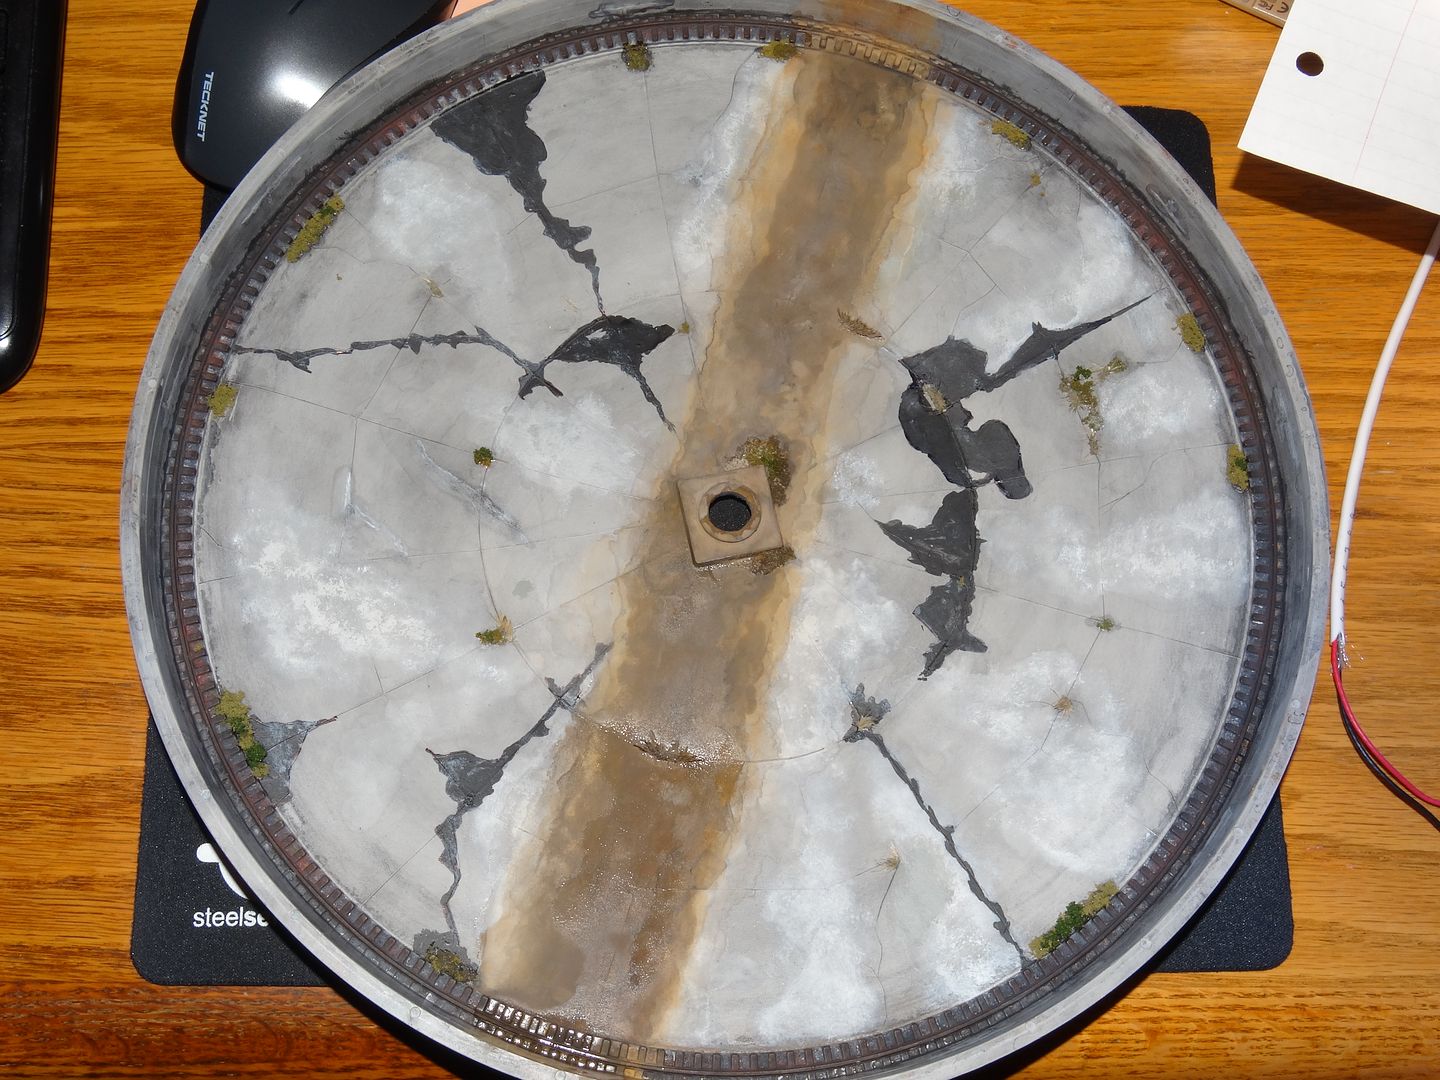
In the mean time I have taken a shot at modelling the sort of weathering shown in the picture that Henry posted. Here is where it stands. The rust stain will be under the bridge when the bridge is set to the main turntable feed track, hence the accumulation of deposits where the most traffic is. However, the rust stain needs to be toned down significantly and made to look greasier in the middle:
It seems to me that the only thing that can explain that rust staining in the prototype pit is parking the bridge in the same position when the turntable in not being used. That makes sense in a museum setting, but would that also be the case on your railroad? And to that degree?
When I browsed my limited collection of turntable photos, I saw a couple that had some degree of staining, but nothing as severe as that in Henry’s photo.
Yes, the rust stains are still way too prominent. I seem to lack a subtle touch. I should have paid closer attention to Henry’s photograph. I had it in my mind that there was lots of rust but there wasn’t. It actually looks more like grease and oil stains that have dropped between the ties on the bridge. I’m still learning! There is hope!!
You are not too late to the party! I’m sure that lots of folks with the built up units are watching the thread.
I have addressed the contact issues with the rings on the bridge shaft by bending the contact strips into a ‘V’ shape so the pressure is more concentrated. Someone suggested that earlier in the thread.
An auto reverser will still be required to keep the locomotives running in the right direction.
Yes, as you and CG have pointed out, the rust stain is much too prominent. My problem is that I have run out of the grey Polly Scale paint that I used for the base colour. I have several other greys but none of them is even close. I’ll have to do some mixing.
Thanks for the compliment on the other stains. Henry’s wonderful example was a great inspiration. However, I still have to tone down some of the white marks because they are too symetrical. Like I said, by the time I get it right the pit will be full of paint![swg][(-D][(-D]
I came across a few photos from the NYC’s Ashtabula roundhouse. NO arch for the motor power? Some turntables were air driven from the locomotive’s brake pipe. Looks like wires strung along the hand rail?
I found a photo in the NYC Headlight Magazine where they used an old pair of tender back-up lights as spot lights at the bridge ends. I’ll have to dig that up and post it…
I didn’t know about air driven turntables. I haven’t given much thought to how to model the power system. Thanks.
What were the wife and kids doing at the roundhouse?!? Did they let the kids run the train and they went too fast as usual?!? Seriously, it appears as though the locomotive was coming out of the roundhouse. Someone must have really messed up to have that much power applied, although I guess the locomotive would still try to move forward whether the wheels were on the tracks or not. I didn’t see any guard rails on the bridge. I’ll bet they regretted the lack thereof.