Where can I find those extra railroad ties for my kind of track? I know they make them for regular O-guage. I am going to need HUNDREDS of these little guys.
If you need a ton of them, it’s likely you’re going to pay a ton if they are sold individually (I don’t know of any sources). Often times you see bulk deals on O27 track dirt cheap where the rail is corroded but the ties are still in good shape. You can cannibalize the track for the ties and insulators. Count on a 75% successful cannibalization and buy extra track pieces.
It depends how good you want it to be. When I used 027 track I would cut popsickle sticks and stain them. Not the right height but gave a nice tie rail look. And cheap.
I don’t have my copy of CTT here at work, but there is a vendor ad in every issue for plastic ties for both O in black and O27 in brown. They sell in bulk lots of 100 I think. Or, you can do what Frank53 and many others I suppose do, find strips of bass wood or balsa at a craft store like Michael’s or AC Moore in the height and width of the O27 ties, paint it and cut as many as you need. These stores sell these strips in 2 - 3 foot lenghts at around 99 cents each.
Mike
Three R Plastics.
Hundreds won’t cost too much. alternative is to cut strips of wood, you can get the right shape and height at Lowes or Home Depot, then stain them all.
Tim
Popsicle sticks. They are 3/8-inch wide, compared to 1/2 inch for the exposed part of an O27 tie, but when mixed in with the metal ties, they give the impression of narrower ties generally without being different enough to stand out.
Thanks for all your help guys. I want my track to look very realistic. It’s going to be a hi rail layout.
Berk
I would go with the popsicle sticks. I made over 6000 for my layout and love them. Once they are painted and ballasted they look great. You can buy a thousand count box at wal-mart for about 6 dollars and make 2,000 ties from them. I paint them in a very quick way. First I place a bunch on a strip of ductape, then I spray them flat black with a light overspray of red and grey primer. The tape works great because they stay in place and you can peel them off one at a time for placement.
hope this helps!
BTW great layout pic and video!
Thanks!! Sounds like a great idea. I already have the paint for that. It sounds alot cheaper also. The only thing I would dread doing is cutting all those ties one by one with my dremel tool, lucky I have one of those!!
I found that using a side cutter like a Kline tool works great. These are also known as lineman pliers. I would just do a few (hundred) while watching tv.
I used 1/4" black foam board cut to size. If I were to do it over I would get some pine and cut strips to size. Even using #3 there is enough clear wood for something as small as a tie.
Here is what the foam ties look like
Jim
Here is another source of ties. These come in both black and brown, ) ‘O’ and 027. These are the ones that I used. They do not have the clamping plate for the rails. Approx price is $13.95 per bag of maybe 200 or 250. You should check current pricing as it has been some time since I ordered these.
Great Plains Hi-Rail
4707 Sherwood Drive
Regina, Saskatchewan, Canada S4R 4B7

I do not know why but when I made my first post, I was convinced you were looking specifically for O27 metal ties. What the guys posted is the way you want to go. If you go home made, personally, I would stain them verses painting them because stain looks more realistic and is much easier to apply than paint.
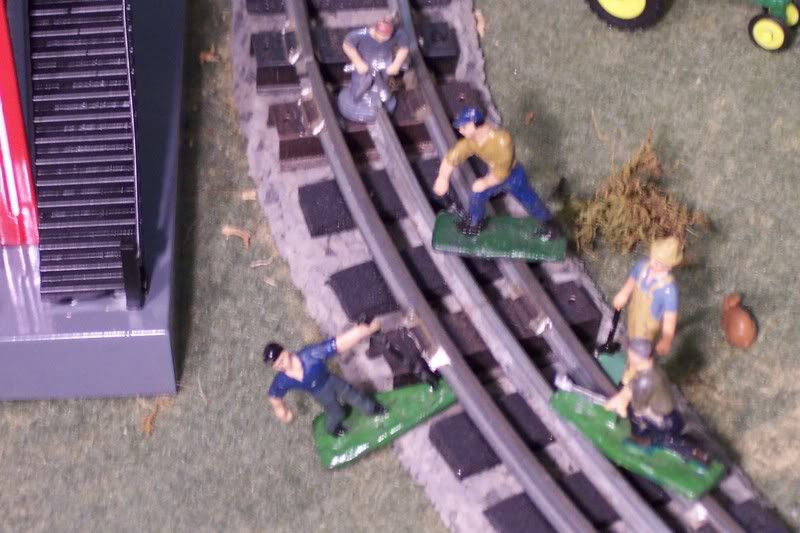
In my opinion, if you are going to add extra ties, do not forget this important step. You can see where I have done this in the photo below.
Be sure to slide a tie under the existing metal tie to close off the opening seen from the side - particularly if you are going to ballast your track.
The ties I am using are left over from the 50’s, and I cut them into quarters and insert a “stub” into the end under the hollow metal tie.

Also, if you are going to ballast, it will look more realistic if you use good ballast and grime it liberally.
Other things:
Before you secure your track, decide if you are going to pain the rails. Major mistake on my part trying to paint the rails after the track is down.
Super elevate your curves by placing a 1/16’ thick strip of wood or wire or chipboard under the tie to the outside. That 1/16th makes a difference.
When ballasting, lay in your ballast and apply your glue and then apply weight - 10 or so pounds to hold everything down until teh glue is firmly set.
While I’m a big fan of Frank53’s layout, I’m also a big fan of the ties from 3r Plastics. I used the “O” Gauge variety:

Jon [8D]
Looks awesome!! I would like for my track to look like that eventually. I wonder if there are cheaper ways to get ballast? Like crushed run from a rock quarry, and then sift it to get the smaller granuals out. And I think I would use a paint marker to paint the rails, but I will just have to wait and see about that.
Dennis Brennan’s Ballast - well worth the price.
Painting the rails, I use Floquill roof brown. You can probably use just about any similar brown that you can get at Wal-Mart in their “Colorplace” line of sprays, which are $1.97. Paint before you permanently secure your track. Mask off the ties, spray on in light coats, use thinner to wipe down the top of the rail.
Sounds like a good plan, but I have already secured my track down
Ahh, Frank53, the details, the details…there in lies the difference! Thanks again for sharing.
BTW, do you use cork roadbed as a foundation?